en Installation
26 WILO SE 2020-02
WARNING
Risk of electrical shock
Danger from electric current must be eliminated.
7.1 Unpacking the product
Unpack the product and recycle or dispose of the packaging in an environmentally re-
sponsible manner.
7.2 Installation
CAUTION
Risk of material damage
Position the product horizontally and level
Choose a place in compliance with the product dimensions and in such a way to have
access to the couplings.
CAUTION
Risk of material damage
Install the product in a dry, well ventilated location free of frost. The product is not
designed for outdoor use.
As the product is mounted on the wall, do not install anything below in case of flood
through the overflow. Do not cover the product. The system is only designed for wall
mounting and must, be installed at least 1 meter above the ground.
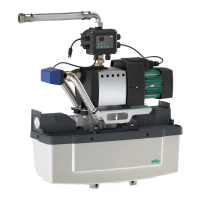
7.3 City main water connection
NOTICE
The city main water inlet (Fig. 3, rep. 4) is installed on the right side of the break-
tank as standard. For a convenient and easy installation, it is possible to move it to
the left side.
To do so the product should not be connected electrically or hydraulically.
DANGER
Physical injuries
The applicable regulations for the prevention of accidents must be complied with.
ƒ Remove the clamp as indicated (Fig. 5), then push the valve body to the back (Fig. 3,
rep. 12). Ensure to not lose the sealing gasket of the valve.
ƒ Unscrew (Fig. 6) the upper module of the system in order to release the break tank
then remove it.
ƒ Unscrew (Fig. 7) the top cover of the break tank and remove it.
ƒ Disassemble the float valve (Fig. 8) and install it on the other side.
ƒ Proceed the reverse way to assemble the system.
CAUTION
The break tank could contain city main water up to 11 litres. Make necessary ar-
rangements to drain it during this operation.
Wall mounting instructions:
ƒ Mark the drill holes on the wall as indicated (Fig. 9).
ƒ Use the provided screw anchors if suitable with wall material
ƒ Use 3 screws Ø 8 mm, without tightening them completely. If used, the washers’
diameters should not exceed 16 mm.
ƒ Mount the system on the screws through the oblong holes on the rear side (Fig. 10),
adjust and then tighten with a screwdriver from the front side (torque max. 5N.m).