For the basic
system
you
will require:
*
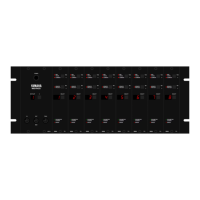
A Yamaha TX816 FM
Tone
Generator System.
*
A
Yamaha
DX7 Programmable
Algorithm Synthesizer.
*A
high quality eight
channel mixing
console, with
at
least eight input
channels.
(An amplifier
with
two inputs would be sufficient
for the TX216,
as it only has
two audio
outputs).
The audio output
on each
TF1 module has an impedance
of
600
ohms and is
rated
at
-lOdBm.
*
A high quality power
amp/speaker system.
Stereo is preferable,
for full enjoyment
of
the
TX81 6's sight voices.
*Two standard
MIDI
cables.
*
Eight balanced line
audio cables
with XLR type connections.
(For
the
TX21
6,
two
cables
are sufficient).
^==============^^^^^^=
The
TX816
receives
highly complex
information via MIDI cables, so
only MIDI
MIDI
CONNECTIONS
standard
DIN
cables
should be used,
like
the ones that
are supplied with the
TX81
6.
If you wish to
purchase further MIDI cables,
we
recommend the Yamaha
MIDI-03
and
MIDI -1
5
cables
(3
metres and 1 5 metres
long
respectively).
MIDI cables longer
than 15 meters
should
not be used, as the
MIDI
signal can deteriarate if sent
over
too
long a
distance, and
data
errors may result.
(a)
Make sure that the
TX81 6 and the
DX7 are not connected to
the
AC supply.
Connect
the
MIDI
OUT
of the DX7 to the
COMMON MIDI IN on the
front
of
the TX816 MIDI rack frame.
This enables
the DX7 to send
MIDI
data to
the
TX816, and "play" the eight voice
modules.
(b)
Connect the MIDI IN of the
DX7
to
the
COMMON
MIDI OUT on
the front
of the
TX816. This enables the TX816 to
dump voice data
into the
DX7's
internal
memory.
Each TF1 module
in
the
TX816 has a balancaed line
XLR
type
output
on its rear
panel.
This connector
is wired
in
the
following manner:
Pin 1
:
Shield: pin 2: Hot:
pin 3 cold.
FM digitally generated voices
are
subtle and complex, and
we recommend
that you use the
highest quality of cables
abailable
to
connect
your TX81
6
audio
outputs to your
mixer,amplifier or
tape deck.
(a)
Make sure
that the TX81 6 and
your
mixer are not connected to
the AC mains.
Connect
the eitht
audio aouputs on the
back of the
TX816 to eight
line inputs
on your mixer (the
inputs must be suitable
for
a 600
ohm signal
rated
at
-10
dBm). The easiest
method is to connect outputs
1
thru
8
of the
TX816
to
input
channels
1
thru
8
on
your mixer. You can adjust
input
channel
sensitivity
using the
audio
Check Signal, as described
later in this chapter.
(b) As
an option, you can connect
hte audio output of the
DX7 to your mixer
if
you
with.
This will give you a total of
nine voices which
can
be
played
si-
multaneously.
However, to hear more clearly
how
the DX7 controls the
TX81
6,
it is better
not
to
use this
option
to
begin with.
NOTE:
The volume control
lever on the
DX7 will not affect the
volume
of the TX816
voices.
AUDIO
CONNECTIONS
17