PGC5007
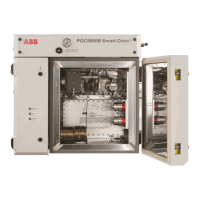
PGC5007 Operating Instructions 5 Furnace repair
28 OI/PGC5007-EN, Rev C
The thermocouple probe is very close to the sulfur furnace tube. Be careful not to contact the
thermocouple probe when you are removing the furnace tube.
3. Remove the fitting nuts on one end of the sulfur furnace tube.
4. Remove the old sulfur furnace tube by pulling it through the furnace heater assembly at the other end.
5.6 Installing a new sulfur furnace tube
The new quartz sulfur furnace tube must never be touched with bare hands. Always wear rubber gloves
when installing or handling the quartz sulfur furnace tube.
1. Clean the new sulfur furnace tube with acetone, inside and out.
2. Wipe the tube with a clean, absorbent, non-abrasive, lint-free wipe.
3. Clean the new sulfur furnace tube again, with methanol, inside and out.
4. Wipe the tube with a clean, absorbent, non-abrasive, lint-free wipe.
The thermocouple probe is very close to the sulfur furnace tube. Be careful not to contact the
thermocouple tube when you are installing the furnace tube. Refer to “Installing a new thermocouple”
for additional information.
5. Install the new sulfur furnace tube into the furnace heater assembly by inserting the tube into one end and sliding it
through until an equal portion protrudes from each end.
6. Using new nuts and graphite ferrules supplied in the furnace tube kit, place a nut and a ferrule on each end of the furnace
tube. The ferrules should be approximately 1/16-inch from the end of the furnace tube.
7. Install the furnace into the explosion-proof housing as described in “Installing the Furnace.”
8. With the nuts and ferrules still loose, be sure that the tubing is centered in the furnace..
9. Tighten the fittings finger tight and then tighten them one additional complete turn. Be sure not to overtighten the fittings
as damage to the tube may result.
When a compression fitting is tightening, the tubing that it is sealing will be forced towards the tube stop.
With most tubing materials this is not a problem. Quartz, however, will crush at the tips if the tube is not
backed off the tube stop. You must take care to see that the ferrules make proper engagement on the
tube to prevent leaks.
10. If this completes the furnace work, install the furnace cover as described in "Installing the Furnace Cover."
5.7 Removing the thermocouple
The thermocouple is part of the furnace assembly. This procedure explains how to replace the thermocouple when the furnace
does not need to be replaced.
1. Remove the furnace cover as described in "Removing the Furnace Cover."
2. Disconnect the thermocouple connections on the furnace side of the terminals (see Figure 5.3).
3. Place one wrench on the 1/8-inch fitting and a second wrench (backup wrench) on the 3/16-inch tube fitting, and remove
the tube fitting and its ferrule from the furnace.
4. Remove the old thermocouple from the furnace.
5.8 Installing a new thermocouple
1. Ensure that the 1/8-inch fitting on the furnace is tight.
2. Assemble the tube nut, graphite ferrule and new thermocouple.
3. Insert the new thermocouple assembly into the furnace until the tip touches the furnace tube.
4. Tighten the tube nut slightly but still allowing the thermocouple to be moved.