ENGLISH
PSPIX² • User manual
29
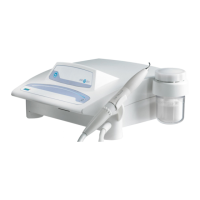
allowing you to quickly check the image and the computer screen. The Pre-view display time on the Touch
screen is confi gurable from the “Setup”/”Confi guration”/”Time” menu.
6. After reading, the IP passes through the delete module, where the image data is deleted. It then falls into
the IP receptacle of the PSPIX system and can be reused for a new X-ray image.
NOTE:
If an image cannot be transferred onto the computer due to a network error, computer failure or
software bug, the last image read is saved in the PSPIX system. A warning window appears on the Touch
screen of the PSPIX and no other IP can be inserted for reading.
You are offered three options:
- Attempt to re-establish the Ethernet connection with the computer to automatically transfer the image. To
do this ensure that the Ethernet cable is correctly connected OR ensure that the PSPIX acquisition module
is correctly open.
If the Ethernet connection is reconnected then a new window confi rming the reconnection will be displayed
during the image transfer time.
- Delete the X-ray image from the memory by clicking on the “Trash” icon
. Confi rm the deletion by
pressing the OK button.
-Collect the image from the PSPIX acquisition module of another computer connected to the PSPIX system (in
the case of a multi-user confi guration). Take care to open the correct patient fi le in the imaging software,
then access the “Setup” menu, then the “Image” tab in the PSPIX acquisition module. Finally click on the
“Retrieve the Last Scanned Image” button.
7. Retrieve the IP from the IP receptacle. The PSPIX system is now ready to read the next IP (the animation
on the screen asks you to insert a new IP).
NOTE:
Avoid sliding the IP when retrieving it from the IP receptacle in the PSPIX system. Lift out the IP by
holding it along its edges.
CAUTION:
Risk of PSPIX system malfunction. Do not put an IP back in the insertion slot of the PSPIX system until the
previous IP has fallen into the IP receptacle.