Changing
the
cartridge
Remplacement
de
la
cellule
Notes
Turn
of
all
the components before changing.
•
How
to
attach
1.
Undo the screws and
disconnect
the
lead wires.
2.
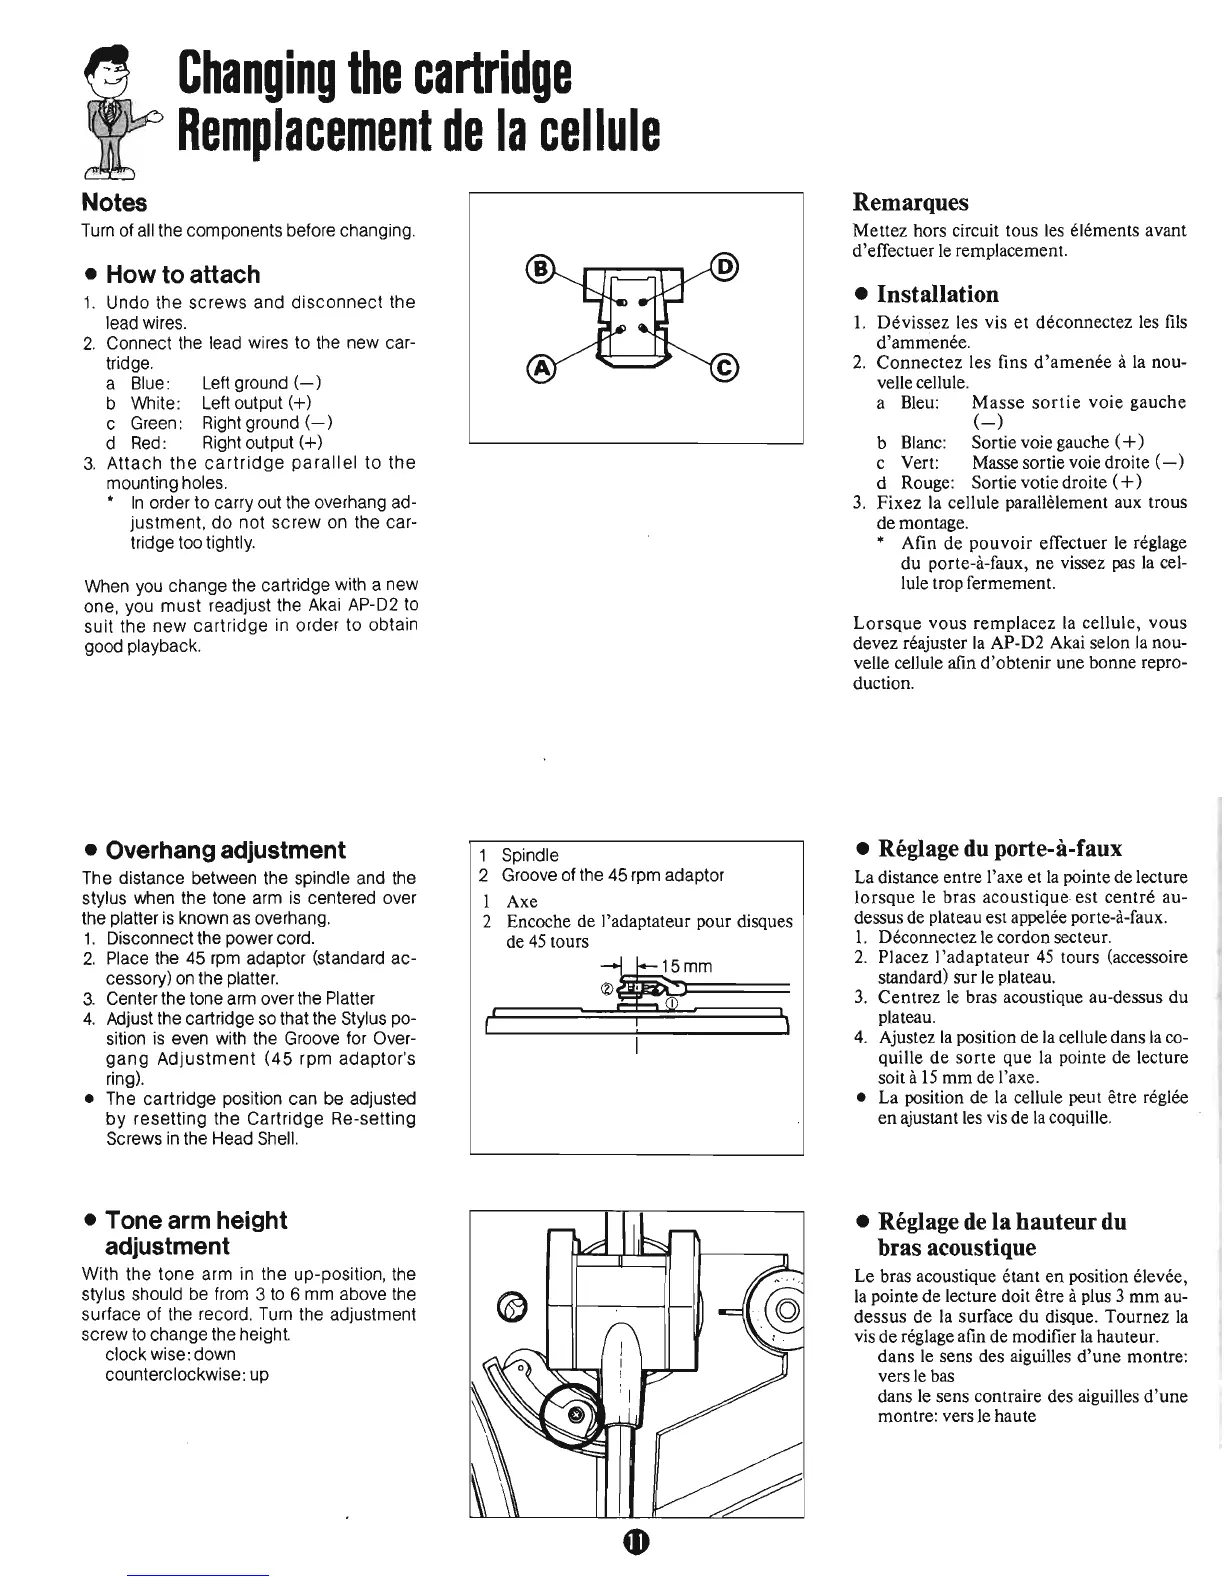
Connect the lead wires to the new car-
tridge.
a Blue: Left ground
(-)
b White: Left output (+)
c Green: Right ground
(-)
d
Red:
Right output (+)
3.
Attach
the
cartridge
parallel
to
the
mounting holes.
*
In
order to carry out the overhang ad-
justment,
do
not
screw
on the car-
tridge too tightly.
When
you
change the cartridge with a new
one, you must readjust the
Akai
AP-D2
to
suit the
new
cartridge in order to obtain
good playback.
•
Overhang
adjustment
The distance between the spindle and the
stylus when the tone arm
is
centered over
the platter
is
known as overhang.
1.
Disconnect the power cord.
2.
Place the 45 rpm adaptor (standard ac-
cessory)
on
the platter.
3.
Cent
er
the tone arm over the Platter
4.
Adjust the cartridge so that the Stylus po-
sition
is
even with the Groove for Over-
gang
Adjustment
(45
rpm adaptor's
ring).
• The cartridge position can be adjusted
by
resetting the Cartridge Re-setting
Screws
in
the Head
Shell.
• Tone
arm
height
adjustment
With the tone arm in the up-position, the
stylus should be from 3
to
6 mm above the
surface of the record.
Turn
the adjustment
screw
to
change the height.
clock wise: down
counterclockwise: up
1 Spindle
2 Groove of the 45 rpm adaptor
1
Axe
2 Encoche de I'adaptateur pour disques
de
45
tours
I j
Remarques
Mettez hors circuit tous les elements avant
d'efTectuer
le
remplacement.
• Installation
1.
Devissez
les vis
et
deconnectez les fils
d'ammenee.
2.
Connectez
les fins
d'amenee
a
la
nou-
velle cellule.
a
B1eu:
Masse
sortie
voie
gauche
(-)
b Blanc: Sortie voie gauche (+)
c Vert: Masse sortie voie draite
(-)
d Rouge: Sortie votie draite (+)
3.
Fixez
la cellule parallelement aux trous
de
montage.
* Afin
de
pouvoir
efTectuer
le
reglage
du
porte-a-faux,
ne
vissez pas
la
cel-
lule trap fermement.
Lorsque
vous
remplacez
la cellule,
vous
devez reajuster
la
AP-D2 Akai selon
la
nou-
velle cellule afin d'obtenir une bonne repro-
duction.
• Reglage
du
porte-a-faux
La distance entre I'axe et
la
pointe de lecture
lorsque
le bras
acoustique
est
centre
au-
dessus de plateau est appelee porte-a-faux.
1.
Deconnectez le cordon secteur.
2.
Placez I
'adaptateur
45
tours (accessoire
standard) sur le plateau.
3.
Centrez
le
bras acoustique au-dessus
du
plateau.
4.
Ajustez
la
position de la cellule dans
la
co-
quille
de
sorte
que
la
pointe de lecture
soit a
15
mm
de I'axe.
• La position de
la
cellule peut etre regl6e
en
ajustant les vis de
la
coquille.
• Reglage
de
la hauteur
du
bras
acoustique
Le
bras acoustique etant
en
position elevee,
la
pointe
de
lecture doit etre aplus 3
mm
au-
dessus
de la surface
du
disque. Tournez
la
vis
de
reglage afm de modifier
la
hauteur.
dans
le
sens des aiguilles
d'une
montre:
vers
le
bas
dans
le
sens contraire des aiguilles
d'une
montre: vers le haute