1
2
3
×8×8
5
7
6
×2×2
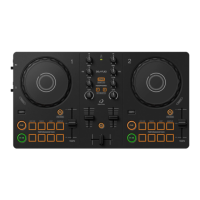
[1-2] Panel and HPJC Assy
1 Remove the 8 screws.
(DBA1290)
2 Slide the Panel around the 5-7 mm.
3 Pull out it until you can see the connector of
HPJC Assy.
4 Disconnect the one connector.
(CN6201)
Caution:
Remove the Panel after disconnecting the
connector earlier.
The connector in the main unit disconnect when
you pull the jumper wire at assembling too much.
5 Remove the 2 screws and then remove the
HPJC Assy with stay.
(BPZ30P080FNI)
6 Remove the one nut.
7 Remove the one screw and then remove the
HPJC Assy.
(BBZ30P060FTC)
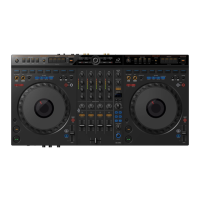
At the panel assembling, tighten the screws while pressing the panel like the figure below in the direction of the arrow.
Panel
DBA1290
Caution :
Be sure to use the following screw at the
reassembling!
Panel
Stay
HPJC Assy
HPJC Assy
• Rear view
4
CN6201CN6201
1
2
Screw tightening order
g Notes on assembling