7
P/N 1011550 Rev. D 03/21
Operating
Instructions
NOTE: If the toasting quality needs
adjustment, refer to the section
titled “Adjusting Toasting
Quality” in the Operation
section of this manual.
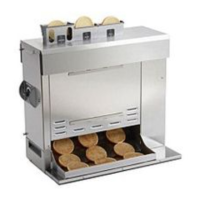
1. Verify that the toaster is clean and
assembled correctly. Turn the Power
switch to the on position. The unit
makes a clicking sound. This is
normal.
2. Place a red food tray in front of the
Bun Chute.
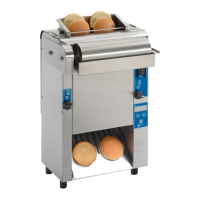
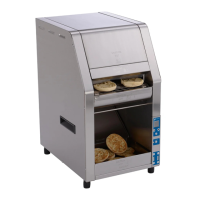
Check Bun Thickness
Compression Settings
CROWNS
(Cut sides
facing IN)
HEELS
(Cut sides
facing IN)
Buns Exit
Toaster Here
Power
Switch
4D
USE
Before toasting product, verify that the
Bun Thickness Compression Knobs are
set appropriately. The typical settings for
crowns and heels is #4, however these
can be changed according to product
thickness. See the section titled “Bun
Thickness Compression Knob Settings”
for more information.
Toasting Product
Test the toaster before use by toasting
1 bun and 1 slice of Wheatberry bread.
Facing the front of the unit, insert product
as described:
y Bun - Feed crown into front slot
and heel into back slot, with
cut sides facing each other.
y Wheatberry bread - place 1
slice of bread into back slot.
Check the color against Quality Photos
(Buttered White Bun Toasting, Multi grain
Bun Toasting, Chicken Salad Sandwich
toasting). Adjust settings if needed.
NOTE: If bun or bread gets stuck in
the toaster, use the platen tool
to dislodge it from the toaster.
y Insert Crowns into the front lane
with the cut side facing in.
y Insert Heels into the rear lane
with the cut side facing in.
Refer to Figure 4 below.
If product gets stuck inside toaster:
If buns or a bread slice gets stuck
inside the toaster, use the platen tool to
dislodge it from the toaster. Before using
the platen tool:
1. Insert one edge of a new scrub pad
onto the top slot of the platen tool.
2. Insert the other edge of the scrub
pad into the bottom slot. Make sure
the scrub pad is at against the tool.
3. From the top of the toaster, insert
the platen tool with the pad facing
the middle of the toaster. Dislodge
product.
WARNING
Do NOT use the platen tool without a
scrub pad installed. Be sure to insert
the platen tool into the toaster with the
scrub pad facing the toaster platen.
Do not allow the metal portion of
the platen tool to contact the toaster
platen.
8888
3. After the system check, the unit
begins to warm up and Lo-P appears
on the display.
4. After the system check, the unit
begins to warm up and Lo-P appears
on the display.
5. The unit displays the USE
message when it reaches proper
operating temperature (in
approximately 10 minutes).
Figure 4. Toasting Product