Pro Tools | MTRX Studio Installation Guide26
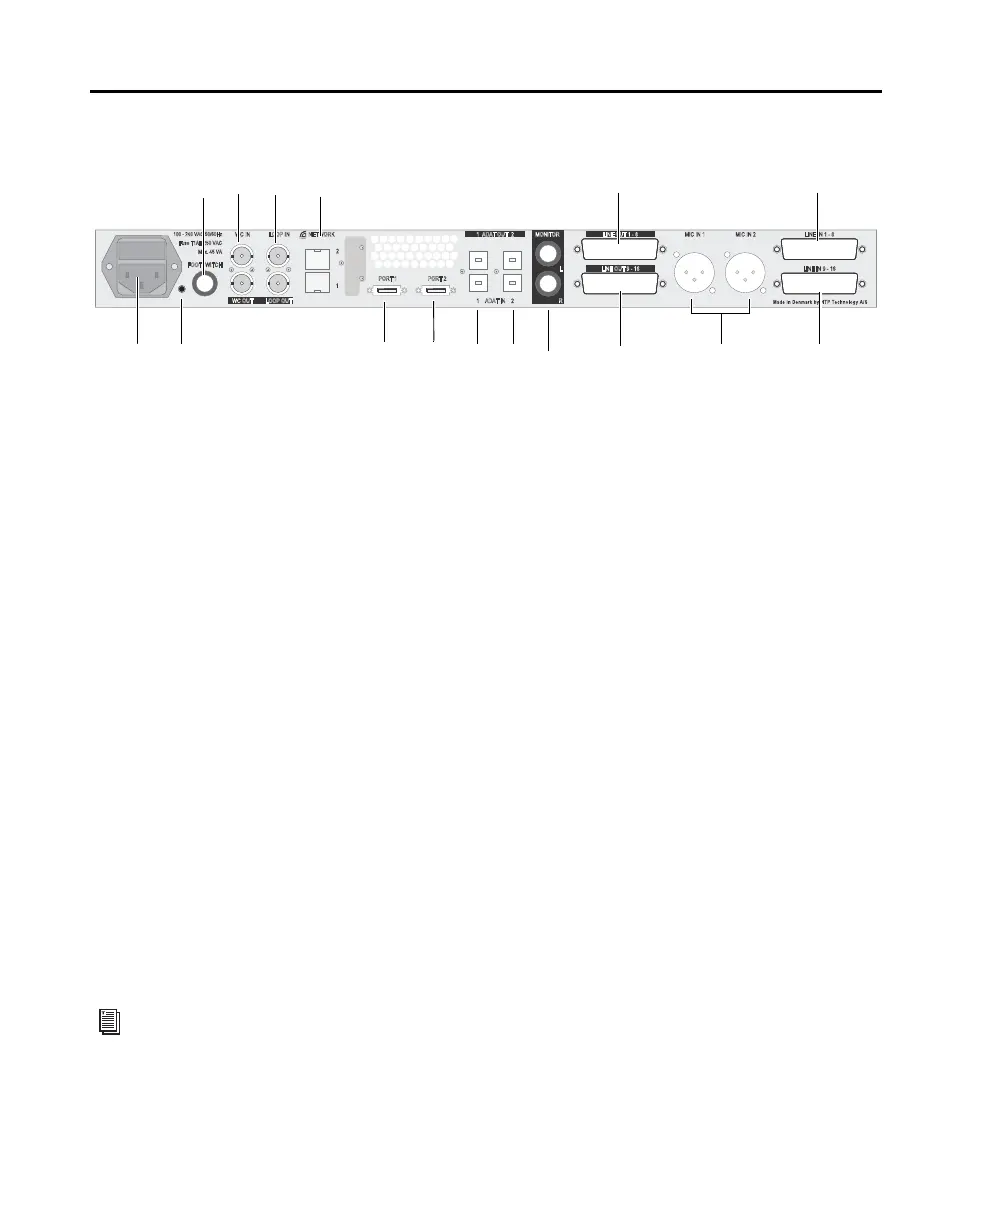
Pro Tools | MTRX Studio Back Panel
1 IEC power connector.
2 Reconfig button (see “Reconfig Button” on page 29).
3 Footswitch — the footswitch can used for controlling the DADman monitor profile or talkback (see the
MTRX Studio Operation Guide.pdf).
4 Word Clock In and Out (BNC).
5 Loop Sync In and Out (BNC).
6 Ethernet 1 and 2 (network or Dante) — Two RJ45 Ethernet ports for Control and Dante (which can be
set to switched or redundant mode). In redundant mode the control network must be connected to port 1.
7 DigiLink Mini port 1, primary port.
8 DigiLink Mini port 2, primary or expansion port (configured in DADman software).
9 ADAT In and Out 1.
10 ADAT In and Out 2.
11 Main Monitor Out L and R (balanced 1/4-inch).
12 Line Out 1–8 (DB25).
13 Line Out 9–16 (DB25).
14 Mic/Line In 1 and 2 (XLR and balanced 1/4-inch). These inputs are shared with the instrument inputs
on the front panel, select MIC inputs to use these inputs.
15 Line In 1–8 (DB25).
16 Line In 9–16 (DB25).
Pro Tools | MTRX Studio back panel
In addition to front panel and DADman control, the built in Mic pres can also be controlled from
Pro Tools (Mac only). For more information, see the MTRX Studio Operation Guide.pdf.
2
Fuse T1AH/250 VAC
Max. 45 VA
100 - 240 VAC 50/60Hz
FOOTSWITCH
MIC IN 2MIC IN 1
PORT 1 PORT 2
NETWORK
2
1
LINE IN 9 - 16
LINE IN 1 - 8
21 ADAT IN
21 ADAT OUT
LINE OUT 9 - 16
LINE OUT 1 - 8
MONITOR
L
RWC OUT LOOP OUT
WC IN LOOP IN
5
3
4
1
6
12
13118 9 102 7
15
1614