39
• USER, you can set the port that your camera is using.
• Please consult your camera provider for port information.
This keyboard supports any brand of Visca Over IP cameras in a same system.
If you have Visca-Over-IP cameras from more than one different camera makers, you may have to set the camera port
differently. Go to camera setting, you can set Visca-Over-IP camera port individually.
NOTE:
Once the Visca-Over-IP configuration is set in this section, the Visca-Over-IP configuration data will be applied to all
Visca-Over-IP cameras in the system.
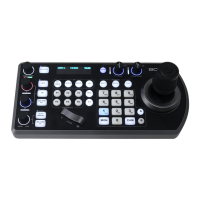
Control Mode
The Control Mode contains PTZ Controller mode
and Video Router Switch mode
• PTZ Controller: the keyboard used as a
standard PTZ camera controller that we use
usually. In this mode, RS422 A&B port all
use for camera PTZ control
• Video Router Switch: the keyboard used as a
video switching controller as well as a
standard controller. In this mode, RS422 A
port is used for video switching control,
RS422 B port is used for PTZ camera control
How to assign camera
Manually adding cameras
The keyboard can store settings to control up to
• 255 cameras by RS485 PELCO protocol
separately
• 7 cameras by VISCA protocol via RS422
group A separately
• 7 cameras by VISCA protocol via RS422
group B separately
• 255 cameras by IP ONVIF protocol
separately
• 255 cameras by VISCA-Over-IP protocol separately
• Total 255 cameras by cross protocol mix-controlling.
With the cursor on the Camera Selection, use the Zoom Speed dial to select which camera slot to assign a camera.
Each camera can be configured to be controlled using any of the following protocols:
• VISCA
• PELCO-D
• PELCO-P
• ONVIF
• VISCAIP (VISCA over IP)
• CGI*
If VISCA, PELCO-D, or PELCO-D are selected as
the protocol, the Baud Rate Setting screen will
appear. Use the Zoom Speed dial to set the baud
rate. Click the Zoom Speed dial to save, and then
exit this menu.