46 Serviceanleitung / Service Manual / / /
4.5 Wechsel der Rutschkupplungen
Lebensgefahr!
Trennen Sie den Drucker vom Netzanschluss
sonst besteht u. U. Lebensgefahr durch
spannungsführende Leiter im Innern des
geöffneten Druckers!
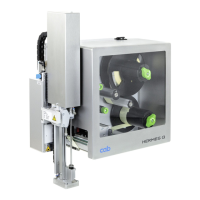
Der Aufwickler für die Transferfolie und der interne Auf-
wickler sind mit Rutschkupplungen (2 und 3) in den Haupt-
antrieb eingekoppelt. Die Bremse für den Abwickler
Transferfolie ist ebenfalls mit einer Rutschkupplung (1)
ausgestattet.
Der Wechsel einer der 3 Rutschkupplungen ist notwendig,
wenn sich die betreffende Kupplung nicht mehr einstellen
lässt. Beachten Sie die Montagehinweise für die Kupplun-
gen ebenfalls, wenn ein Austausch eines Wicklers erforder-
lich ist.
Nach einem Kupplungswechsel bzw. einer zwischenzeitli-
chen Demontage ist in jedem Fall eine Justage des Wickel-
moments der betreffenden Kupplung vorzunehmen (siehe
Abschnitt 5.1)!
Im folgenden werden zunächst die Arbeiten zur Demontage
jeder der Kupplungen beschrieben.
Entfernen der Rändelmutter an einer der Kupplungen:
1. Trennen Sie den Drucker vom Netzanschluss!
2. Entnehmen Sie das Material aus dem Drucker.
3. Demontieren Sie die Rückwand.
4. Drehen Sie entgegen dem Uhrzeigersinn die Rändel-
mutter (4) der betreffenden Kupplung ab. Achten Sie
dabei auf sechs kleine Federn (5) innerhalb der
Rändelmutter. Diese können leicht herausfallen!
4.5 Replacing the Slipping Clutches
Danger to life and limb!
Disconnect the printer from the mains
connection, otherwise there is a risk to life
and limb from the live wires inside the open
printer.
The rewinder for the transfer ribbon and the Internal
Rewinder (for label material) are coupled with slip clutches
(2 and 3) in the main drive. The brake for the Internal
Rewinder is also equipped with a slip clutch (1).
One of the three slip clutches has to be replaced when the
clutch concerned can no longer be adjusted. The assembly
instructions for the clutches also have to be observed when
a winder has to be replaced.
The winding torque of the clutch concerned always has to
be readjusted after replacing a clutch or if it has been
disassembled at any intermediate time (see section 5.1).
In the following, the work to disassemble each of the
clutches is described first.
Removing the knurled nut from one of the clutches:
1. Disconnect the printer from the mains connection.
2. Remove the media from the printer.
3. Remove the rear cover of the printer.
4. Turn the knurled nut (4) of the clutch concerned in a
clockwise direction. Be careful with the six small
springs (5) inside the knurled nut, as they can
easily fall out.
Bild 22 Rutschkupplungen Fig. 22 Slipping Clutches
2
1
3