25
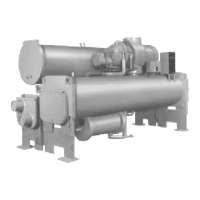
9. Cut the vaporizer refrigerant return line as shown (see
Fig. 17, item 13, or Fig. 18, item 8).
10. Disconnect all sensors with cables that cross from
the condenser side of the machine to the cooler side
including:
a. Evaporator refrigerant liquid temperature sensor.
See Fig. 19.
b. Entering and leaving chiller liquid temperature
sensors. See Fig. 20.
c. Evaporator pressure sensor (not shown).
11. Disconnect the tubesheet mounting brackets from the
vessel connectors on the tube cooler tubesheet.
12. Cover all openings.
13. Rig the cooler away from the condenser/compressor.
NOTE: To reassemble, follow steps in reverse order. Connect
sensors and cables after major components have been secured
to reduce the risk of damaging them.
19
18
17
16
15
14
5
13
12
11
10
9
8
7
5
6
5
4
3
2
1
1—Suction Elbow (Unbolt) 11 — VFD Cooling Drain Line
2—Vaporizer Vent Line (Unbolt) 12 — Oil Reclaim Line (Cut)
3—Motor Cooling Line (Unbolt) 13 — Vaporizer Hot Gas Return Line (Cut)
4—Motor Cooling Drain Line (Cut) 14 — Discharge Isolation Valve (Optional)
5—Tubesheet Mounting Bracket 15 — Condenser Relief Valves
6—Bearing Oil Drain Line 16 — Discharge Temperature Sensor
7—Support Plate 17 — Discharge Pipe Assembly Relief Valve (Unscrew)
8—In-Line Economizer Orifice Plate 18 — Discharge Pressure Sensor
9—Cooler Liquid Feed LIne (Unbolt) 19 — Discharge Pressure Switch
10 — Hot Gas Bypass Line (Cut)
Fig. 17 — Cooler/Discharge Pipe Assembly Removal (Unit with R Compressor Shown)
a23-1560
 Loading...