Using installer settings
Carrier Connect™ Wi-Fi Thermostat 33CONNECTSTAT43FX CARRIER CORPORATION ©2021
Installation Guide All rights reserved
28
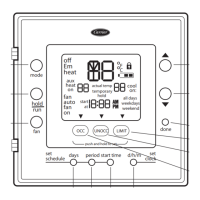
To reach the Installer Settings screens, set the mode to OFF and press and hold the MENU button for 5 seconds.
Scrolling though the installer settings:
• The HOME button returns the installer to the home screen.
• The UP and DOWN arrows scroll through the settings.
• The SELECT button allows the installer to change the value of the setting.
• Press DEFAULT to set the value to the factory default. Press SAVE to store the value.
• Press SAVE to store the current value and return to the SELECT screen.
• Press CANCEL to return the setting value to the last saved value and then return to the SELECT screen.
HEAT EQUIP—Set the type of heating equipment being used.
If you set the COMPRESSOR to HP, the heading of this screen is EHEAT EQUIP instead
HEAT EQUIP.
GAS
GAS
ELEC (Electric Heat)
HEAT STAGES
• If the COMPRESSOR EQUIPMENT TYPE is set to HP, the heading of this screen is
EHEAT STAGES.
• The option of 0 heat stages is only available if the HEATING EQUIPMENT is set to
electric heat (ELEC).
• If set to 2, the W2 RELAY OUTPUT is not available for optional functions such as
HUMIDIFIER, DEHUMIDIFICATION, and OCCUPANCY OUTPUT
COMPRESSOR
When set to NONE:
• COOL mode is disabled
• DEHUMIDIFY setting is not available
• COOL STAGES setting is not available
• AUTO ALLOWED setting is not available
When set to HP, the O output is not available for optional functions such as HUMIDIFIER,
DEHUMIDIFICATION, and OCCUPANCY OUTPUT.
 Loading...