11
APPENDIXPIÈCES DÉTACHÉESWARTUNG
• Einbau des Filterkorbes
Bringen Sie den Filterkorb wieder am Gerät an. Der Filterkorb im Poolroboter ist nach
dem Wasserzulauf ausgerichtet. Setzen Sie die Abdeckplatte auf und stellen Sie sicher,
dass der Filterkorb perfekt an der Abdeckplatte sitzt.
7. After restarting, the machine will execute the corresponding cleaning
program according to the preset parameters
Note:
1. When using App, it needs to obtain Bluetooth use permission and
location permission of the mobile phone
2. App is suitable for ios14 and above, and Android 8.0 and above.
3. To obtain weather information in APP, you need to turn on Location
service.
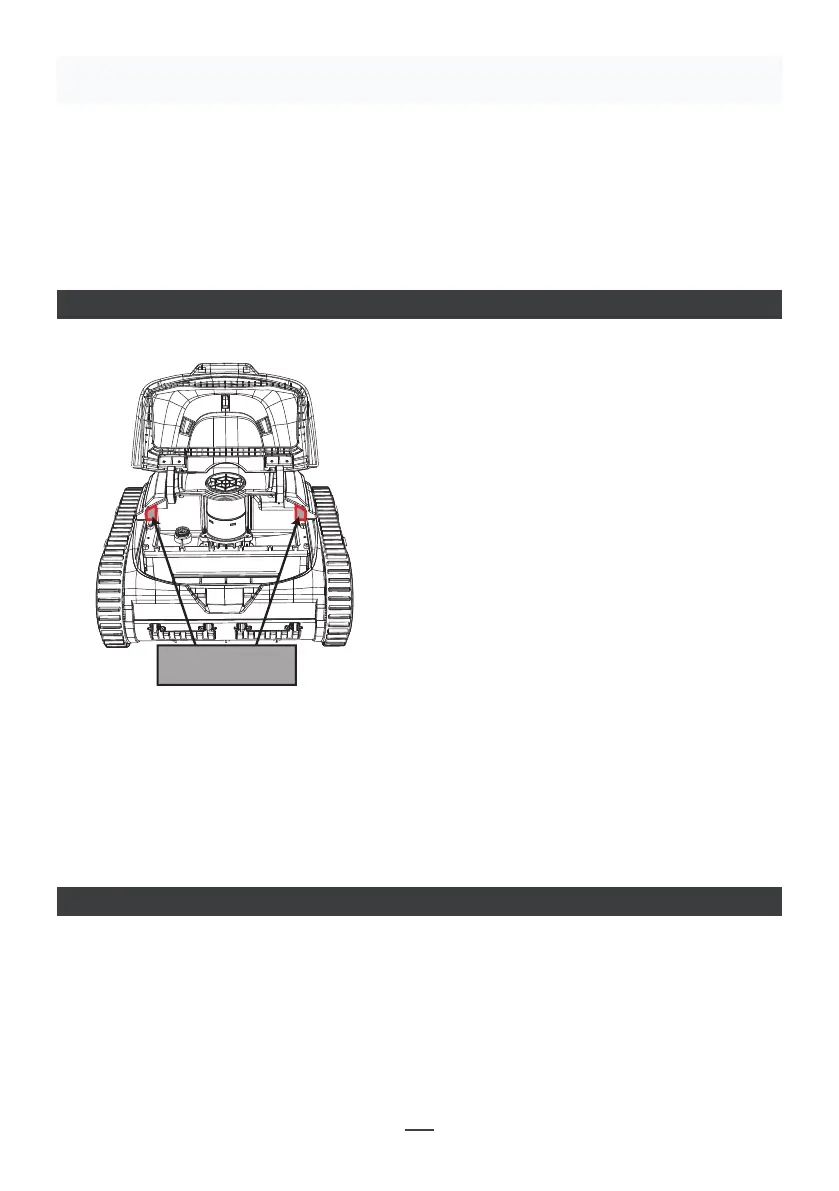
When it is difficult for the machine climb
the wall, it cannot clean the waterline,
and it tilts seriously when climbing the
wall, solve the problems according to the
figure. If the machine climbs the wall
normally, the following operations are
not required. After removing the
adhesive, two top floating blocks are
attached to the machine. Carry out
installation according to (Figure 6-1).
Attention:
1. Before installation, ensure that there is no water in the bonding
position.
2. There is adhesive on the back of the top floating block. When installing
the top floating block to the big cover, the edges of top floating block must
be glued properly. After 24 hours, the machine can be put into the pool for
work.
12
VI. Installa�on of floa�ng blocks (op�onal)
Floating blocks
Figure 6-1
EINBAU VON SCHWIMMERBLÖCKEN (OPTIONAL)
Wenn der Roboter normal an der Poolwand
aufsteigt, sind die folgenden Vorgänge
nicht erforderlich. Wenn das Gerät nur mit
Mühe an der Poolwand aufsteigt, kann es
die Wasserlinie nicht reinigen und gefährlich
kippen. Lösen Sie die Probleme gemäß der
Abbildung. Bringen Sie die beiden oberen
Schwimmerblöcke am Gerät an, nachdem Sie
das Klebeband entfernt haben. Führen Sie die
Montage gemäß (Abbildung 6-1) durch.
Vorsicht:
1 • Stellen Sie vor der Montage sicher, dass die
Verbindung absolut trocken ist.
2 • Auf der Rückseite des oberen
Schwimmerblocks ist ein Klebeband
angebracht. Beim Anbringen des
oberen Schwimmerblocks an die große
Abdeckung müssen die Ränder des oberen
schwimmenden Blocks ordnungsgemäß
verklebt werden. Nach 24 Stunden ist das
Gerät wieder betriebsbereit.
Abbildung 6-1
Schwimmerblöcke
4.3.2 Take out the filter basket from the machine (Figure 4-3).
Figure 4-3
4.3.3 Cleaning of the filter basket
Rinse the dirt of the filter screen with clear water (Figure 4-4).
4.3.4 Installation of the filter basket
Reinstall the filter basket to the machine. The filter basket is aligned with
the water inlet and put into the cleaning machine. Put the cover plate on,
make the filter basket fit with the cover plate perfectly.
Figure 4-4
10
ZUSTAND DES POOLWASSERS
Hinweis: Der Zustand des Poolwassers muss innerhalb der folgenden Parameter liegen:
• PH: 7,0-7,4
• Temperature: 50 °F -95 °F (10 °C - 35 °C )
• Salz: max. 5.000 ppm
• Chlor: max. 2 ppm
 Loading...