Operation
4-19
4.6.1 Limit
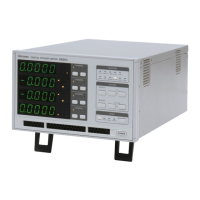
Figure 4-28 Limit Function Setup Screen
Enable the Limit function by setting the detection time and the upper/lower limits of each
parameter can judge if the measured data is within the specification. The parameters
include V, Vpk+, Vpk-, I, Ipk+, Ipk-, Is, W, PF, VA, VAR, CFi, VTHD, ATHD, E and F. The
user can select one or several of them for setting.
Following is the procedure to set the parameter:
1. Press SETUP and select Limit. The Limit indicator is on indicating it is in Limit menu.
2. Use ↑, ↓ to select on in the 1
st
display window and press TRIG/ENTER to confirm it.
3. Use ↑, ↓ to set the time in the 2
nd
display window and press TRIG/ENTER to enter into
the parameter setting screen.
4. Use ↑ , ↓ to select the desired testing channel in the 1
st
display window. If the
parameter upper and lower limits of every channel are the same, select all and press
TRIG/ENTER to confirm it.
5. Use ↑, ↓ to select the test parameter in the 2
nd
display window and press Enter/Trig to
confirm it.
6. Use ↑, ↓ to set the upper limit in the 3
rd
display window. If there is no upper limit, set
“-----” and press TRIG/ENTER to confirm it.
7. Use ↑, ↓ to set the lower limit in the 4
th
display window. If there is no lower limit, set
“-----” and press TRIG/ENTER to confirm it.
8. Repeat step 4~7 to set other test channel, parameters and upper/lower limits. When
done, press SETUP to exit the menu and the GO/NG indicator will turn on.
9. Press TRIG/ENTER to begin the GO/NG testing on every channel. The GO/NG will
blink during the test.