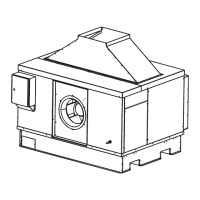
Pump
Access
Panel
SideView
TopView
MAINTENANCE
SeeleyInternationalPtyLtd
CleaningPumpStrainers&Impellors
1. Openthepumpaccesspanel(eitherside)toexposethepumpenclosure.
2. Cutthecabletiesecuringthepumplead.
3. Removethe2screwssecuringthepumpbrackettothewallofthecooler.
4. Disconnecttheplumbinghosefromthespigotatthepumpbase.Removetheentire
pump/chlorinatorassemblyfromthecoolercabinet. Toremovepumpfromthestrainer,
pressthereleasebuttononthestrainer,twistthepumpbodyclock-wisewithbutton
depressed,liftthepumpbodyoutofthestrainerbase.
5. Inspectandcleanthepumpstrainerandimpellorhousing.Removeanysolidsor
residuesfromthestrainerslotsoraroundtheimpellorwithasoftbrush.
6. Re-assembleinthereverseorder,useanewcabletietotidyandsecureallthecables
again.
Pumplocations-
CW-H10(2percooler)
Pumplocations-
CW-H15(3percooler)
Pumpjunctionbox
CW-H15only
(locatedunderlid)
ChangingPumps
For2&3corecoolers
For3corecoolers
1. Openthepumpaccesspanel(eitherside)toexposethepumpenclosure.Cutthecable
tiesecuringthepumplead.
2. Removethe2screwssecuringthepumpbrackettotheinnerwallofthecooler.
3. Disconnecttheplumbinghosefromthespigotatthepumpbase.Removetheentire
pump/chlorinatorassemblyfromthecoolercabinet.Unscrewthe2screwssecuringthe
pumptothebracket.
4. Unplugthepumpfromthecontrolbox(interface)PCB(refertothewiringdiagram
adheredtothecontrolboxdoorfortheplugpointlocation).Releasethecablegland
fromthepumpleadatthebaseofthecontrolbox.Pullthepumpleadthroughthe
rubbergrommetlocatedinthewallofthecoolerbelowthecontrolbox.
5. Re-assembleinthereverseorder,useanewcabletietotidyandsecureallthecables
again.
2ofthepumpsareconnectedinparallelviaajunctionboxmountedbelowthecooler
lid.Shouldoneofthesepumpsfail,itisnecessarytoremovethelidassemblytoaccess
thejunctionboxtoreleasethefailedpump’slead.
Pumpjunctionbox
CW-H15only
(locatedunderlid)
InterfacePCB
Pumpenclosurewith
accesspanelremoved
(Notecableexit/rubbergrommetlocation)
Pumppluglocations
Cutthecabletie Removethe2screws Removetheentirepump/chlorinatorassembly
CleaningorreplacingtheChlorinator
Cleanthechlorinatorbladesbygentlywipingthecontactsurfaceswithasoftbrush,cloth
ornon-abrasivewoodenorplasticimplement.Besuretocleantheinnersurfacesofthe
chlorinatorblades.
Toreplacethechlorinator,followthedirectionsabovetoremovethepumpandchlorinator
assembly.
1. UnplugthechlorinatorleadfromthemainPCB,(refertothewiringdiagramadheredto
thecontrolboxdoorfortheplugpointlocation)removetheleadfromthecableglandat
thebaseofthecontrolbox,pulltheleadthroughtherubberglandmountedbelowthe
controlboxfromtheaccesspanelopening.
2. Removethepumpandchlorinatorassemblyfromthecooler.Unclipthechlorinatorfrom
thepumpbracketandrefitthenewchlorinator.
3. Refitthepumpandchlorinatorassemblybackintothecoolerfollowingthereverseorder
asabove.
Donotscratchordamagethemetallicsurfacesofthechlorinator.
SideView
Cleantheinner
surfacesofthe
chlorinatorblades
Cleanthepumpstrainer
andimpellorhousing.
24
859736-A AU1007