MAINTENANCE
23
SeeleyInternationalPtyLtd
SeasonalProcedures
NOTE!
TheheatexchangercoresareuniquetoClimateWizardandhavebeenmanufacturedtogivethehighest
possiblecoolingperformance.WHENREPLACINGCORESDONOTUSE ALTERNATIVES.Themanufactureris
notresponsiblefortheperformance,damageto,orsafetyofthecoolerifanyformofalternatecoresareused.
Usinganyothertypeofcorewillseriouslyaffectthecooler’sperformanceandmaycausewatercarry-overthat
canenterthesupplyairducts.
Allmaintenancemustbedonebyatrained,licensedtechnician.Someactivities to
complywithlocalHealthandSafetyregulations.Maintenanceactivitiesdetailsaredescribedinthefollowingpages.
mayrequire2persons
End-season Maintenance
1. If not already drained, initiate a Drain sequence, “dr” is displayed on the wall control (refer Pg. 20). The reservoir will
drain and the cooler will shut down. Allow sufficient time to let water drain from the cooler cores and tank.
2. Turn off the power supply to the cooler.
3. Remove the cooler lid (refer Pg. 24).
4. Remove the core and pump access panels (refer Pg. 24).
5. Inspect the cores for salt build-up, dirt, algae and general cleanliness. Fit new cores if necessary (refer Pg. 24). (If in
doubt, contact Seeley International Service for advice.)
6. Clean the Water Level probes by gently wiping the contact surfaces with a soft cloth. Make sure the probe is returned to
the correct height (as set ex factory) to ensure proper water level control. Check that the probe is fully pressed down into
its mounting bracket (refer Pg. 22).
7. Remove the pump from the cooler and clean the filter section. This also provides clear access to clean the Chlorinator
(refer Pg. 22).
8. Clean the Chlorinator blades by gently wiping the contact surfaces with a soft brush or cloth. Be sure to clean the inner
surfaces of the chlorinator blades (refer Pg. 22).
9. Refit the pump and chlorinator assembly back into the reservoir.
10. Clean/replace the inlet air filters (if fitted) to remove any foreign matter captured during the operating period. Inspect the
filter material, if the filters are significantly discoloured, chocked or blocked, then they must be replaced.
11. Turn off the water supply. Make sure no water is left in the reservoir. Leave pipe drained for winter to prevent freezing
and splitting. If necessary, winterise the cooler to ensure no water can be locked in any pipes under pressure.
12. Clean the bottom reservoir thoroughly using a wet cloth or brush. Flush with minimal water to remove any remaining
residue (refer Pg. 23).
13. Refit the core and drain access panels back on the cooler.
14. Cover the cooler for winter if desired. (No covers are available from the manufacturer.)
Pre-seasonCommissioning:
1. Removethepumpaccesspanels.
2. Turnonthepowerandwatersupply.
3. TurnonthecoolerviatheWallControlorBMSandrunthecooleraccordingtothepreviousinstructionsunder
"OperationofCooler".
4. Checkthatwaterisflowingintothecoolerreservoirandthatitstopsflowingwhenitreachesthetopprobe.(A torch
willbeneededforthischeck.)
5. Fitthepumpaccesspanelsbackontothecooler.
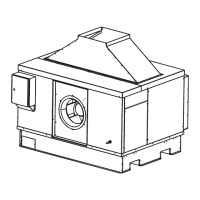
RearView
DrainConnection
Access
Panel
Pump
Access
Panel
SideView
Core
Access
Panel
WaterManagementProbe
Chlorinator
DrainValve
Pump
Cores
WaterDistributionSpreaders
Reservoiraccess
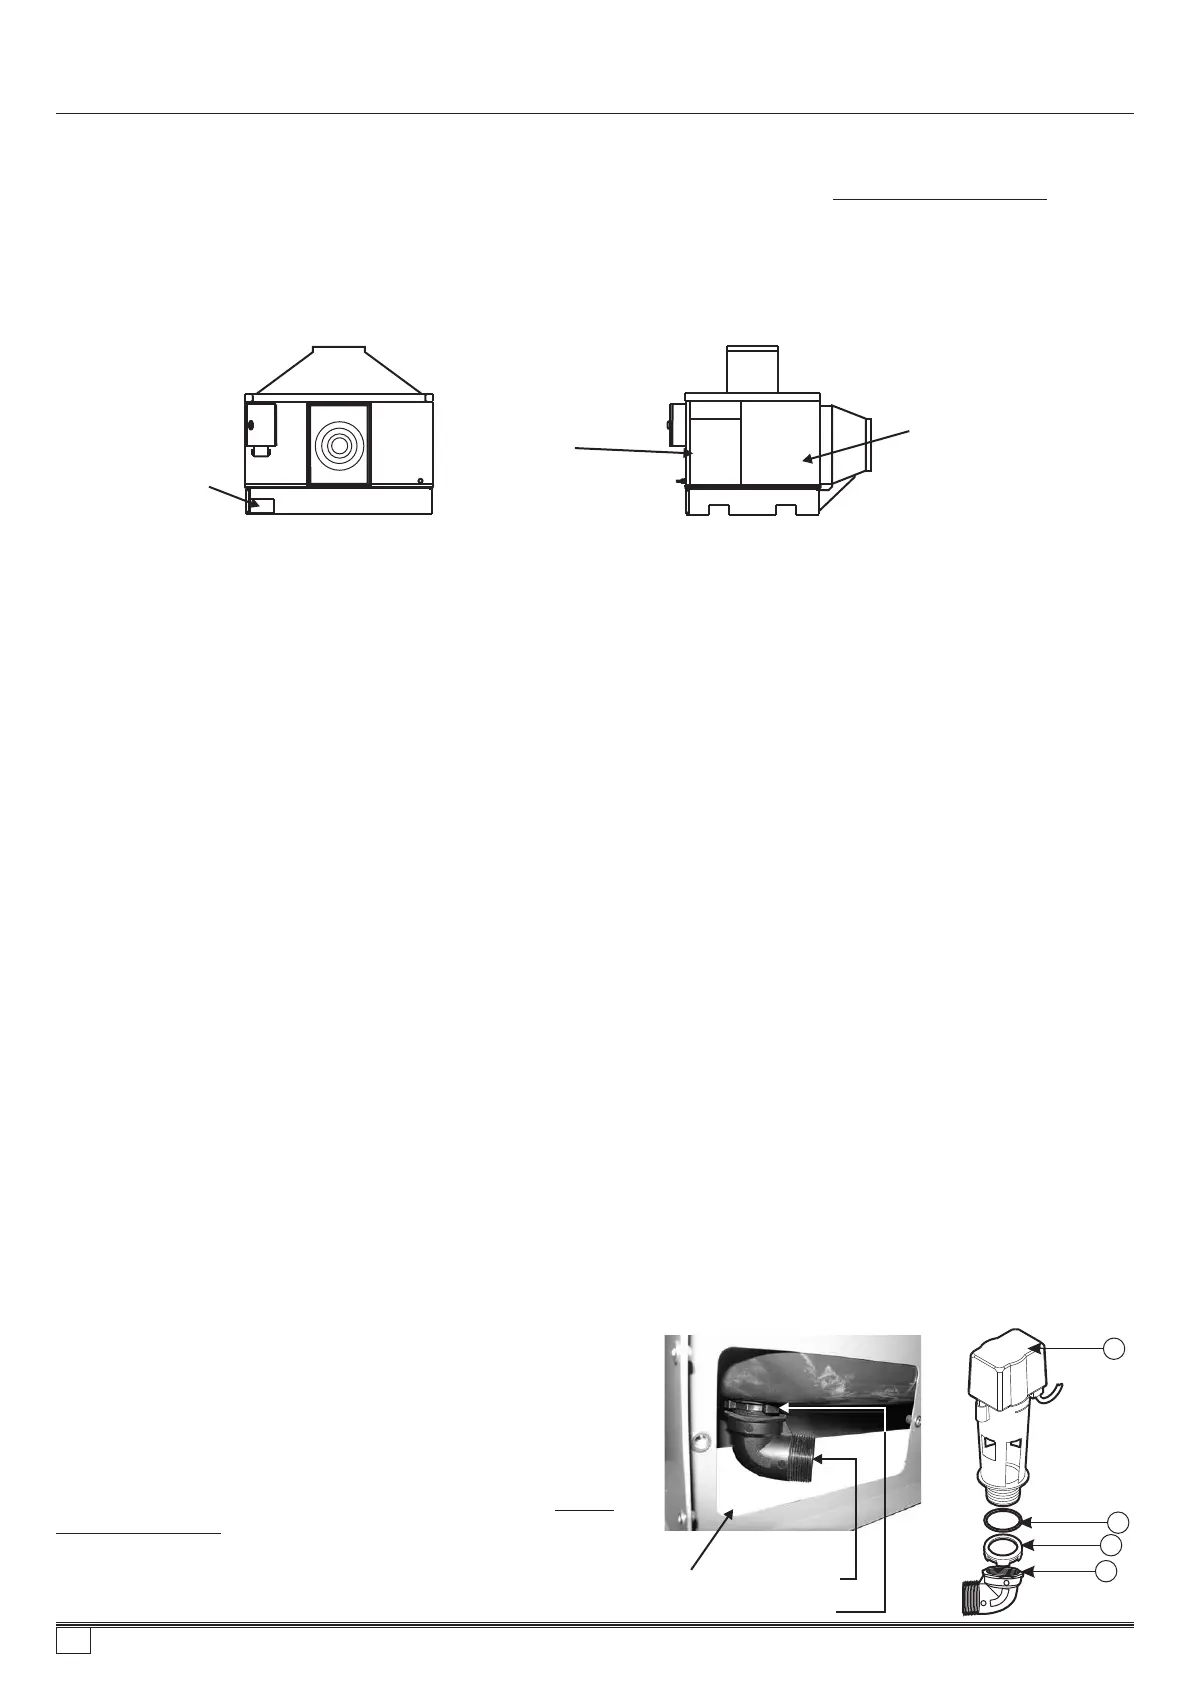
ReplacingtheDrainValve
Ifservicingthedrainvalve,re-assembledrainvalveasshown.
AccessthedrainvalveviathePump Accesspanelonthecontrol
boxsideofthecooler.
MakesurethattheO-ring(B)isfittedtothedrainvalvethread
beforereplacingthevalvebackintothereservoir.Screwthenut
uptightlybyhandthroughthedrainvalveaccesspanel.
Fitthedrainelbowtothedrainvalvethread.
Re-connectthedrainplumbingtotheelbow.Nowrunthedrain
valvecablethroughtothecontrolbox.
Donot
overtightenthenut.
A
B
C
D
A -DrainValve
B-‘O’Ring
C-Nut
D-Drain Adaptor
Nut
Elbow
DrainValve
Accesspanel
859736-A AU1007