Do you have a question about the Conair 150 and is the answer not in the manual?
Explains the manual's goal: to guide users through installation, operation, maintenance, and repair of the dryer.
Details the use of symbols and formatting to convey important information for safe installation and operation.
Addresses specific information regarding the dryer's application as a central dryer within the manual.
Outlines user duties regarding safety procedures for installation, operation, and maintenance of the equipment.
Highlights critical safety warnings to prevent potential hazards and personal injury during operation and maintenance.
Provides step-by-step instructions for safely isolating electrical power sources before performing maintenance or repairs.
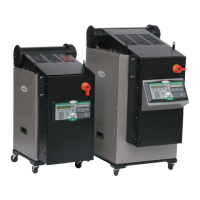
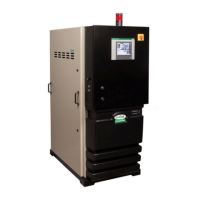
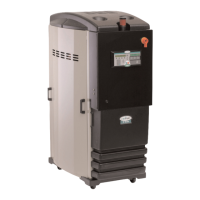
Introduces the dryer's function in producing hot, low-dewpoint air for plastic drying and its closed-loop design.
Lists common configurations and environments where the W Series Dryer can be successfully used for plastic drying.
Explains the continuous, closed-loop drying process involving heaters and a rotating desiccant wheel.
Presents detailed technical specifications including airflow, temperature range, dimensions, and electrical requirements.
Details optional features available for the dryer, such as volatile traps, precoolers, and communication modules.
Guides the user through the process of safely removing the dryer and components from shipping containers and inspecting them.
Outlines essential steps to ensure the mounting area is properly prepared, including power and water sources.
Instructs on how to lift and position the dryer near the processing machine, ensuring hose connectivity.
Details the procedure for opening side panels and removing the desiccant wheel securing cable tie.
Provides safety precautions and steps for connecting the dryer to the main electrical power supply.
Explains how to correctly install and connect the process RTD probe for accurate temperature readings.
Details the installation and connection procedure for the setback RTD probe.
Guides on verifying correct air flow direction and blower operation before loading material.
Instructs on connecting the flexible hoses between the dryer and hopper for proper airflow.
Explains hose connection sizes for different models and when hose adapters might be needed.
Outlines the steps for installing air hose adapters if dryer and hopper connections differ in size.
Details the process of connecting water supply and discharge lines to the optional aftercooler.
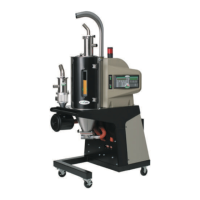
Describes how to use provided clips and flanges to mount a Conair loader or vacuum receiver.
Provides steps to verify that the dryer installation is functioning correctly before starting operation.
Refers to an addendum for details on optional Modbus, Ethernet, SPI, or DeviceNet communication setup.
Provides an overview of the DC-2 control panel, explaining the function of each button and display area.
Summarizes control functions with flow charts, referencing screen numbers for detailed explanations.
Guides users on navigating the dryer's control panel menu structure to access various functions and settings.
Offers detailed explanations of each screen and its associated function within the dryer's control system.
Outlines the procedure for starting the dryer, including setting the drying temperature and initiating operation.
Explains the correct procedure for stopping the dryer, including the cool-down period.
Details the process of entering the supervisor password to access and modify protected control parameters.
Describes how to program the dryer for automatic startup and shutdown based on a set schedule.
Explains how to set process temperature limits to protect the drying process and prevent unauthorized changes.
Details how to use the dewpoint monitor and control features to maintain a desired dewpoint for optimal drying.
Explains how the setback feature saves energy by reducing process temperature during idle periods.
Provides recommended setpoint values and guidelines for effectively using the setback feature.
Lists recommended maintenance tasks and their frequency to ensure optimal dryer performance and longevity.
Details procedures for monitoring the dryer's dewpoint performance using a portable instrument.
Provides instructions for thoroughly cleaning the hopper, spreader cone, and discharge assembly to prevent contamination.
Guides on how to clean or replace the process filter to maintain proper airflow and dryer efficiency.
Details the procedure for cleaning or replacing the regeneration filter to ensure optimal dryer performance.
Explains how to clean the aftercooler coils to maintain efficient operation of the aftercooler.
Outlines the process for cleaning the cooling coils of the optional precooler for efficient operation.
Provides instructions for cleaning the volatile trap to ensure its efficient operation.
Guides on inspecting hoses, clamps, fittings, and gaskets to prevent moisture ingress into the drying system.
Advises on initial steps to take when a problem occurs, including checking the control panel and alarm messages.
Emphasizes safety precautions and the importance of not disabling safety devices during operation or troubleshooting.
Explains how dryer alarms are indicated and how to use the diagnostics table to resolve issues.
Details common shutdown alarms, their possible causes, and recommended solutions to prevent equipment damage.
Describes passive alarms, their causes, and solutions, noting they indicate potential issues affecting drying quality.
Covers error messages beyond passive and shutdown alarms that indicate problems with the dryer's control system.
Addresses issues related to the dryer not producing the desired dewpoint and provides solutions.
Discusses common problems in material drying and how to identify and resolve them by checking system requirements.
Provides instructions and safety precautions for disconnecting power and replacing blown fuses.
Guides on how to check the continuity of heater solid state relays using an ohmmeter.
Explains how to check sensor positions and conditions and replace RTD sensors if necessary.
Provides detailed steps for safely replacing the regeneration and process heater tubes.
Outlines the procedure for replacing the desiccant wheel when it becomes clogged or contaminated.
Details the steps for safely removing and replacing the desiccant wheel motor.
Highlights Conair's commitment to customer support and the availability of service experts for installation and operation assistance.
Provides contact information and operating hours for Conair's customer service department.
Lists essential information and checks to perform before contacting customer service for troubleshooting assistance.
Outlines Conair's guarantee against defects in material and workmanship under normal use.
Details Conair's warranty that the equipment will perform at or above stated ratings under proper conditions.
Specifies limitations and disclaimers for warranties, excluding implied warranties of merchantability and fitness.
Explains the use of standard Modbus protocol for supervisory functions and data display via SCADA systems.
Guides on installing the necessary hardware, including connectors, cabling, and optional converters.
Details how to access and interpret the parameter list arranged in Modbus registers for data retrieval and control.
Introduces Modbus TCP/IP protocol applied to Ethernet for dryer communication and network integration.
Guides on changing the default IP address to match the plant network structure via the DC-2 operator interface.
Refers to an appendix for a list of parameters available with the Modbus TCP/IP interface.
Explains how DeviceNet facilitates information exchange with PLCs and supervisory systems using a gateway.
Guides on mounting and wiring the DeviceNet gateway to the main control board and cabinet.
Details configuring DIP switches for gateway address, baud rate, and controller settings.
Explains the meaning of the gateway's LEDs for monitoring communication status and troubleshooting.
Covers installing EDS files and configuring the DeviceNet software for network integration and parameter management.
Defines the SPI standard for interconnecting plastics equipment using RS-485 and its parameters.
Guides on installing SPI option hardware, including RS-232/RS-485 converters and connectors.
Details setting the SPI protocol and slave ID via the operator display for equipment configuration.
Lists SPI commands for selecting, polling, and managing dryer parameters and status information.