PreSet Wheel Hubs – Recommended Service
20 ConMet
5. PreSet Wheel Hubs – Recommended Service
106856a
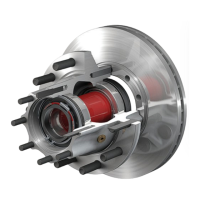
Welding Bead
FIGURE 46
2. Inspect the bearing cup bore
for evidence of cup rotation or
spun cups.
- If cup rotation exists, replace
the hub.
REMOVING CUPS IN
IRON HUBS
1. On an iron hub, remove the
bearing cup using a large
hammer and a mild steel bar
or a hydraulic press. Take
precaution to avoid damaging
the bearing cup bore and
shoulder.
2. Inspect the bearing cup bore
for evidence of cup rotation or
spun cups.
- If cup rotation exists, replace
the hub.
INSTALLING A NEW CUP
IN ALUMINUM HUBS
To install a new cup in an aluminum
hub, it is recommended that
the hub be heated in boiling
water (212°F) or in an oven at a
temperature not to exceed 300°F.
Cooling the cup in a freezer to
32°F or below will further ease the
installation.
Do not overheat the hub as it may degrade the
heat-treated strength of the hub. Do not heat the
hub with a torch or open ame.
WARNING
!
Remove the aluminum hub from the
oven or water and carefully drop in
the new bearing cup being certain
it is fully seated. If the cup is loose,
allow a few seconds for it to heat up
and secure itself before moving the
hub. Use a 0.001″ to 0.002″ feeler
gauge to ensure the cup is fully
seated against the shoulder of the
bearing bore.
INSTALLING A NEW CUP
IN IRON HUBS
Iron hubs do not need to be heated
for bearing cup installation. Press
the bearing cup into the hub, being
certain that it is fully seated (see
gure 47). Use a 0.001″ to 0.002″
feeler gauge to ensure the cup is
fully seated against the shoulder of
the bearing bore.
105742a
Bearing Cup Pressed into Hub
FIGURE 47
WHEEL STUDS
Replace all wheel studs that have
damaged or distorted threads,
are broken or bent, or are badly
corroded. Also, replace both
studs adjacent to the damaged
stud. If two or more studs have
damage, replace all the studs in
the hub. Broken studs are usually
an indication of excessive or
inadequate wheel nut torque.
STUD REMOVAL
Observe all warnings and cautions for press
operation provided by the press manufacturer
to avoid serious personal injury and damage to
components.
WARNING
!
1. Place the clean hub in a shop
press with the hub supported
evenly around and adjacent to
the stud being removed.
Failure to adequately support the hub can result in
physical injury and/or damage to the hub.
Some hubs are congured so it is impractical to
have supports to prevent the hub from tipping
when force is applied to the stud. In this case,
support the hub on wood blocks on the oor and
use a heavy hammer to drive the studs out with
several sharp blows. Be careful to avoid damaging
the hub and components, particularly the seal
bore and the ABS tone ring.
WARNING
!
2. Press the stud out of the hub.
STUD REPLACEMENT
On the ball seat wheel mounting system, always
use left-handed threaded studs, which are gold in
color and have an “L” stamped on the end, in the
hub on the driver’s side of the equipment, and use
right-handed threaded studs, which are silver in
color and have an “R” stamped on the end, in the
hub on the passenger’s side of the equipment.
The ConMet part number is located on the head
of the stud. The same part number must be used
for replacement unless changing the drum or
wheel type.
CAUTION
!
1. To install a new stud, support
the hub evenly around and
adjacent to the stud being
installed.
2. Press the new stud all the way
into the hub. Be sure the stud
is fully seated and that the stud
head is not embedded into the
hub.