PreSet Plus
®
Hub
Assemblies
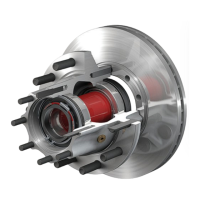
ConMet PreSet Plus hub assemblies
feature the same PreSet technology
and include the same precision-
machined hubs, premium seals
and specially toleranced roller
bearings. However, PreSet Plus hubs
incorporate the following:
- An integrated spindle nut
that eases installation and
disassembly and protects
components during wheel end
service
- An optimized spacer
- Standard magnetic ll plug
106922a
ABS RING
INNER
BEARING
CONE
INNER
BEARING
CUP
OUTER
BEARING
CUP
OUTER
BEARING
CONE
INTEGRATED
NUT
LUBRICANT
FILL PLUG
OIL SEAL
SPACER
(SECTIONED)
PreSet Plus Hub and Components
FIGURE 60
PreSet Plus Wheel Hubs – Recommended Service
29ConMet
6. PreSet Plus Wheel Hubs – Recommended Service
When inspections indicate that
service is necessary on a PreSet
Plus Hub, follow the recommended
service, inspection, reassembly
and reinstallation instructions found
in the following section.
In order to ensure optimum
wheel hub performance, ConMet
recommends that only approved
PreSet Plus service parts be used
to replace all critical components
of the system. Refer to the back of
this section for a listing of approved
parts.
HUB REMOVAL AND
DISASSEMBLY
Vehicles on jacks can fall, causing serious personal
injury or property damage. Never work under a
vehicle supported by a jack without supporting
the vehicle with stands and blocking the wheels.
Wear safe eye protection.
WARNING
!
1. Park the vehicle on a level
surface. Block the wheels
to prevent the vehicle from
moving.
2. Raise the axle until the tires are
off the oor.
3. Place safety stands under the
trailer frame or under each axle
spring seat (see gure 61).
FIGURE 61
4. Remove the tire and wheel
assembly using procedures
specied by the wheel
manufacturer (see gure 62).
103160a
FIGURE 62
Sudden release of compressed air can cause
serious personal injury and damage to
components.
Before you service a spring chamber, carefully
follow the manufacturer’s instructions to
compress and lock the spring to completely
release the brake. Verify that no air pressure
remains in the service chamber before you
proceed.
WARNING
!
5. If the axle is equipped with
spring brake chambers,
carefully compress and lock
the springs so that they cannot
actuate (see gure 63).
103161a
FIGURE 63
6. For drum brakes, remove
the brake drum. Support the
drum during the removal
process to prevent damage
to the components. For disc
brakes, remove caliper per
manufacturers’ recommended
procedure.
If the hub to be disassembled is a drive hub,
remove the drive axle shaft, and capture the oil
(see gure 64).
NOTE
106803a
Removing the Drive Axle Shaft
FIGURE 64