


D
Donald RiosSep 23, 2025
What to do if the application sent track data for a track not supported by the magnetic stripe module on DataCard CD820?
- SScott SweeneySep 23, 2025
Verify the type of magnetic stripe option in the DataCard Printer.
What to do if the application sent track data for a track not supported by the magnetic stripe module on DataCard CD820?
Verify the type of magnetic stripe option in the DataCard Printer.
What to do if the DataCard CD820 cable is loose?
Reconnect the USB cable to the ports on the PC and the printer. Power the DataCard printer off, and then back on. If the PC and printer still do not communicate, restart the PC.
Why is the printing blurred on my DataCard Printer?
Printing may be blurred due to several reasons: * The cards have a matte, not glossy, finish. Use cards that meet the requirements for the printer. * The rollers are dirty. Run a cleaning card. * The printhead is dirty. Clean the printhead.
What to do if DataCard CD820 Printer did not detect cards in the input hopper?
Add cards to the input hopper of the DataCard Printer.
What to do if the magnetic stripe data sent does not match the format set in the DataCard printer?
Press the User button on the DataCard Printer to clear the message.
Why text has broken characters on my DataCard Printer?
The monochrome (K) power setting is balanced to print both fine text and bar codes. If the card does not include a bar code, increase the monochrome intensity on the DataCard Printer.
Why color printing on top of a black background does not print on the card with DataCard CD820 Printer?
The black panel of the ribbon is printing over the color panels. The DataCard Printer uses the print ribbon panels in sequence; the Y panel prints first, then M, and so on. The black panel of the print ribbon is used last and prints over the color panels. For best results, change the 100% black background to a color near black, so that it prints using the YMC (color) panels of the print ribbon.
Why the card shows wrinkles in darkly colored areas with DataCard CD820 Printer?
The card includes very dark areas. Change the design to use smaller areas of dark color on the DataCard Printer.
Why is the printing very light on my DataCard Printer?
The printing can be very light because: * The ribbon is loaded incorrectly. Load the print ribbon correctly. * The card was previously printed and has topcoat on it. Print only new cards. * The printhead is not installed correctly. Contact your service provider for instructions to install the printhead correctly. * The printhead power is too low. Log on to the Printer Manager as a WebAdmin. Open the Printer Settings > Print menu. Increase the YMCPower setting, and click Set Current to save your changes.
How to fix PC USB port if it does not communicate with the DataCard Printer USB port?
Power management on the PC has shut down USB communication. Check the following: * Open Device Manager and the list of USB devices. * Disable shutdown for each hub in the list. * Restart the PC to make the changes take effect, if necessary.
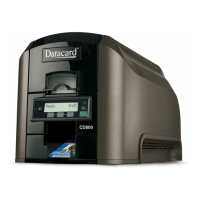
Provides user information for the CD820™ system, covering components, operation, and maintenance tasks.
Defines the target users for this manual, including operators and those responsible for setup.
Lists contact information for technical support in different regions for the CD820 printer.
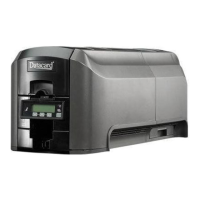
Overview of the card printer's function, capabilities, and optional features like hoppers and modules.
Introduces the main physical parts of the printer, directing users to detailed views.
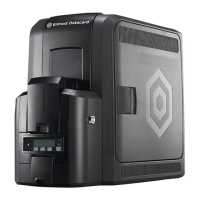
Details the components located on the left side of the printer, including hoppers and connections.
Details the components located on the right side of the printer, including the printhead and reject tray.
Illustrates and describes the printer configuration featuring a single input card hopper.
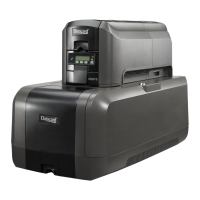
Illustrates and describes the printer configuration with an optional multi-hopper system.
Explains the print ribbon cartridge and its components, including the cleaning sleeve.
Describes the information found on the printer's configuration label for service and identification.
Explains the path a card takes through the printer during the issuance process.
Provides a general overview of the card printer system, its components, and its purpose.
Defines the typical roles and responsibilities of operators and system administrators in a card production environment.
Details the functions of the power button, arrow keys, and enter key on the printer's front panel.
Explains the functionality of the USER button and the meaning of its associated status light colors.
Describes the ribbon light's indicators for ribbon status, such as low or out.
Explains the card light's indicators for card status, such as card presence or cleaning needs.
Illustrates the menu structure of the printer's LCD panel for accessing functions and settings.
Provides step-by-step instructions to find the printer's network IP address using the LCD menu.
Guides users on how to print a test card to verify printer functionality and quality.
Instructions for loading blank cards into the single or multi-hopper.
Explains how to insert a single card into the printer using the exception slot.
Step-by-step guide for installing a new print ribbon cartridge into the printer.
Instructions for installing a new cleaning sleeve onto the ribbon cartridge for maintenance.
Detailed steps for correctly installing the assembled print ribbon cartridge into the printer.
Lists prerequisites for printing cards, including loaded cards and ribbon, and correct design setup.
Steps for printing cards using the CardWizard issuance software and sending them to the printer.
Emphasizes regular cleaning for optimal printer performance and condition.
Detailed instructions for cleaning the printer's printhead to ensure print quality.
Guides users on how to use a cleaning card to remove debris from the printer.
Instructions for cleaning the printer when equipped with the optional multi-hopper system.
Outlines the general steps for cleaning the printer, especially after preparing it.
Specific instructions for cleaning the rollers within the multi-hopper system.
Steps to prepare the printer for use after completing maintenance procedures.
Helps identify and isolate issues within the card production system and basic printer functions.
Guides users through specific troubleshooting categories such as installation, card appearance, and ribbon issues.
| Print Technology | Direct-to-card dye-sublimation/resin thermal transfer |
|---|---|
| Print Resolution | 300 dpi |
| Card Input Capacity | 100 cards |
| Power Supply | 100-240 VAC, 50/60 Hz |
| Print Capability | Single- or dual-sided printing |
| Media Size | CR80 (85.6 x 54 mm) |
| Card Output Capacity | 25 cards |
| Connectivity | USB 2.0 |
| Encoding Options | Magnetic stripe, contact smart card, contactless smart card |
| Interface | USB |