


J
John ValentineAug 30, 2025
What to do if the DataCard Printer printing was paused?
- JjeremynicholsAug 30, 2025
To complete the current card, press the DataCard Printer’s USER button.
What to do if the DataCard Printer printing was paused?
To complete the current card, press the DataCard Printer’s USER button.
What if the DataCard CD820 Printer data cable is damaged?
Power off the DataCard Printer. Replace the cable if you have a spare. Contact your service provider to order a new data cable.
Why does the printed card have small unprinted areas with DataCard CD820 Printer?
There are several reasons why the printed card has small unprinted areas: * Unprinted cards have scratches. Handle cards carefully. * Cards have embedded particles, an uneven surface, or the card edge has burrs. Use cards that meet the requirements for the printer. * The rollers are dirty or the card packaging contains debris. Run a cleaning card.
What to do if DataCard Printer did not pick a card?
For DataCard Printers with an input hopper, open the input hopper, add or reposition cards, and close the hopper.
What to do if DataCard CD820 Printer did not detect cards in the input hopper?
Add cards to the input hopper of the DataCard Printer.
Why is the printing blurred on my DataCard Printer?
Printing may be blurred due to several reasons: * The cards have a matte, not glossy, finish. Use cards that meet the requirements for the printer. * The rollers are dirty. Run a cleaning card. * The printhead is dirty. Clean the printhead.
What to do if the DataCard CD820 cable is loose?
Reconnect the USB cable to the ports on the PC and the printer. Power the DataCard printer off, and then back on. If the PC and printer still do not communicate, restart the PC.
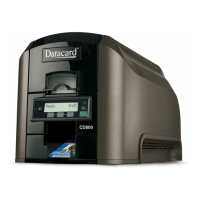
Provides user information for the CD820™ system, covering components, operation, and maintenance tasks.
Defines the target users for this manual, including operators and those responsible for setup.
Lists contact information for technical support in different regions for the CD820 printer.
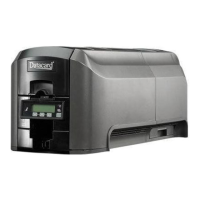
Overview of the card printer's function, capabilities, and optional features like hoppers and modules.
Introduces the main physical parts of the printer, directing users to detailed views.
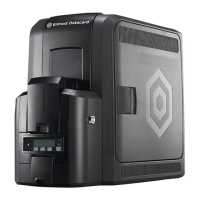
Details the components located on the left side of the printer, including hoppers and connections.
Details the components located on the right side of the printer, including the printhead and reject tray.
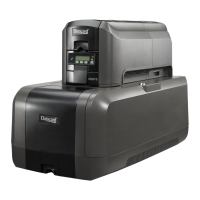
Illustrates and describes the printer configuration featuring a single input card hopper.
Illustrates and describes the printer configuration with an optional multi-hopper system.
Explains the print ribbon cartridge and its components, including the cleaning sleeve.
Describes the information found on the printer's configuration label for service and identification.
Explains the path a card takes through the printer during the issuance process.
Provides a general overview of the card printer system, its components, and its purpose.
Defines the typical roles and responsibilities of operators and system administrators in a card production environment.
Details the functions of the power button, arrow keys, and enter key on the printer's front panel.
Explains the functionality of the USER button and the meaning of its associated status light colors.
Describes the ribbon light's indicators for ribbon status, such as low or out.
Explains the card light's indicators for card status, such as card presence or cleaning needs.
Illustrates the menu structure of the printer's LCD panel for accessing functions and settings.
Provides step-by-step instructions to find the printer's network IP address using the LCD menu.
Guides users on how to print a test card to verify printer functionality and quality.
Instructions for loading blank cards into the single or multi-hopper.
Explains how to insert a single card into the printer using the exception slot.
Step-by-step guide for installing a new print ribbon cartridge into the printer.
Instructions for installing a new cleaning sleeve onto the ribbon cartridge for maintenance.
Detailed steps for correctly installing the assembled print ribbon cartridge into the printer.
Lists prerequisites for printing cards, including loaded cards and ribbon, and correct design setup.
Steps for printing cards using the CardWizard issuance software and sending them to the printer.
Emphasizes regular cleaning for optimal printer performance and condition.
Detailed instructions for cleaning the printer's printhead to ensure print quality.
Guides users on how to use a cleaning card to remove debris from the printer.
Instructions for cleaning the printer when equipped with the optional multi-hopper system.
Outlines the general steps for cleaning the printer, especially after preparing it.
Specific instructions for cleaning the rollers within the multi-hopper system.
Steps to prepare the printer for use after completing maintenance procedures.
Helps identify and isolate issues within the card production system and basic printer functions.
Guides users through specific troubleshooting categories such as installation, card appearance, and ribbon issues.
| Print Technology | Direct-to-card dye-sublimation/resin thermal transfer |
|---|---|
| Print Resolution | 300 dpi |
| Card Input Capacity | 100 cards |
| Power Supply | 100-240 VAC, 50/60 Hz |
| Print Capability | Single- or dual-sided printing |
| Media Size | CR80 (85.6 x 54 mm) |
| Card Output Capacity | 25 cards |
| Connectivity | USB 2.0 |
| Encoding Options | Magnetic stripe, contact smart card, contactless smart card |
| Interface | USB |