Do you have a question about the Dell Force10 C150 and is the answer not in the manual?
Explains graphic symbols used in the document to highlight hazards and provide critical information.
Lists related documentation for the Dell Force10 Operating System (FTOS) for the C-Series.
Summarizes the recommended installation steps for the Dell Force10 C150 system.
Details environmental and physical requirements for the C150 installation site.
Provides instructions on how to prepare and ground the equipment rack for chassis installation.
Highlights safety precautions and guidelines for safely mounting the C150 chassis in a rack.
Step-by-step instructions for physically mounting the C150 chassis into a 19-inch equipment rack.
Details the requirements and functionality of Route Processor Modules (RPMs) for the C150 system.
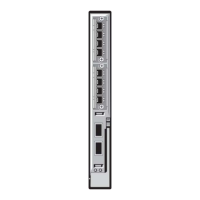
Describes the front panel labels and LED indicators for the RPM, providing status information.
Information on line card installation, hot-swappability, and compatibility notes for the C150 system.
Explains the purpose and installation of blank panels in empty chassis slots for cooling and EMI.
Step-by-step guide for installing RPMs and line cards into the C150 chassis, including lever operation.
Instructions for safely removing RPMs and line cards from the C150 chassis, including lever operation.
Details serial port settings for connecting a terminal or PC to the C150 console port.
Provides pinout configurations for RJ-45 console ports and common adapter types (DB-9, DB-25).
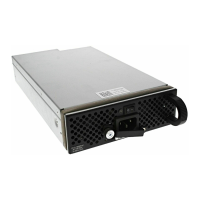
Illustrates the physical location of AC power supply slots within the C150 chassis.
Explains the C-Series capability to transmit power over Ethernet for PoE devices.
Step-by-step guide for installing AC power supply units into the C150 chassis.
Table listing maximum PoE ports supported per AC power supply unit.
Instructions for safely removing AC power supply units from the C150 chassis.
Specifies requirements for AC power cords, including compliance with local electrical codes.
Details input voltage and operating range specifications for DC Power Entry Modules (PEMs).
Explains the configuration for full facility redundancy using two DC PEMs.
Specifies requirements for cables and connectors used with DC PEMs for power source connection.
Step-by-step instructions for installing a DC Power Entry Module (PEM) into the C150 chassis.
Details the meaning and description of the status LED on the DC Power Entry Module (PEM).
Instructions for safely removing a DC Power Entry Module (PEM) from the C150 chassis.
List of essential checks and verifications before supplying power to the C150 system.
Step-by-step instructions for safely powering on the C150 system.
Instructions for installing the fan tray into the C150 chassis.
Describes how fan speed is determined for different C150 fan tray models based on temperature.
Detailed procedure for removing and installing a new fan tray in the C150 system.
Instructions for removing and replacing AC or DC power supply units in the C150.
Describes power-on self-tests, LED indications, and CLI prompt display during system boot.
Explains how to interrupt the boot process and enter BOOT_USER mode for parameter management.
Instructions for inserting a Compact Flash card into the RPM slot for boot and system images.
Procedure for safely removing a Compact Flash card from the RPM, noting the In Use LED status.
Lists conditions that trigger alarms in the C150 system, including major and minor alarms.
Table detailing alarm events, associated LEDs, and how they are reported in the event log.
Provides physical dimensions, weight, and mounting clearance requirements for the C150 chassis.
Details AC and DC input voltage, power consumption, and thermal output for the C150 system.
Information on accessing Dell Force10's iSupport website for technical information and services.
Steps to register, log in, and access support services through the iSupport portal.
Provides contact methods, including website, email, and phone numbers for Dell Force10 Technical Assistance.
Lists essential information required to open a support case, such as model, serial number, and symptom.