KOSMOS User Guide 23
Configuring KOSMOS settings
Configuring KOSMOS settings
Once you’ve configured your system settings, they remain as you set them
whenever you log back on to Kosmos Bridge.
Setting imaging preferences
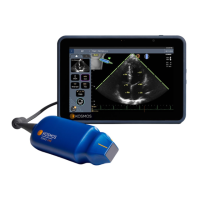
The Imaging Preferences screen is where you can customize the information
Kosmos Bridge displays on the Imaging screen.
To set the imaging preferences:
1. From the Home screen, tap SETTINGS.
2. Tap Imaging Preferences.
3. To have certain information display in the top bar of the Imaging screen, tap
one of the following options under Customize information:
• Name of facility
—Displays the name of your organization in the top bar
of the imaging screen.
• Patient name
—Displays the patient name in the top bar of the imaging
screen.
• Patient ID
—Displays the patient ID in the top bar of the imaging screen.
4. To configure the way KOSMOS records clips, tap one of the following options
under Record clip:
• Retrospective
—Captures frames from the cine buffer when you tap the
Clip icon. KOSMOS captures cine buffer frames for the number of
seconds.
• Prospective
—Captures frames after you tap the Record Clip icon.
KOSMOS captures frames for the number of seconds.
5. To set how long the clips record, select a time from the Clip duration area.
6. To adjust the horizontal screen split between M-Mode and B-mode, select
from the following options under M-Mode layout:
During an exam, if you tap the Record Clip icon again, you can
finish the recording earlier than the clip duration defined here.