Voice Modes (SSB, AM, FM)
Mode Selection
Tap either end of MODE to select LSB/USB,
AM, or FM mode. Holding the left end of this
control, ALT , selects an alternate mode. LSB and
USB are alternates of each other. The alternate for
AM is AM- S (synchronous AM, pg. 31). In FM
mode, ALT enables a repeater offset (pg. 31).
Microphone Selection
The K3S provides both front- and rear-panel mic
jacks. Some operators use rear-panel jacks to
minimize clutter around the front panel. Use
MAIN:MIC SEL to select the front panel (FP) or
rear-panel (RP) jack, low or high mic gain range,
and bias voltage for electret microphones.
The front-panel mic jack is compatible with the
Elecraft MH2, MD2, Proset-K2, and some other 8-
pin mics (see pg. 13 for pinout and bias settings).
The rear-panel jack is 3.5 mm (1/8”). The rear-
panel PTT IN jack can also be used if required.
Voice Monitoring
Voice monitoring allows you to hear the way you’ll
sound on the air with your selected mic gain,
compression, and TX EQ settings. For voice
monitoring without any processing or delays, set
CONFIG:TX MON to FAST.
To set up voice monitoring:
• Hold TEST to put the K3S in TX TEST mode,
so you won’t be transmitting (pg. 13).
• Set MIC high enough to hear your voice.
• Press your mic’s PTT switch or tap XMIT .
• While speaking into the mic, adjust MON for
the desired level. (DVR playback level can be
set differently; see CONFIG:TX DVR).
• Exit transmit (release PTT, or tap XMIT again).
• You can either leave the K3S in TX TEST
mode or go back to normal transmit (hold
TEST) as you follow the instructions in the
next section.
Mic Gain and Compression Settings
See pg. 82 for a general discussion about voice-
mode ALC. To set up mic gain and compression:
• Set the monitor level as described earlier.
• Optionally select TX TEST mode (pg. 13) or
set power to zero. This will not affect your
CMP/A LC bar graph readings.
• Set CMP to 0 .
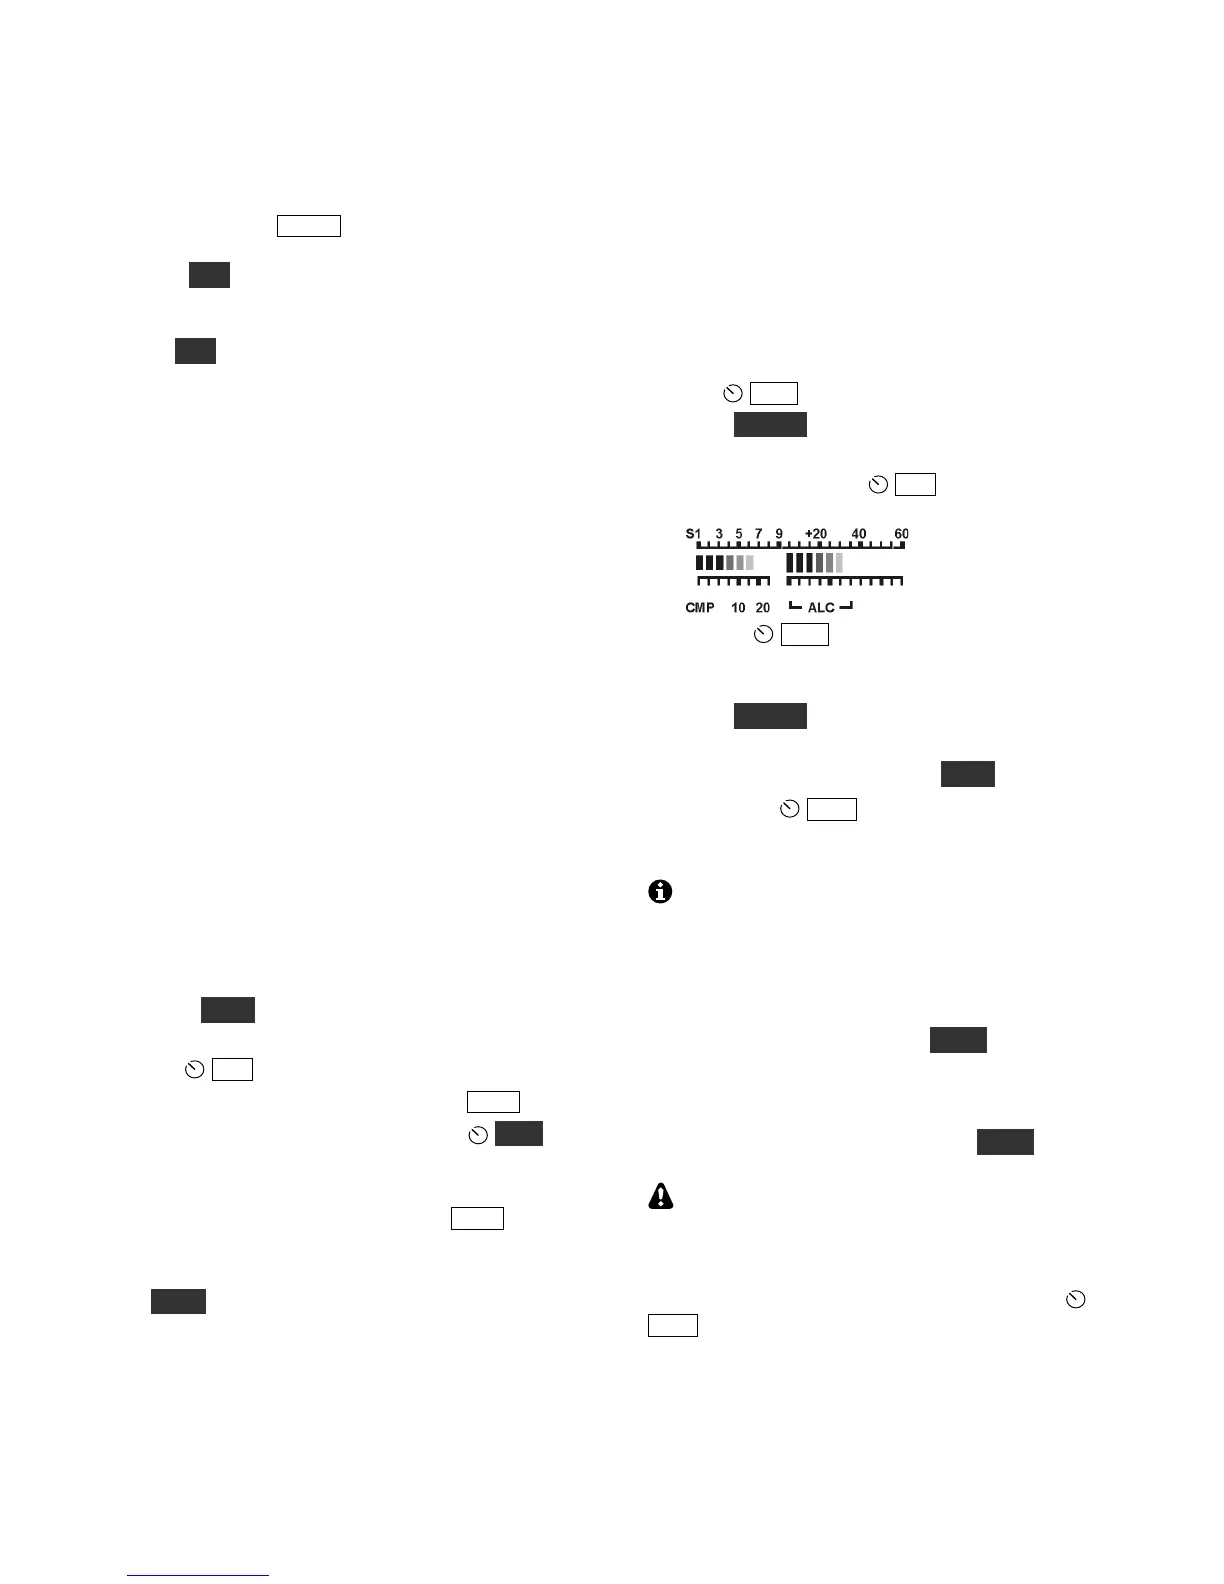
• Hold METER to select CMP/ALC metering.
• While speaking into the microphone in a
normal voice, adjust MIC for a peak ALC
meter indication of about 5-7 bars (see below).
•
• Adjust CMP for the desired speech
compression level while speaking. The CMP
scale shows approximate compression level.
• Hold METER to select S WR/PWR metering.
• If you were in TX TEST mode, return to
normal operation by holding TEST.
• If you had PWR set to 0, set it for the
desired level. Key the rig again and verify that
you have about the right power output level.
You can LOCK the MIC, CMP, and PWR
settings if required; see CONFIG:PWR SET.
Power Level for Voice Modes
Voice power may be slightly different from the CW
power you see in when you use TUNE. Increasing
mic gain cannot correct for this. Instead, use the
CONFIG:TXG VCE menu entry (voice transmit
gain). A value of -1.5 to 1.5 dB should make voice
power about the same as when using TUNE.
If you’re using an external peak-reading
wattmeter, adjust power such that speech peaks
remain at or below your desired power level. The
RF bar graph may not capture all speech peaks, but
your actual output will be close to that set with
PWR.