4. Installation V10k automatic
16
EN
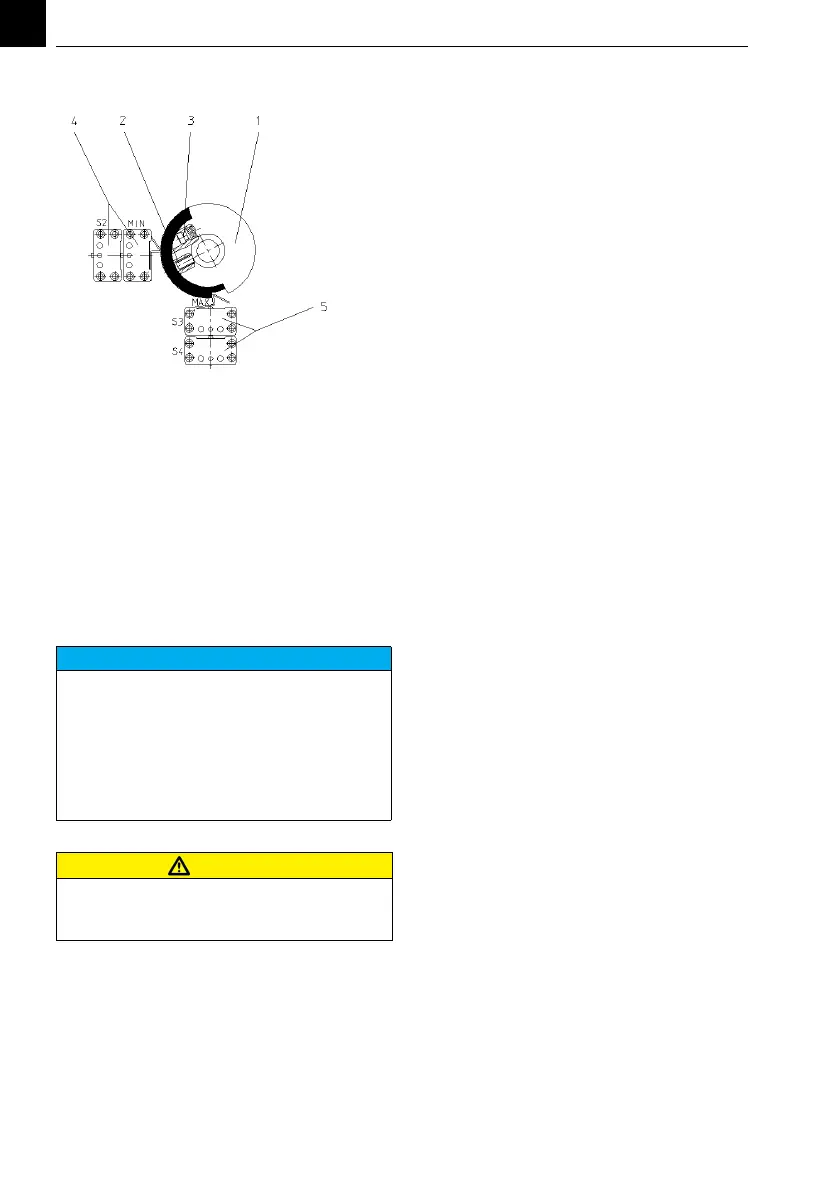
Adjust the reduced MAX limit
1 Set the connecting rod to the desired
max. end switching point, i.e. to the desi-
red, reduced max. dosing rate.
2 Turn the lower part of the cam disk (Pos.
2) by turning the set screw (Pos. 3) until
both MAX switches (Pos. 5) engage audi-
bly. Do not release or turn the cam disk as
a whole as you do this.
3 Then check both end switching points, the
zero setting and reduced max. end swit-
ching point again by displacing the con-
necting rod in Manual mode.
Adjust the feedback potentiometer
Adjustment is necessary, when a new board is
mounted in the positioner or the motor-gear-
unit has been removed or changed.
1 Open the cover (see preparation)
2 Pull off connectors 13/14/15
3 Move the connecting rod fully outside to
the stop.
4 Connect an ohmmeter to the terminals 13
and 14 on the board.
5 Loosen the great output tooth wheel on
the shaft below the cam wheel.
6 Turn the tooth wheel until the ohmmeter
displays between 10 and 30 ohm.
7 Fix the tooth wheel without turning it.
8 Move the connecting rod fully inside to
the stop.
9 Ohmmeter must display resistance smal-
ler than the total resistance of 1kohm
measured between the terminals 13 and
15.
10 Check both adjustments by moving the
connecting rod.
11 Remove the ohmmeter and connect the
terminals 13/14/15 again.
Close the cover
1 Remove the knob, if mounted.
2 Place the cover without damaging the
shaft sealing.
3 Move the connecting rod fully outside.
4 Place the knob on the shaft, turn that the
arrow points to the minimum and fix.
5 Switch to automatic operation (press in
the knob), if necessary turn slightly to let
the tooth wheels match.
6 Switch on and check for function.
4.6 Insert the flowmeter
(preferably only immediately before commis-
sioning to avoid damage to the flowmeter)
1 Mount the spring and the socket from the
accessories set.
2 Apply some silicone grease to the two 'O'-
rings and place them into the grooves.
3 Hold the flowmeter tube in the middle,
the high values at the top, the tip of the
float pointing to the bottom.
4 Place the flowmeter tube onto the lower
'O'-ring, the high values of the scale on
top, press down the lower seat with two
fingers of the other hand, if necessary
press down the lower 'O'-ring with the
flowmeter tube.
5 Position the tube into the upper seat, turn
the tube until the scale is in front and
slowly release the lower seat. Hold the
tube until the tube safely rests on the o-
rings.
NOTICE
With this setting, only the desired, reduced
control range from the zero setting to the
reduced max. end switching point is availa-
ble in Automatic mode. In Manual mode, it
is still possible to set a dosing rate above the
reduced max. end switching point, up to the
maximum possible dosing rate (mechanical
end stop of the connecting rod).
ATTENTION
Switchover from Manual to Automatic mode
may only be carried out with the controller
in fully closed position!