13
AT THE END OF THE WORK
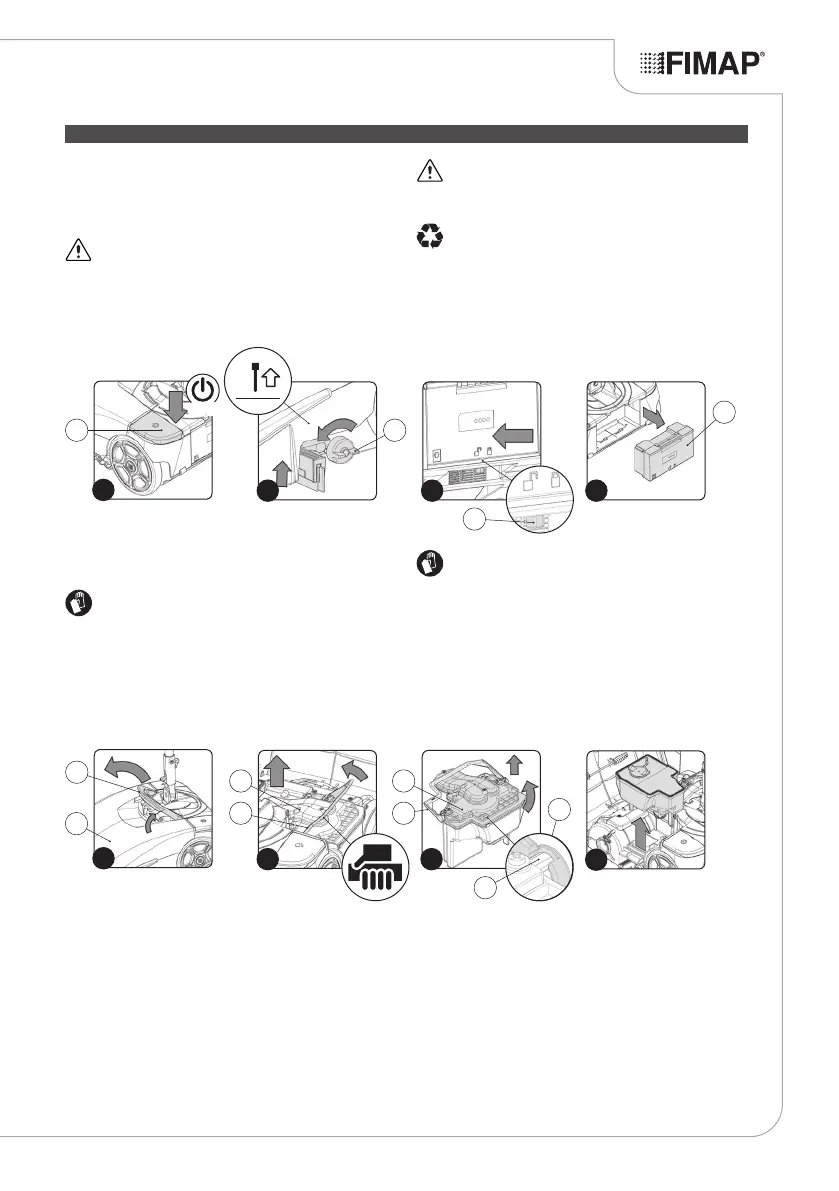
ATTENTION: Fig.2 shows the left side of the device. Rotate
the knob on the right-hand side in the opposite direction.
4. Take the appliance to the dedicated waste water drainage area.
ATTENTION: the place given over to this operation must
comply with current environmental protection regulations.
5. Remove the power battery (3) from the appliance. To free the
battery, shift the stop lever (4) in the direction of the arrow (Fig.3).
6. Remove the battery from the appliance using the handle moulded
on it (Fig.4).
At the end of the work, and before carrying out any type of
maintenance, perform the following operations:
1. Deactivate the appliance using the main switch (1) (Fig.1).
2. Rotate the handlebar so it is vertical.
ATTENTION: during this operation, do not rest your foot on
the appliance.
3. Raise the squeegee off the oor and rotate the knob (2) in the
direction of the arrow (Fig.2).
7. Rotate the front carter (5) as far as it will go - do this with the aid
of the handle (6) (Fig.5).
ATTENTION: these operations must be carried out using
protective gloves to avoid any possible contact with the edges
or tips of metal objects.
8. Remove the recovery tank (7) from the appliance - do this with the
aid of the handle (8) (Fig.6).
9. Remove the recovery tank cover (9), then rotate the handle (8)
completely to free the pin (10) from the clamp (11) (Fig.7).
ATTENTION: protective gloves should always be worn when
handling detergents or acidic or alkaline solutions, to avoid
serious injury to the hands.
10. Empty the tank.
11. Rinse the inside of the tank with a jet of water. If necessary, use a
spatula to remove the sludge that has accumulated at the bottom.
12. Position the recovery tank cover (9) on the tank.
13. Fix the cover on the tank, then rotate the handle (8) completely to
x the pin (10) on the clamp (11).
14. Remove the solution tank from the device (Fig.8).
15. Remove the detergent solution lling cap (12) from its seat on the
solution tank (Fig.9).
16. Empty the tank.
17. Rinse the inside of the tank with a jet of water.
18. Replace the detergent solution lling cap (12) in its seat on the
solution tank (Fig.10)
19. Insert the two tanks in the appliance, positioning rst the solution
tank and then the recovery tank.
20. Rotate the front carter (5) as far as the work position - do this with
the aid of the handle (6) (Fig.11).
21. Block the handlebar in the horizontal position (Fig.12).
1
1
OFF
3
32 4
2
4
6
5
7 9
8 8
11
5
76
10
8