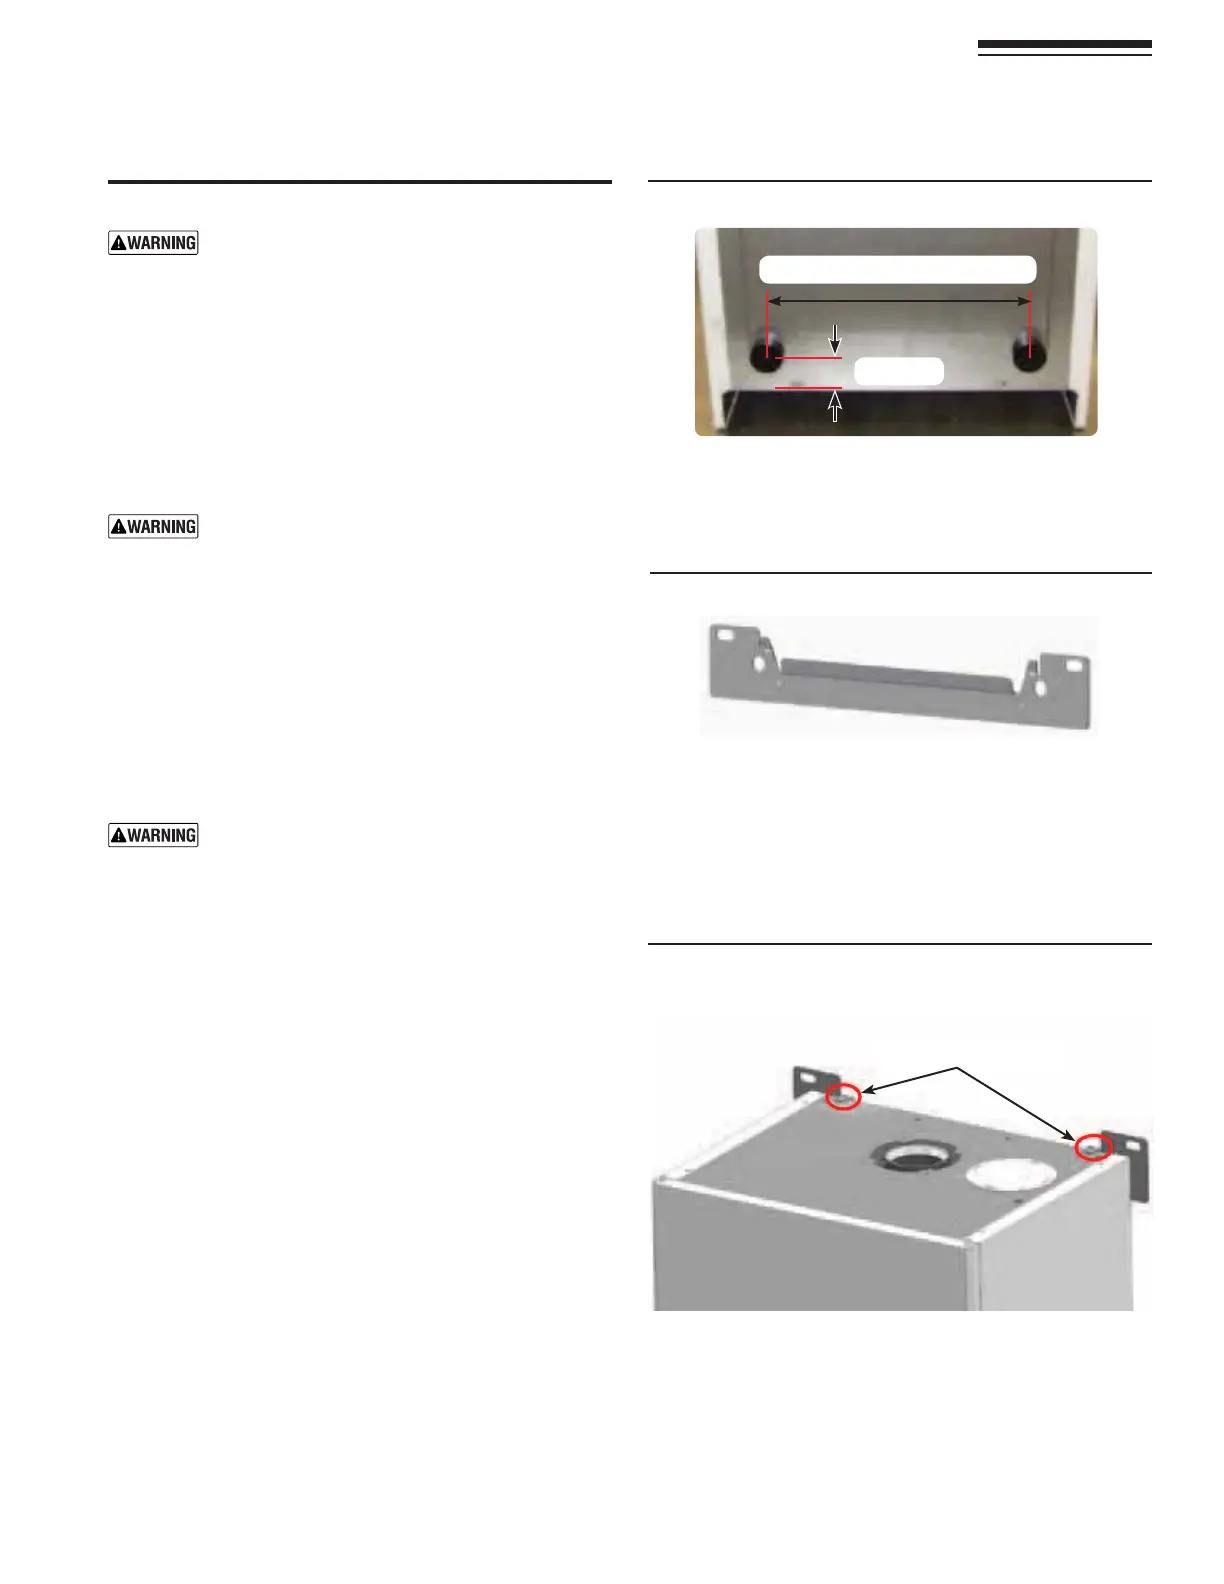
Figure 3 !DDITIONOFRUBBERBUMPERFOR WALLMOUNTING
2 inches
14 inches-center to center of rubber
Part number 550-142-850/0716
9
FreeStyle
®
WALL MOUNT GAS-FIRED WATER BOILER — Boiler Manual
5. Remove the mounting bracket and drill holes 1/4” diameter
by 3 inches deep, centered on the screw slot outlines. (For
metal stud walls, using 3/16” toggle bolts, drill required
clearance holes.)
Place boiler on bracket
1. 4HEWALLMOUNTBRACKETMUSTBEINSTALLEDBEFOREMOUNTING
the boiler.
2. !FTERINSTALLING THE BOILERON THE MOUNTINGBRACKETBEND
down the two (2) tabs in order to secure boiler in place,
see Figure 5.
3 Prepare boiler continued
Wall-mounting requirements
DO NOT attempt to attach the wall mount bracket
using anchors or any means other than directly
securing to the wall studs (or equivalent wood
STRUCTUREIFSTUDSARENOTONINCHCENTERS
4HEWALLMUSTBEVERTICALLYPLUMBANDCAPABLE
OFCARRYINGTHEWEIGHTOFTHEBOILERANDANYAT-
TACHEDPIPINGCOMPONENTS
.
4HEOPERATING WEIGHT FOR WALLMOUNTABLE BOILERSARE
FreeStyle
®
80: POUNDS
FreeStyle
®
120: POUNDS
FreeStyle
®
155: POUNDS
Failure to comply with above and the procedure
given below could result in severe personal injury,
death or substantial property damage.
1. 3TUDSPACING"RACKETHOLESARESPACEDFORSTUDSONINCH
centers. For other stud spacing, provide secure, solid mounting
SURFACEONWHICHTOATTACHTHEBOILERWALLMOUNTINGBRACKET
2. Wood stud wall: Install bracket with lag screws (3/8” x 3”)
included in kit, only into the studs.
3. -ETALSTUDWALL3ECUREBRACKETANDSPACERBOARDTOSTUDS
with 3/16-inch toggle bolts and 3/16-inch flat washers (not
included with kit).
4. Concrete or block wall: Secure wall bracket with approved
BOLTSFORTHATAPPLICATION
6ERIFYTHATTHESTUDSARESUITABLEFORCARRYINGAWALL
mounted load. Some metal studs are not designed
FORTHISPURPOSE
5. )FTHEMOUNTINGWALLHASEXPOSEDSTUDSINSTALLERMUSTPROVIDE
a backer board to mount boiler. Boiler cannot be leveled
WITHOUTABACKINGSURFACE
6. -OUNTTHEBOILERONTHEWALLFOLLOWINGTHESEINSTRUCTIONS
The boiler mounting studs must engage with the wall-mount
BRACKET-AKESURETHEBRACKETISNOTJUSTRESTINGONTHEEDGE
OFTHEMOUNTINGSTUDORWASHER0ERFORMALLPROCEDURESGIVEN
INTHE "OILER -ANUALON PREVIOUS PAGES BEFOREMOUNTING
the boiler.
Install rubber bumpers to back of boiler
1. 2EMOVESUPPLIEDRUBBERBUMPERSFROMPLASTICBAGANDMEA-
SUREACROSSINCHESANDUPINCHESFROMTHEBACKOFTHE
BOILERBOTTOMEDGE-ARKTHESETWOLOCATIONSANDPEELOFF
ADHESIVEPROTECTIONFROMTHERUBBERBUMPERSANDMOUNT
the two according to the directions in Figure 3.
2. DO NOT drill holes to mount the rubber bumpers
Install the wall-mount bracket
1. Locate the studs — must be on 16-inch centers. See previ-
OUSINSTRUCTIONSIFSTUDSARENOTONINCHCENTERS
2. Place the wall-mount bracket Figure 4, below on the wall,
using a level to align correctly.
3. Place the wall-mount bracket so the mounting slots are
centered over the studs.
4. ,EVELTHEBRACKETANDTRACETHEOUTLINEOFTHESCREWSLOTS
with a pencil.
Figure 4 7ALLMOUNTBRACKET
Figure 5 7ALLMOUNTBRACKETTABSBENDOVERBOILERTO
SECUREBOILERINPLACE
6. Position the wall-mount bracket on the wall. Insert and
LOOSELYTIGHTENTHETWOLAGSCREWSORTOGGLEBOLTSFOR
metal studs).
7. Level the wall-mounting bracket. Then tighten lag screws
securely. For drywall or plaster lathe installations, avoid
tightening so much that the bracket digs into the wall
SURFACE
Bend tabs after installation