EN
FRIGOMAT KREAM 2.5 E M04.37389 R.2022.03.30 9
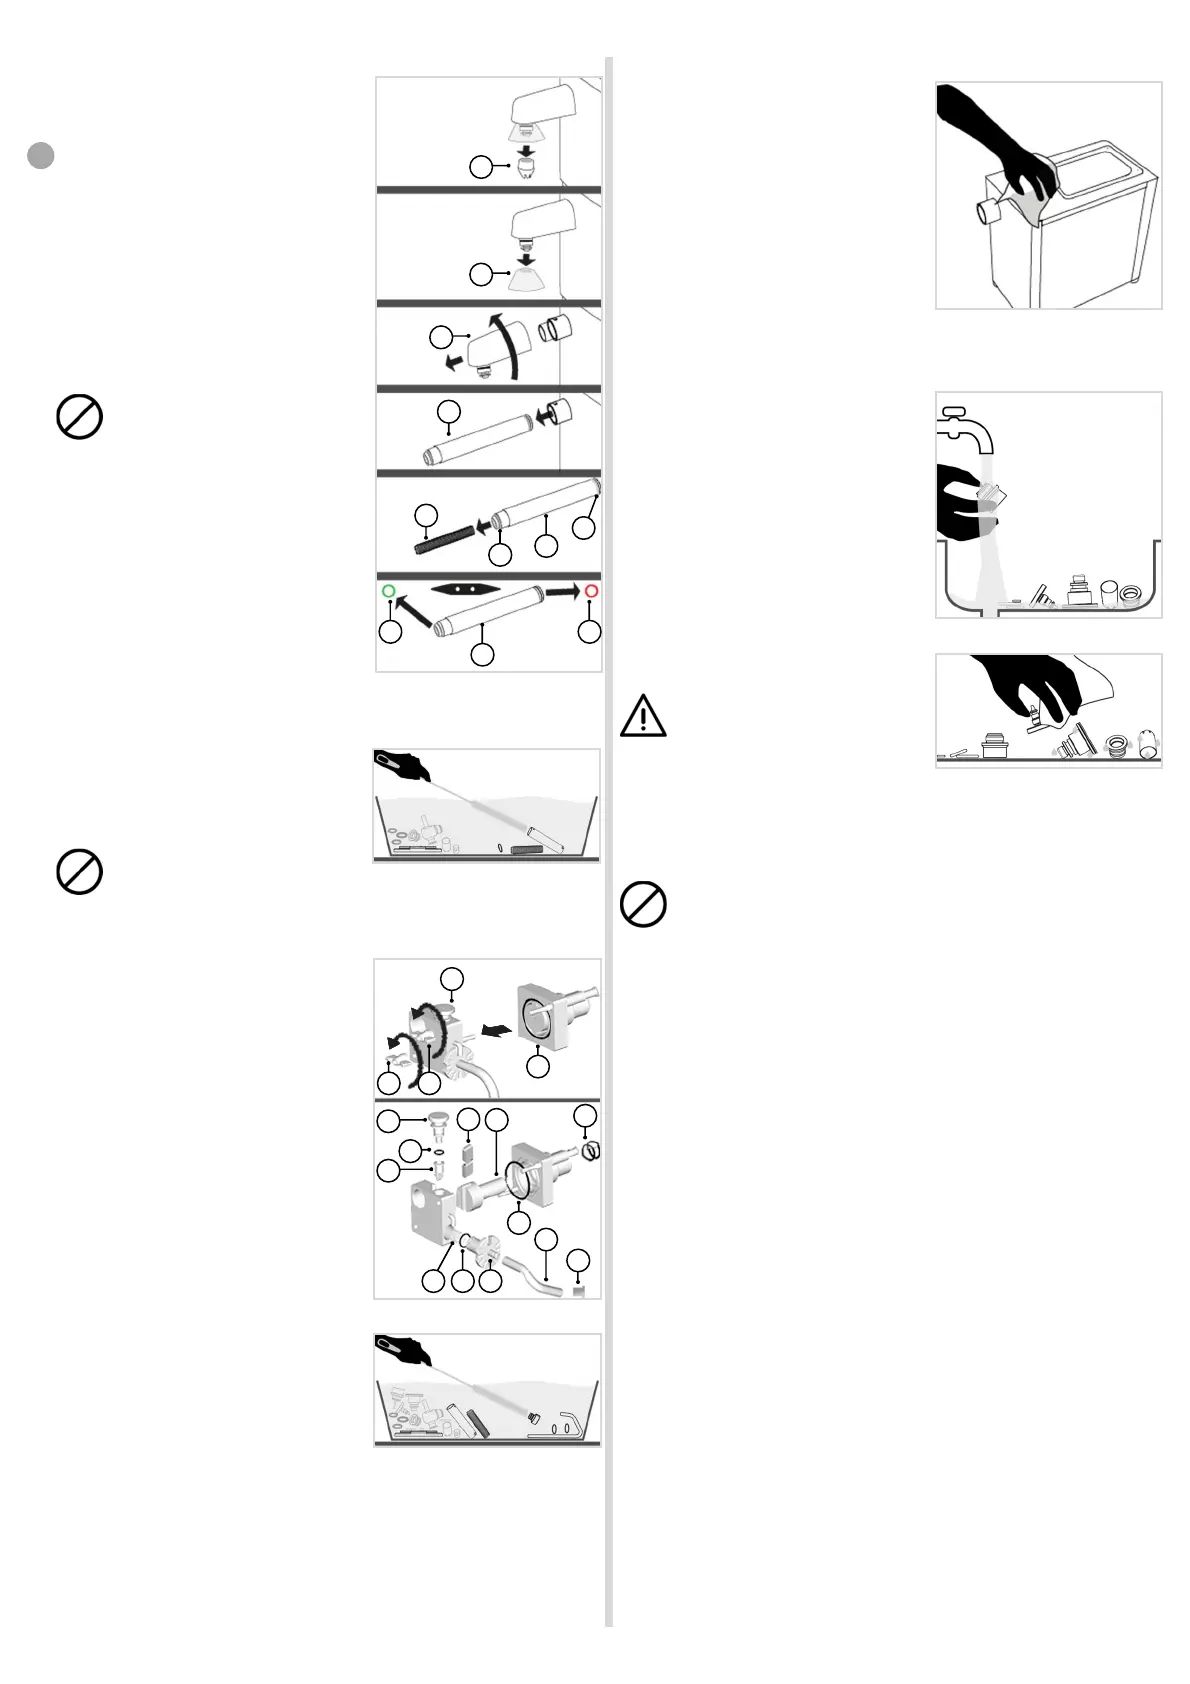
Remove and cleaning of the nozzle, of the labyrinth cover and of the
labyrinth
Wash your hands well and/or wear
disposable gloves.
Pull down the star nozzle (fig.IV/07 "a")
Pull down the splash guard (fig.IV/07 "b")
Turn the nozzle body counterclockwise
(fig.III/06 "c") and pull it towards you to
remove it from its seat.
Remove the labyrinth cover (fig.IV/07 "d")
Remove the labyrinth (fig.III/06 "e”) from the
labirynth cover (fig.III/06 "d”).
Remove the gaskets (fig.IV/07 “h, g”) using
the O-Ring disassembling tool.
Pay attention to the positioning of
the RED and GREEN gaskets on
the labyrinth cover in order to
correctly reassemble the labyrinth
cover.
Emerge the previously disassembled
components into the tub with the sanitizer
and brush the surfaces with care. Pay
special attention to the internal ducts and to
the labyrinth notches (fig.IV/08).).
All the parts previously
disassembled must remain immersed in the sanitizing
solution for the time provided by the sanitizer
manufacturer.
Remove and cleaning of the pump
Wash your hands well and/or wear
disposable gloves.
Unscrew the two knobs (fig.IV/09 "a")
Remove the cover (fig.IV/09 "b") from the
pump body (fig.IV/09 "c").
Remove the rotor (fig.IV/09 "d") with the
scraper (fig.IV/09 "e") and the gaskets
(fig.IV/09 “f, g”).
Remove the shutter (fig.IV/09 "h"), the rub-
ber non-return valve out (fig.IV/09 "i") and
the gasket (fig.IV/09 "k").
Remove the cream regulator (fig.IV/09 "l")
with relevant spring (fig.IV/09 "m") and
gasket (fig.IV/09 "n"), the suction hose
(fig.IV/09 “o”) and the suction tube head
(fig.IV/22 “p”).
Emerge the previously disassembled
components into the tub with the sanitizer
and brush the surfaces with care. Pay
special attention to the internal ducts
(fig.IV/10).
1.3 Sanitizing fixing parts
Immerse a disposable paper cloth in the
sanitizing liquid.
Pass the cloth over all the internal surfaces
of the main compartment. Also pass the
cloth over the external surfaces (fig.IV/11).
1.4 Rinsing and drying
Wash your hands well and/or wear
disposable gloves.
Remove from the washing tub all the
components which were previously
disassembled, immersed and brushed.
Rinse the components with plenty of cold
drinking water, taking care to remove all
possible residues of sanitizing solution
(fig.IV/12).
Also carefully rinse the fixed parts of the
machine which were treated with the
sanitizing solution.
Dry with disposable paper (fig. IV/13).
Do not use rags, sponges or
anything else to dry the
components. Make sure no dust or
other impurities come into contact with
the sanitized surfaces while they are
drying.
When all the components are dry, put them back onto the machine making
sure the gaskets and scrapers are in good conditions. If there is evidence of
excessive wear or damage, replace them.
To mount the pump again, follow the opposite sequence, re-
member to apply a thin layer of specific FRIGOMAT lubricant on
the rotor.
2 MAINTENANCE
2.1 Original spare parts
For spare parts ordering, always mention the corresponding code number
and the name reported on each table caption.
The manufacturer declines any liability for damages to people and/or things
due to employment of non-original spare parts.
2.2 Exploded view for the operator, kit and spare parts supplied
See next page diagram.
fig.IV/10
fig.IV/12
fig.IV/13
fig.IV/09
b
a a
d
e
p
o
n m
c
h
i
k
l
f
g
a
b
c
d
e
d
fig.IV/07
f g
RED/ROSSO
ROUGE/ROT/ROJA
f
g
d
GREEN/VERDE
VERT/GRUN
fig.IV/08
fig.IV/11