K0430 Issue No. 2 4
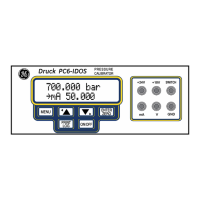
HARD KEY FUNCTIONS (Fig. 1)
* These key functions are not available in BASIC mode
Key Function
Page
reference
I/O
This key selects the instrument ON and OFF. 7
SETUP*
The
SETUP
key provides access to the instrument’s general
configuration parameters that are set-up to certain default
parameters on delivery.
36
ZERO
The
ZERO
key zeroes either the selected input or output display, only if
the display reading is within 5% of zero. Attempts to zero a larger
offset result in an error message,
Zero too large.
9
INPUT*
The
INPUT
key selects the input parameter to be displayed. 18, 19
TASK
The
TASK
key rapidly configures the instrument for a number of
different types of external device calibration. There are twenty task
configurations available, eleven pre-programmed configurations and
nine user defined configurations
10
OUTPUT*
The
OUTPUT
key selects the output parameter to be displayed. 24-27
STORE*
Depending upon how the instrument’s
STORE
mode is set-up, this key
is used either to store up to 20 display screens (in
SNAPSHOT
mode),
or to manually log a screen in
DATALOG
mode.
29, 36
RECALL*
This key recalls a previously stored screen to the display. Depending
on the
STORE
mode set-up, operation of this key recalls either the
snapshot of a previously stored screen or data log file. In
STORE
mode, selection displays the last screen stored. By using the cursor
keys, the operator can scroll either forward or back through memory
locations.
28, 31, 35
ENTER
The
ENTER
key either enters data (accept entered data), or, in
conjunction with the soft keys, accepts a given selection.
2
EXIT
The
EXIT
key operates in conjunction with all the other hard and soft
keys to exit from the current screen or menu level, to the level
immediately preceding it. To quit completely from any menu level,
press
EXIT
until the
MEASURE/SOURCE
screen is displayed.
2
INTRODUCTION Summary of Functions
 Loading...