6 - [EN] English
K405 Issue 3
Table 5: (Part of table) Menu options - Settings (Output)
Table 6: Additional data for Settings (Output):
Operation
This section gives examples of how to connect and use the
instrument. Before you start:
• Read and understand the “Safety” section.
• Do not use a damaged instrument.
Operation - Electrical connections
To prevent instrument errors, make sure that the electrical
c
onnec
tions (A1-item 10 and/or A2) are correct.
Operation - Communications port connections
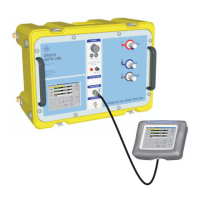
Use the communications port (A1 - item 9) to attach an
IDOS Univ
ersal Measurement Module (UMM).
When you attach the cable from a UMM (Figure 13/14), the
instrument automatically changes the menus to give you
all the applicable options (Table 2/3).
Operation - Change the output values
When the output operation is set up (Table 5), use one of
these procedures to change the output values:
Table 7: Procedures to change the output
Example procedure (“Nudge” output):
Options
(If applicable)
Description
To select and set up values for the “Span Check”
output. Example output cycle:
This cycle repeats
automatically.
Additional data (Table 6): Select Settings (■ ■)
% Step
To select and set up values for the “% Step” output.
Example output cycle:
Auto Repeat - Optional
Additional data (Table 6): Select Settings (■ ■)
... Step
To select and set up values for the “Defined Step”
output. Example output cycle:
Auto Repeat - Optional
Additional data (Table 6): Select Settings (■ ■)
To select and set up values for the “Ramp” output.
Example output cycle:
Auto Repeat - Optional
Additional data (Table 6): Select Settings (■ ■)
Item Value
Span Check
Low (0%) Set the 0% value.
High (100%) Set the 100% value.
Dwell (d) Set the period (Hours:Minutes:Seconds) between
each change in value.
% Step Low (0%), High (100%), Dwell (d): As above.
Step Size (s) ...
%
Set the change in value for each step as a
percentage of the full-scale range (High - Low).
Defined Step Low (0%), High (100%), Dwell (d): As above.
Step Size (s) Set the change in value for each step.
Example: 1.000 mA steps.
Ramp Low (0%), High (100%), Dwell (d): As above.
Travel (t) Set the period (Hours:Minutes:Seconds) to go from
the Low (0%) value to the High (100%) value.
Auto Repeat If applicable, select this item to repeat a cycle
continuously.
The Help button (A3 - Item 25) shows a connection
diagram for the task selections you have set.
Output Procedure
Select Edit (■ ■) and/or use the ▲ ▼ buttons.
See the example below.
,
Select Start/Stop (■ ■) or use the ▲ ▼ buttons
to make the step changes manually.
Select Start/Stop (■ ■).
Display:
mA output
1 Edit 23Edit 4
■ ■ ■ ■
▲
▼
+01.000
Sk1 = Edit
Sk2 = Settings
Display:
mA output
56
▲
▼
2.000
▲
▼
3.000
Increment = 1.000
(Table 5)
 Loading...
