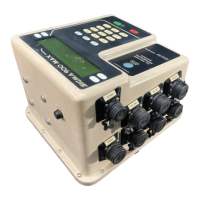
Page 60
Final Check List
8837prgwrk.fm
Section 6
6.5 Final Check List
For Storm Water Setup
• Intake tubing must slope downward from the sampler to the source—no
loops or dips.
• Does the pump create a lift? If not:
• Did you secure the anchor strainer to prevent the flow velocity from
lifting the strainer to the water surface and exposing it to air?
• Make sure the anchor strainer is submerged in channel.
• Check all intake and pump tubing connections, especially the Teflon
Connection Kit (Cat. No. 2186) for vacuum leaks at the connection
points.
• Did you calibrate the sample volume?
• When the starting conditions occur, will the anchor strainer be
submerged? (i.e. when starting on a level of 0.5 inches).
If this example was for a circular pipe, the anchor strainer would not be
submerged because the Teflon/Stainless Steel anchor strainer is
0.84 inches in diameter.
Note: A shallow depth, 0.406 in. diameter anchor strainer (Cat. No. 2071) is
available for low flow applications.
• Does the distributor deposit samples in the bottle?
• Press the
Start Program key; this will cause the distributor to seek
bottle #1.
• Press the
Change/Halt key.
• With the program halted, press the
Take Sample key.
• Press the
Bottle Advance key.
• Press the
Take Sample key again.
• Remove the controller from the bottle tray. Are samples in bottle #1
and #2?
• If the sampler is being powered by a battery, is the battery fully charged?
• Are the knobs on the liquid sensor and pump cover hand tight?
• Make sure the sampler is level.
• Before leaving, make sure the display reads
PROGRAM RUNNING.

 Loading...