How to fix the screen contrast or intensity that is too low on Hach Laboratory Equipment?
- VvmasonSep 23, 2025
While in the Methods menu, press the 0 to darken, and/or 7 to lighten until the desired screen intensity and contrast is obtained.
How to fix the screen contrast or intensity that is too low on Hach Laboratory Equipment?
While in the Methods menu, press the 0 to darken, and/or 7 to lighten until the desired screen intensity and contrast is obtained.
What to do if titrant leaks from Hach AutoCAT 9000 Laboratory Equipment?
Titrant leaks often mean a tubing connector isn't tightened enough or the burette seals are faulty. Try tightening the leaking tube connection. If it's damaged, replace the tubing. Also, check the burette seals; if they're leaking, replace the burette.
Why titrant doesn’t flow through tubing in Hach AutoCAT 9000?
If titrant isn't flowing, it could be due to a loose tubing connection. Make sure the inlet tube for the titrant is secure and below the surface of the titrant solution inside the titrant bottle. Check that all tubing connections are tight and replace any damaged or stripped connections.
What to do if I see air bubbles trapped in the lines of Hach AutoCAT 9000 Laboratory Equipment?
Air bubbles might be trapped during titrant installation or sucked in through loose tubing connections. Ensure the titrant inlet tube is secure and submerged in the titrant solution. Verify all tubing connections are tight, replacing any damaged ones. Use the 'Flush' function under Titrants>Burette functions. While flushing, gently tap the tubing to help purge the air bubbles.
What to do if the concentration for a known standard solution obtained using the Hach AutoCAT 9000 Laboratory Equipment does not match its actual value?
If the measured concentration doesn't match the actual value, the titrant concentration entered in the instrument may be incorrect, or the wrong sample volume was entered. Verify the correct titrant concentration and units are entered. Confirm the correct sample volume is entered. Restandardize the titrant using the embedded calibration procedure. You can also replace the current bottle of titrant with a fresh one and enter the proper concentration for the new titrant.
Why the fitted end points are poor on Hach Laboratory Equipment?
The titration curve may be very poorly shaped or very noisy. In this case, use the manual end point determination.
How to make the Hach AutoCAT 9000 titration curve stop later after the end point?
Increase the fraction of points before the end point (Methods>Method library> “method“ Titr.>Auto-scaling Yes> Fraction before EP).
How to make the Hach AutoCAT 9000 Laboratory Equipment titration curve stop sooner after the end point?
Decrease the fraction of points before the end point by going to Methods>Method library> “method“ Titr.>Auto-scaling Yes> Fraction before EP.
Why are Hach AutoCAT 9000 Laboratory Equipment titration curves fairly asymmetrical?
AEPD works best with symmetrical titration curves, which usually mean the data collection parameters are fully optimized. Adjust the data collection parameters to promote collection of a symmetrical titration curve. You can also use the zoom window cursors to restrict the end point determination to a symmetrical region about the end point.
What to do if the instrument displays a message asking the user to change the data point range on Hach AutoCAT 9000?
This message appears because AEPD needs at least six points on each side of the end point for linear segments in regression analysis. If AEPD can't find six points, it stops. To fix this, use the manual end point determination routine (MEPD), select a wider symmetrical region about the end point with the zoom window cursors, and reduce the volume increment to collect more data points. Adjusting other data collection parameters might also help to get a symmetrical titration curve.
Explains signal words (Danger, Caution, Note) used for hazard communication.
Advises reading all labels and tags for safety information.
Details titration methods, measuring ranges, and printout options.
Covers results display, storage capacity, and sample list capabilities.
Includes burette, inputs/outputs, general specs, power, and environmental conditions.
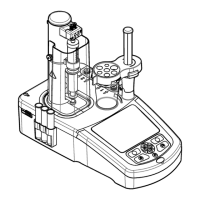
Provides an overview of the AutoCAT 9000 and its capabilities.
Outlines the step-by-step process for setting up the instrument.
Details the procedure for removing and inspecting instrument components.
Explains the different user access levels (Supervisor and Routine).
Specifies the recommended ambient conditions for instrument operation.
Guides the physical assembly of the instrument, including bottle holder, electrodes, and burette.
Explains the instrument's display, keypad layout, and basic navigation.
Describes the main menu structure and navigation within the AutoCAT software.
Covers essential system settings like supervisor code, user ID, language, and time.
Explains how to use the Edition feature for multi-tasking during procedures.
Details how to use Sub-IDs for storing optimized parameters for different sample points.
Guides the user on how to enter supervisor mode for software setup.
Details the software steps for installing electrodes and temperature sensors.
Explains the software procedures for installing the burette.
Covers the software steps for installing or switching titrants.
Guides on how to input or calibrate the titrant concentration.
Explains how to download COA for reagent concentration details.
Introduces the various amperometric methods supported by the instrument.
Details the three main stages of titration: data collection, endpoint determination, and calculation.
Covers parameters like Current Range, Volume Increment, Predose, and Auto-scaling.
Explains Manual (MEPD), Automatic (AEPD), and Auto Detection for finding the endpoint.
Lists parameters like Titrant Concentration, Sample Volume, Dilution, and Reductant Concentration.
Details methods for calculating the mean and standard deviation of results.
Explains how to retrieve and view stored analysis results from the GLP archives.
Step-by-step guide for calibrating the PAO titrant for forward titration.
Guide for calibrating the iodine titrant for back titration.
Discusses factors affecting chlorine sample stability and measurement.
Details how to prepare sample containers to avoid chlorine demand.
Provides guidelines for handling and storing samples for analysis.
Describes the sample preparation steps specific to back titration methods.
Procedure for calculating the yield of a chlorine dioxide generator.
Method for determining chlorine dioxide concentration via forward titration.
Procedure for measuring free chlorine concentration using forward titration.
Method for determining total chlorine using back titration.
Procedure for measuring total chlorine via forward titration.
Method for determining sulfite concentration using back titration.
Procedure for determining total oxidants using a two-step titration.
Method for determining chlorite concentration using a two-step titration.
Guidelines for manually determining titration endpoints.
Covers general protection, display care, and cleaning of the instrument.
Provides a schedule for routine maintenance tasks.
Step-by-step instructions for replacing the primary fuse.
Addresses power, display, leaks, and flow issues.
Covers curve quality, speed, and automated endpoint determination problems.
Troubleshooting for result accuracy and instrument warning indicators.
Explains fundamental concepts of redox reactions and reaction measurement.
Discusses factors affecting chlorine analysis, like electrode deposition and nitrite.
Details errors related to the iodide/triiodide reaction in total chlorine analysis.
Explains how sample iodine demand affects titration endpoints.
Discusses the importance of reagent addition order for saline water samples.
Guides on connecting and configuring the printer for analysis reports.
Details how to configure printout options like Title, Detail, Curve, and Line Fit.
Lists part numbers for common replacement components of the instrument.
Lists available optional accessories for the AutoCAT 9000.
Discusses practical limitations and recommendations for preparing low-level chlorine standards.
Explains how to verify standard accuracy using reference methods or standard additions.
Describes the study conducted to assess the instrument's performance at low chlorine ranges.
Details the determination of Method Detection Limit (MDL), accuracy, and precision.
Provides guidance on sample handling and electrode performance for accurate measurements.
Information about Hach Company's customer service and support.
Lists safety certifications and EMC/immunity standards met by the instrument.
Details compliance with emissions standards for electrical equipment.
Provides contact details and required information for placing orders.
Contact information for technical and customer support in the USA.
Information on how to contact Hach for international support and dealer locations.
Instructions and contact information for obtaining repair services.
Details the one-year warranty period and coverage limitations.
Outlines the exclusive remedies available for warranty breaches.
| Model | AutoCAT 9000 |
|---|---|
| Category | Laboratory Equipment |
| Power Supply | 100-240 VAC, 50/60 Hz |
| Operating Temperature | 5-40°C |
| Accuracy | ±2% of reading |
| Outputs | USB, RS-232 |
| Weight | 10 kg |
| Connectivity | USB, Ethernet |

