Operating Environment
50081_Assembly.fm Page 19
2.2.6 Installing the Electrode
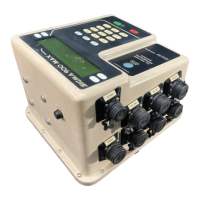
Figure 3 AutoCAT 9000 Workstation Cable Connections
2.2.7 Power Connection
A UL/CSA-approved 125-V ac power cord (Cat. No. 18010-00) is supplied with the North
American AutoCAT 9000 models.
To power North American AutoCAT 9000 models with 230 V ac, replace the supplied 125-V
ac power cord with a UL/CSA approved 230-V ac power cord. See section Section 3.3.6
Selecting the ac Power Frequency on page 28 for configuration settings.
Plug the power cord into the back panel of the instrument and connect the power cord to the
proper outlet. See Figure 3.
After assembly is complete, perform the steps in Section 3 on page 23 to enter basic user
information in preparation for performing analyses to comply with Good Laboratory
Practices. Refer to Section 4 on page 33 for the software setup required prior to
performing analyses. The software setup in Section 4 must be completed before any
analyses can be performed.
1. Remove the protective cap from the electrode.
2. Insert the electrode into a large hole (opposite the plastic anti-diffusion
tip) on the electrode head.
3. Turn the electrode ¼-turn clockwise to lock the collar in place.
4. Connect the cable to the BNC connector on the back of the instrument
(see Figure 3 on page 19).
Note: The electrode must be installed opposite the plastic anti-diffusion tip to
allow maximum mixing of the titrant before the reaction is sensed
by the electrode.
Legend
Number Item Name
1 PC/Printer
2Local
3Electrode
4 Temperature Sensor
5 Power
6 Fuse Access
7 ON/OFF Switch
 Loading...