Operating Environment
50081_Assembly.fm Page 17
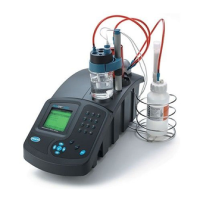
2.2.4 Assembling the Burette
4. Push the long section of exposed titrant pick-up tubing through the
remaining connection point on the bottle stopper and into the titrant
bottle. Thread the tubing connector into the bottle stopper.
5. Thread the opposite connector into the corresponding receptacle on the
rotating valve.
Note: Make sure that the tubing is connected to the correct point on the rotating
valve as indicated by the “bottle” icon.
6. The plastic anti-diffusion tip is pre-assembled onto the beaker supply
tubing. Thread the tubing connector into the corresponding receptacle
on the rotating valve.
7. Insert the plastic anti-diffusion tip into a small hole on the electrode
head. Turn the locking collar ¼-turn clockwise to lock it in place.
Note: Make sure that the tubing is connected to the correct point on the rotating
valve, indicated by the “beaker” icon.
1. Use the metal key to gently pull the piston plunger downward until it
protrudes slightly below the bottom of the burette.
Note: The bottom lip of the cylinder will offer only SLIGHT resistance. Do not pull
the plunger out completely. It it is inadvertently removed it may be carefully
pushed back into the cylinder. After reinsertion, closely monitor the
integrity of the seals after titrant is installed.
2. Place the burette on a flat surface and press the burette downward until
the piston shaft is flush with the bottom of the burette.
Note: Piston position is essential to proper instrument operation. Refer to the
illustration (left) for the correct position.
Piston
Travel
 Loading...