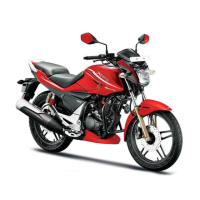
(4) Integrated brake arm (5) First adjuster nut
(i) Decrease free play (ii) Increase free play
Adjustment
•
Push the integrated brake arm (4) by hand
in the direction as shown.
(b) Front brake cable (A) on “F” side
(c) Integrated brake cable (B) on “C” side
•
Push the integrated brake arm (4) by hand
in the direction as shown.
•
Turn the first adjuster nut (5) till you cannot
turn it by hand.
•
Turn the second adjuster nut (6) until a gap
•
After ensuring the gap, turn the second
adjuster nut counterclockwise by half rotation.
•
Check the free play of Front brake lever.
FREE PLAY: 10-20 mm
•
If the free play is more than 20 mm further
turn the adjuster nut to obtain desired free
play.
Adjustment
•
is created between joint (7) and the slot
on the first side in integrated brake arm.
(6) S econd adjuster nut (7)Joint
(i) Decrease free play (ii) Increase free play
(d) Rear brake inspection
Adjustment
•
• Park the vehicle on its main stand.
NOTE
“F” & “C” is marked on integrated brake arm.
41
(1) Rear brake pedal
(2) Free play: 20-30 mm
(i)
(ii)
A
4
5
F
C
B
6
(i)
(ii)
7
F
C
2
1