EasyManua.ls Logo

HIKVISION Castle/Pyronix Euro 280 User Manual

HIKVISION Castle/Pyronix Euro 280
52 pages
To Next Page IconTo Next Page
Page #1 background imageLoading...
Page #1 background image
(Different case sizes available)
For use with EURO 280 software: Version 9.51 or
above
EURO 280
Installation Manual
Security Grade (SG) 3
Environment Class
(
EC
)
II
For Castle/Pyronix Technical Support please call:
08456 434 999 (local rate) or:
01709 535 225
or visit:
www.pyronix.com
When calling Technical Support, please have ready
your software version number. This will enable the
correct advice to be given for your panel and can be
found in the engineer menu under ‘software
revisions’.
RINS1862-5

Table of Contents

Question and Answer IconNeed help?

Do you have a question about the HIKVISION Castle/Pyronix Euro 280 and is the answer not in the manual?

HIKVISION Castle/Pyronix Euro 280 Specifications

General IconGeneral
BrandHIKVISION
ModelCastle/Pyronix Euro 280
CategorySecurity System
LanguageEnglish

Summary

System Overview

System Overview

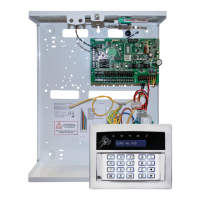
Overview of the EURO 280 panel features and capabilities.

The Devices

Details the different devices compatible with the EURO 280 system.

EURO 280 Input Mapping Table

Maps input addresses to specific devices and input numbers for the EURO 280.

EURO 280 Output Mapping Table

Maps output addresses to specific devices and output numbers for the EURO 280.

Installation

Important Installation Notes

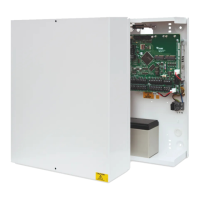
Key guidelines and safety precautions for installing the EURO 280 control panel.

Battery Connection

Instructions for connecting the backup battery for system power.

AC Mains Supply Connection

Details on how to connect the AC mains power supply to the control panel.

Engineer Keypad Connection

How to connect an engineer keypad for direct menu access.

Input Connections

Default Grade 2 DEOL Input Wiring

Wiring example for Grade 2 Double End of Line input configuration.

Grade 3 Mask/Fault Input Wiring

Wiring example for Grade 3 Mask/Fault input configuration.

Output (PGM) Connections

Negative Applied Wiring

Wiring method for negative applied output configuration.

Positive Applied Wiring

Wiring method for positive applied output configuration.

External Sounder Connections

Grade 3 External Sounder Wiring

Wiring guide for Grade 3 external sounders.

Grade 2 External Sounder Wiring

Wiring guide for Grade 2 external sounders.

Connecting the EURO Peripherals

Connecting the LCD Keypad (EURO-LCDPZ)

How to connect and configure the LCD keypad.

Connecting the Internal Tag Reader (EURO-PROXI)

Guide for connecting the internal tag reader.

Connecting the Zone Expander Module (EURO-ZEM8)

Guide for connecting the EURO-ZEM8 input expander.

Connecting the Enforcer Wireless Zone Expander Module (EURO-ZEM32-WE)

Guide for connecting the wireless zone expander.

The Inovonics Radio Expander

Addressing the Radio Expander

Procedure for addressing the Inovonics radio expander.

Assigning Radio Detectors

Steps to assign wireless detectors to the radio expander.

The PSTN Modem

Inserting the PSTN modem

Instructions for installing the PSTN modem module.

Wiring the PSTN modem

Wiring diagram and connections for the PSTN modem.

The RS232 Module

Connecting to the Upload/Download Software

How to connect for panel programming and data upload/download.

Access Levels

User access by an operator

Describes access level for system operators.

User access by an engineer

Describes access level for engineers.

Related product manuals