INTELLIGUARD 9000™
15 74-3047—1
Intelli
uard 9000 Specification Data. Follow the instructions
included with each device for mountin
and connectin
to the
s
stem.
User Interface Devices
AREA KEYPADS (KID)
A KID allows a user to arm or disarm. Fi
. 15 shows an area
ke
pad.
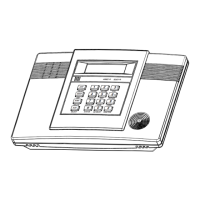
Fig. 15. Area Keypad.
NOTE: TB1-1 and TB1-2 connect to 12 Vdc whereas TB1-3
TXRX-
and TB1-4
TXRX+
connect to CU COM 1
or 2, but not both.
1.
Remove the KID cover at the selected mountin
loca-
tion.
2.
Remove the LED identification card located on the left
side of the unit between the printed circuit board and the
ke
pad.
Store in a safe place
.
IMPORTANT
Touch a grounded object to ensure you are not elec-
trostatically charged before handling the circuit
board.
3.
Carefull
pr
up the left side of the support/ke
pad
assembl
first and then lift up the ri
ht side. Notice how
the ke
pad cable is folded.
4.
Lift up the assembl
from the left side and disconnect
the ke
pad from the connector on the ri
ht side.
5.
Place the assembl
in a safe location.
6.
Avoid touchin
an
of the circuits or terminals.
7.
Mount the KID on the wall usin
four No. 6 round or pan
head screws.
It is not necessar
to remove the printed
circuit board assembl
because access holes are pro-
vided in the top left and ri
ht corners.
NOTE: Feed the re
uired cables into the KID base b
usin
the two holes in the base wirin
channel, or remove
the knockouts on either end of the wirin
channel to
pass the cables throu
h the openin
s.
8.
Connect the wires to the KID as shown in Fi
. 15.
9.
Reinstall the support/ke
pad assembl
b
reconnectin
the cable onto the an
led connector located on the ri
ht
side of the printed circuit board assembl
.
10.
Make sure the connectors are properl
ali
ned.
11.
Carefull
fold
do not crease or twist
the ke
pad cable
and ali
n the ke
pad assembl
mountin
holes with the
four standoffs and snap into place.
12.
Verif
that the LEDs ali
n with the slots in the support
or the assembl
will bend and not seat properl
on the
standoffs
.
13.
Detach one of the LED identification strips
removed
from the card in step 2
, or use a blank strip to enter
custom text and insert it into the slot on the left side of
the ke
pad. See. Fi
15. The text will be visible throu
h
the ke
pad windows beside the point status LEDs.
14.
Replace the KID cover.
15.
Repeat steps 1 throu
h 14 for each KID.
16.
When installation is complete and power is applied,
learn the KID.
NOTE: Steps 16a. throu
h 16k. ma
be replaced b
usin
the PRO 9000 software. See the Commission sec-
tion, steps 1a. throu
h 1c., for more information.
a. From the CC2, select
MODE
.
b. Enter the technician ID and code.
c. Press
5
to select
CONFIGURATION
mode.
d. Press
✓
.
e. Press
1
to select
LEARN
mode.
f. Press
✓
.
.Press
2
to learn devices with serial numbers.
h. Press
✓
.
NOTE: The CC2 displa
s
Searching
and all the LEDs on
the KID blink simultaneousl
. If the KID had previ-
ousl
been learned, the LEDs would blink and turn
off as soon as the I9000 established communication
time varies before this happens dependin
on the
number of devices connected to the s
stem
.
i. Press an
ke
to learn the KID and turn off the
LEDs.
. Press the
ACCEPT
ke
from the CC2. The I9000
exits the learnin
mode and displa
s the total num-
ber of devices known b
the s
stem includin
the
KIDs.
k. From the CC2, exit from the CONFIGURATION
menu for chan
es to become effective.
12
3
4
5
6
7
8
9
0
M16113C
ID-CODE
KID UNIT
ASSEMBLY
8003-220
KID P.C.B. ASSEMBLY
8003-218
ID CODE
RED = ENTER ID
YELLOW = ENTER CODE
GREEN = VALID
FLASHING GREEN = ENTER SECOND ID AND CODE
AREA STATUS
OFF = SEE POINT STATUS LEDS
GREEN = READY TO ARM
RED = ARMED
FLASHING RED = EXIT DELAY
POINT STATUS (4 LEDs)
OFF = ALARM RESTORED/CLEAR
RED = POINT IN ALARM
LED
IDENTIFICATION
CARD SLOT
(FITS UNDER WINDOWS OF KEYPAD).
CARD PROVIDES PREDEFINED OR
CUSTOM TEXT FOR POINT STATUS LEDS.
NOTE: THE LED IDENTIFICATION CARD (7003-174) IS INCLUDED
WITH THE UNIT BETWEEN THE P.C.B. AND KEYPAD SUPPORT.
DOOR
TRBL.
CU COM
12 VDC
+–
+–
RS-485
TB-1
1 2 3 4

 Loading...