18
• Press the »
SELECTSELECT
SELECTSELECT
SELECT key to configure the DHCP
settings:
• Use the a and v keys to select between
On On
On On
On and
OffOff
OffOff
Off.
• Press the »
SELECTSELECT
SELECTSELECT
SELECT key to confirm the setting.
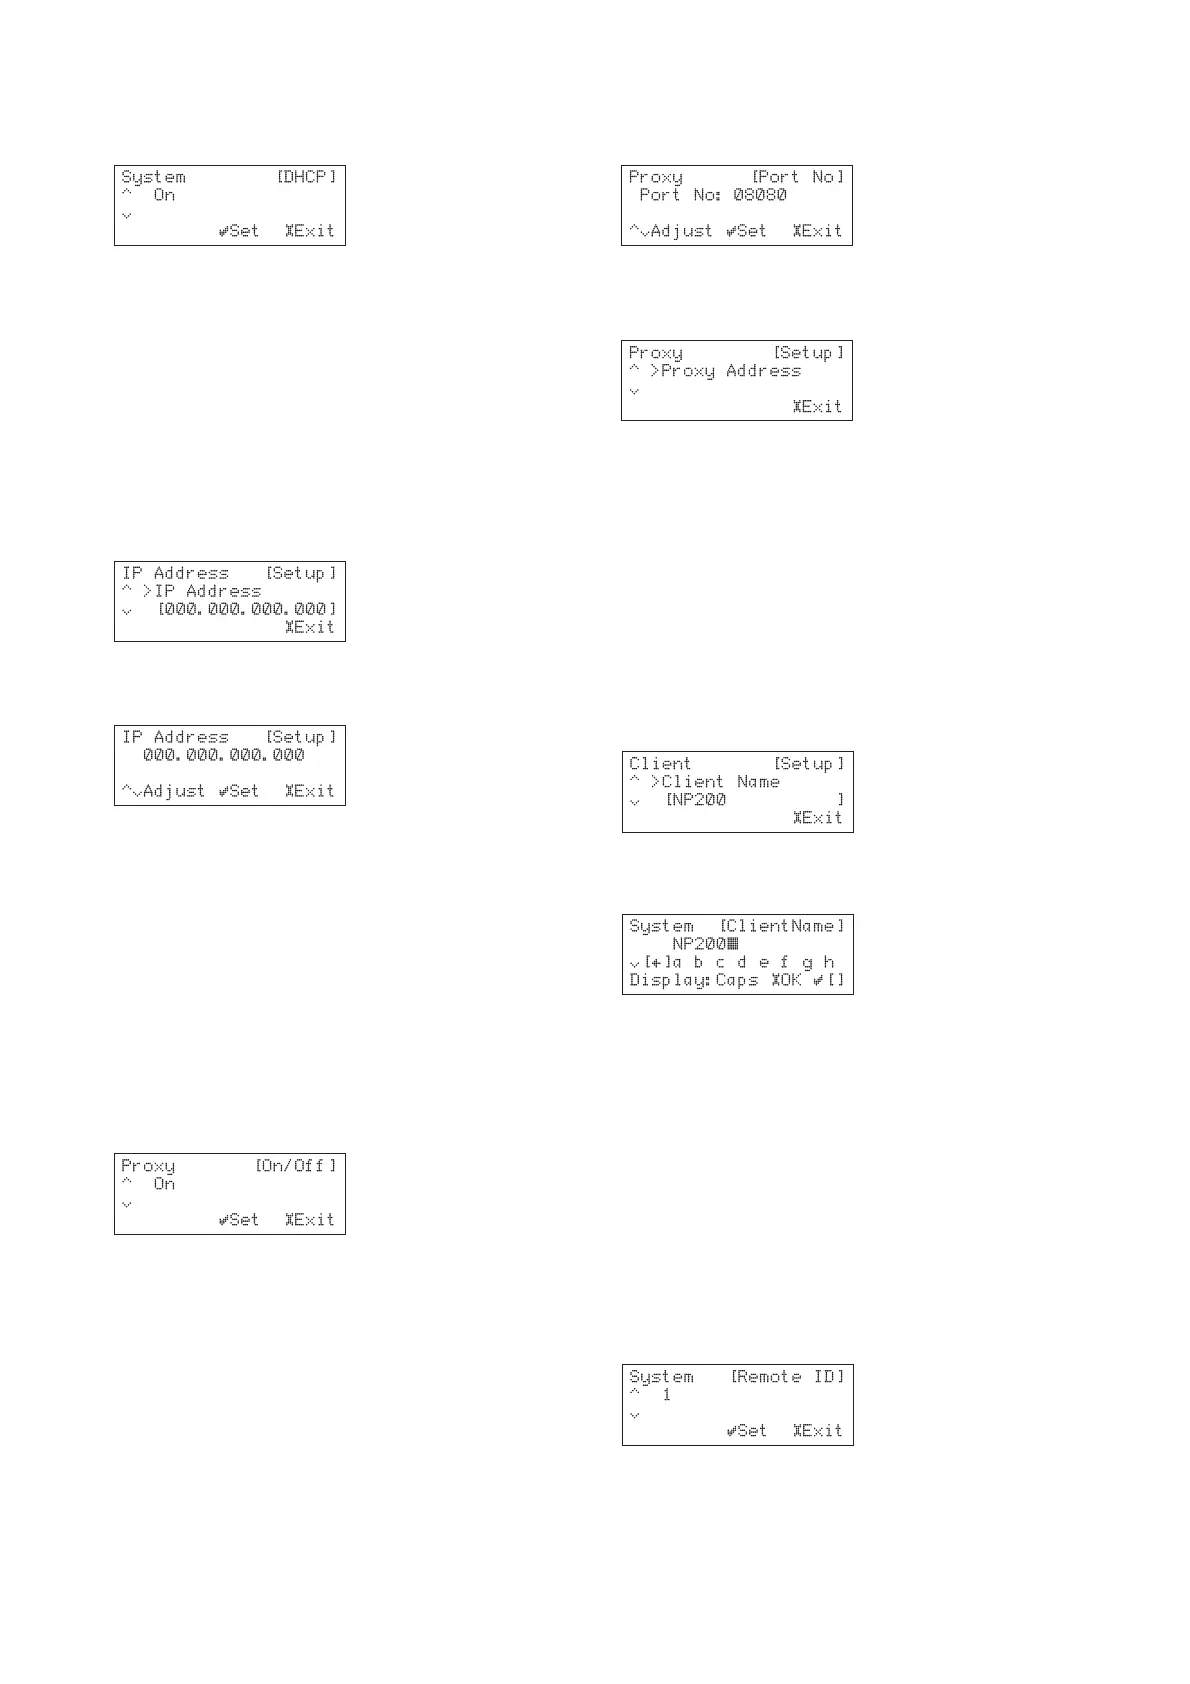
To specify the IP address settings manually
If you do not have a DHCP server on your network you
will need to manually configure the IP address, IP mask,
gateway address, and DNS addresses using the
appropriate options on the
IP AddressIP Address
IP AddressIP Address
IP Address menu.
• Display the
Ethernet SettingsEthernet Settings
Ethernet SettingsEthernet Settings
Ethernet Settings menu as previously
described.
• Use the a and v keys to highlight
IP AddressIP Address
IP AddressIP Address
IP Address and
press the »
SELECTSELECT
SELECTSELECT
SELECT key:
• Enter the IP address using the { and } keys to
select the digit to change and the a and v keys
to change the number:
• Press the »
SELECT SELECT
SELECT SELECT
SELECT key to confirm the new
setting.
The same procedure can be used to set the IP Mask,
gateway address, DNS1 address, and DNS2 address.
PROXY SETTINGS
If your network uses a proxy server you should specify
the settings in the
Proxy Setup Proxy Setup
Proxy Setup Proxy Setup
Proxy Setup menu.
• Display the
Ethernet SettingsEthernet Settings
Ethernet SettingsEthernet Settings
Ethernet Settings menu as previously
described.
• Use the a and v keys to highlight
Proxy SetupProxy Setup
Proxy SetupProxy Setup
Proxy Setup
and press the »
SELECTSELECT
SELECTSELECT
SELECT key.
• Use the a and v keys to highlight
Proxy On/OffProxy On/Off
Proxy On/OffProxy On/Off
Proxy On/Off
and press the »
SELECTSELECT
SELECTSELECT
SELECT key.
• Use the a and v keys to select between
On On
On On
On and
OffOff
OffOff
Off.
• Press the »
SELECTSELECT
SELECTSELECT
SELECT key to confirm the setting.
To specify proxy address and port number
• Display the
Ethernet SettingsEthernet Settings
Ethernet SettingsEthernet Settings
Ethernet Settings menu as previously
described.
• Use the a and v keys to highlight
Proxy SetupProxy Setup
Proxy SetupProxy Setup
Proxy Setup
and press the »
SELECTSELECT
SELECTSELECT
SELECT key.
• Use the a and v keys to highlight
Port NoPort No
Port NoPort No
Port No and
press the »
SELECTSELECT
SELECTSELECT
SELECT key.
• Use the a, v, {, and } keys to enter the port
number:
• Press the »
SELECTSELECT
SELECTSELECT
SELECT key to confirm the setting.
• Use the a and v keys to highlight
Proxy AddressProxy Address
Proxy AddressProxy Address
Proxy Address
and press the »
SELECTSELECT
SELECTSELECT
SELECT key.
• Enter the address and press the »
SELECTSELECT
SELECTSELECT
SELECT key to
confirm the setting.
CLIENT SETTINGS
To change the client name
You can change the default name to identify the NP200
on the network.
• Display the
Ethernet SettingsEthernet Settings
Ethernet SettingsEthernet Settings
Ethernet Settings menu as previously
described.
• Use the a and v keys to highlight
ClientClient
ClientClient
Client and
press the »
SELECTSELECT
SELECTSELECT
SELECT key.
• Use the a and v keys to highlight
Client NameClient Name
Client NameClient Name
Client Name
and press the »
SELECTSELECT
SELECTSELECT
SELECT key:
• Enter a name, such as
BedroomBedroom
BedroomBedroom
Bedroom, in same way as
for radio presets; see
To edit the preset name
,
page 13:
• Press the »
SELECT SELECT
SELECT SELECT
SELECT key to confirm the name.
Note:Note:
Note:Note:
Note: Client names must be unique.
CHANGING THE REMOTE CONTROL CODE
TO RESOLVE CONFLICTS
When you use multiple NP200s within the same infra-red
range, you can change the remote control code to avoid
multiple units operating simultaneously with one remote
control.
• Press the £
SETUPSETUP
SETUPSETUP
SETUP key to display the Setup
menus.
• Use the a and v keys to highlight
SystemSystem
SystemSystem
System and
press the »
SELECTSELECT
SELECTSELECT
SELECT key.
• Use the a and v keys to highlight
Remote IDRemote ID
Remote IDRemote ID
Remote ID and
press the »
SELECTSELECT
SELECTSELECT
SELECT key:
• Use the a and v keys to change the ID
• Press the »
SELECT SELECT
SELECT SELECT
SELECT key to save the change.
• Press the £
SETUP SETUP
SETUP SETUP
SETUP key to exit from the Setup
menus.