D 20
0502GB
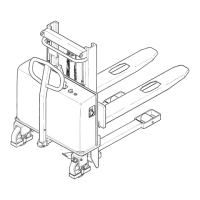
17 Replacing the batteries
– Park the vehicle and secure it (see chapter E).
– Loosen the screws (11) and lift off the cover (10) (allen key is supplied).
m
Route the battery cables in such a way that they do not catch on the battery when it
is lifted out.
Upper battery:
– Unscrew the battery fixtures (9); there are 4 screws.
– Undo the terminal screws and pull the battery cables off of the terminals.
– Lift out the upper battery.
Lower battery:
– Loosen (do not remove completely) the screws (8) securing the battery platform (6)
and pull the platform together with the battery forward.
– Undo the lower battery fixtures (7); there is one nut to be undone.
– Undo the terminal screws and pull the battery cables off of the terminals.
– Lift out the lower battery.
m
Re-assemble in reverse order; ensure that the batteries are correctly orientated and
that the electrical connections are correctly made (see diagram).
– After the battery has been reinstalled, check all cable connections and plugged
connections for visible damage.
Connection Diagram
D 20
0502GB
17 Replacing the batteries
– Park the vehicle and secure it (see chapter E).
– Loosen the screws (11) and lift off the cover (10) (allen key is supplied).
m
Route the battery cables in such a way that they do not catch on the battery when it
is lifted out.
Upper battery:
– Unscrew the battery fixtures (9); there are 4 screws.
– Undo the terminal screws and pull the battery cables off of the terminals.
– Lift out the upper battery.
Lower battery:
– Loosen (do not remove completely) the screws (8) securing the battery platform (6)
and pull the platform together with the battery forward.
– Undo the lower battery fixtures (7); there is one nut to be undone.
– Undo the terminal screws and pull the battery cables off of the terminals.
– Lift out the lower battery.
m
Re-assemble in reverse order; ensure that the batteries are correctly orientated and
that the electrical connections are correctly made (see diagram).
– After the battery has been reinstalled, check all cable connections and plugged
connections for visible damage.
Connection Diagram
 Loading...