English 97
3. Maintenance work may only be carried out by approved cus-
tomer service sites or qualified staff in this field who are famil-
iar with all the relevant safety instructions.
4. Any welding work on the vehicle or attachments must be per-
formed by the authorised Kärcher Customer Service.
Service indicator
The service indicator lights up when the respective maintenance
needs to be done.
The service indicator flashes on the display:
after 50 operating hours when the initial inspection needs to be
performed.
Next service after 250 operating hours.
Then every 500 operating hours.
Note
The service indicator must be reset by the Customer Service.
Maintenance intervals
Note
In order to preserve warranty claims, all servicing and mainte-
nance work during the warranty period has to be performed by an
authorised Kärcher Customer Service, in accordance with the in-
spection check list.
Daily before starting operation, see chapter Safety checks be-
fore startup.
Lubricate all bearings after washing the vehicle.
If necessary have the safety checks according to the applica-
ble local regulations performed by the Customer Service de-
partment.
The intervals for inspection and maintenance work to be per-
formed by the customer are listed in the following table.
Additional maintenance work is to be carried out by the Cus-
tomer Service department in accordance with the inspection
checklist after 250, 500 (annually), 1000, 1500 or 2000 oper-
ating hours. Please inform the Customer Service department
in time.
Vehicle maintenance plan
Vehicle lubrication plan
ATTENTION
Malfunctions
Keep the V-belt clean and free of grease.
1 Use high-grade multi-purpose grease.
2 Lubricate the grease nipples in accordance with the lubricating
intervals (Table) using a grease gun.
Daily Weekly
Lubricate all bearings specified in the lu-
brication plan.
(8h)
Check all Bowden cables and moving
parts for freedom of movement.
X
Check the side brushes and suction
mouth for wear and tangled pieces of
tape (for sweepers).
X
If the device has been operated with the
water circulation system switched off
(option), clean the filter and valve of the
water circulation system to ensure relia-
ble operation of the water circulation
system and prevent damage.
X
Check the rollers at the suction mouth
for freedom of movement (for sweep-
ers).
X
Check the spray pattern of the brush ir-
rigation spray nozzles and in the suction
mouth. Clean or replace the nozzles if
necessary (for sweepers).
X
Check all hoses and cable clamps. X
Check the coolant hoses. X
Clean the cooler fins on the water cool-
er, oil cooler and air-conditioning sys-
tem.
X
Check the V-belts and V-belt tension. X
Check that the parking brake functions
correctly and is correctly adjusted.
X
Check the engine air filter. X
Clean cooler grille. X
Check the air-conditioning system. X
Check the exhaust system. X
Clean the blower chamber. X*
Clean the waste container and cover. X*
* several times daily in the case of heavy
soiling
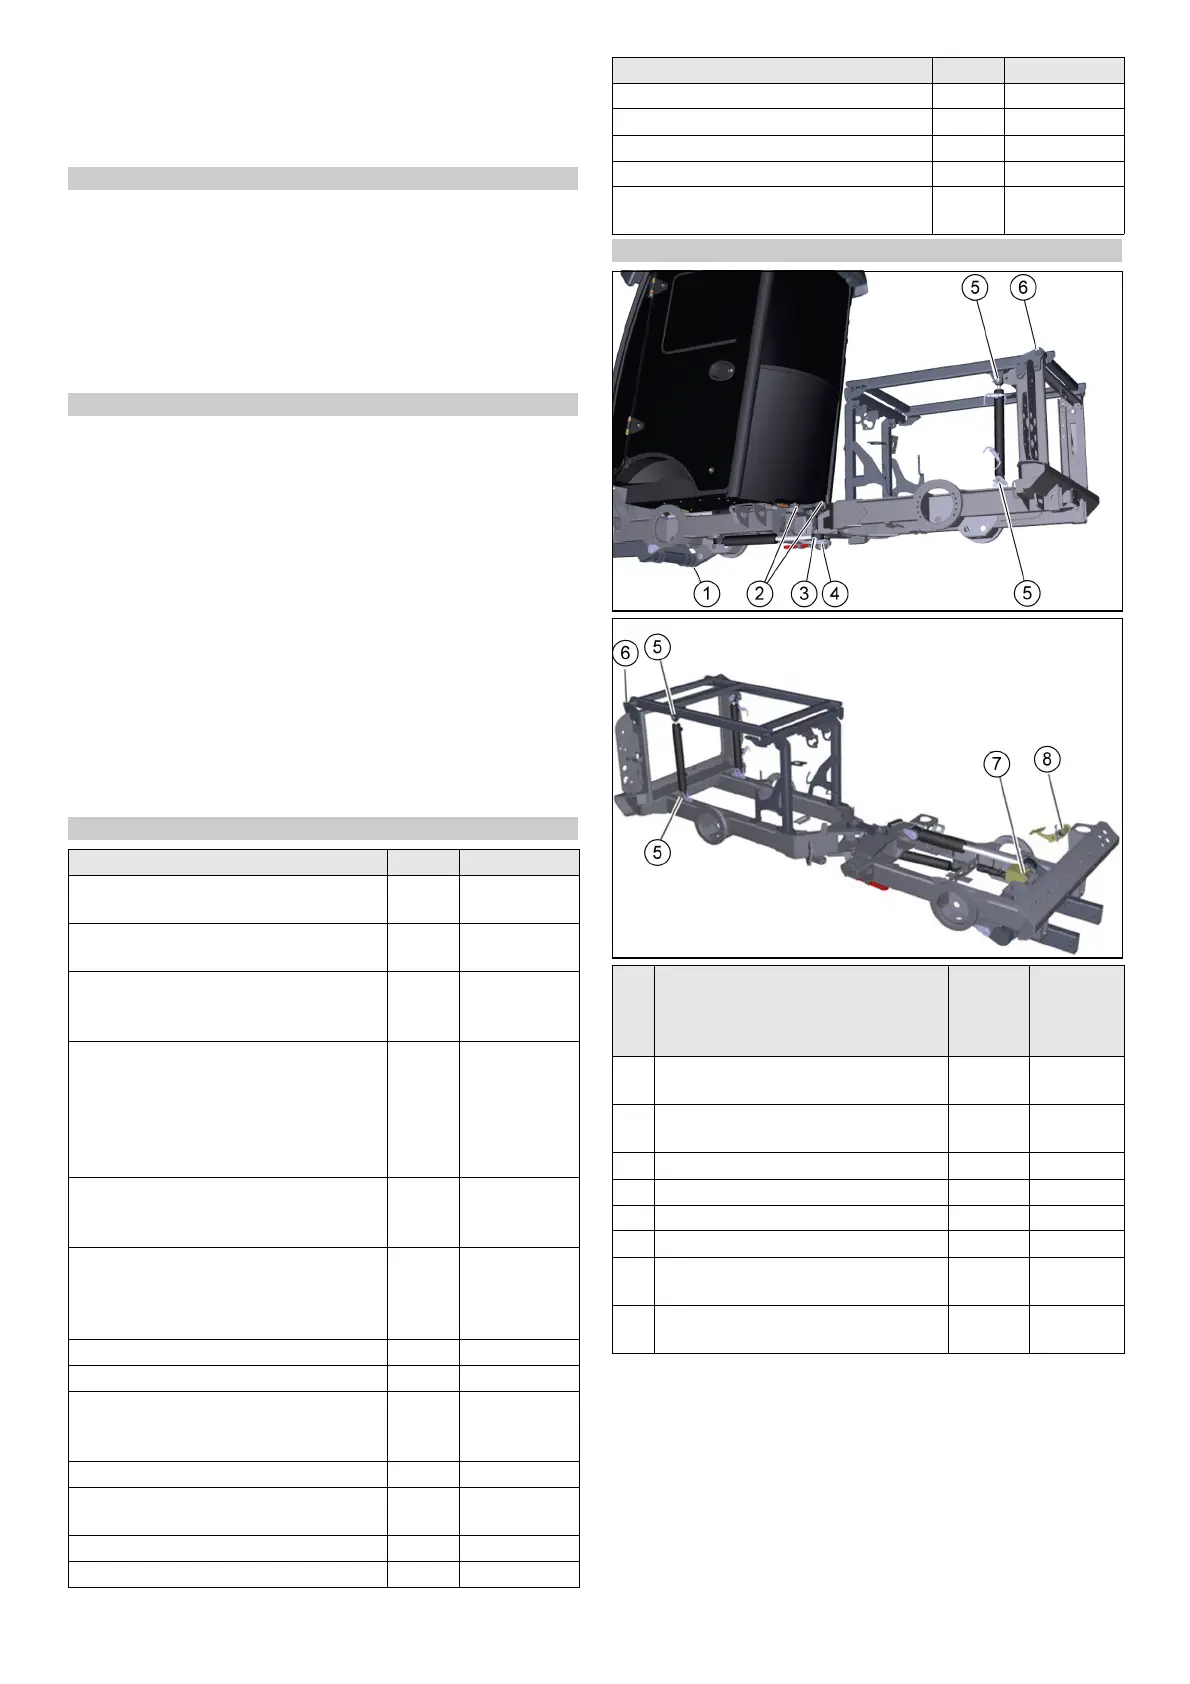
Lubrication point Number
of lubri-
cation
points
Lubrica-
tion inter-
val
1 Front power lifter slew bearing and
lifting cylinder
1 each Every 8 h
2 Articulated steering at centre of vehi-
cle
2 Every 8 h
3 Steering cylinder 2 Every 8 h
4 Lower articulated joint bearing 1 Every 8 h
5 Lifting cylinder 4 Every 25 h
6 Lifting platform 2 Every 8 h
7 Accelerator 1 Every 100
h
8 Brake pedal deflection lever 1 Every 100
h
Daily Weekly
 Loading...