9
INSTALLATION
INSTALLATION
Inside Mount — Cassette Shades
■
Mark 4” from each jamb for bracket location.
➤
If more than two installation brackets came with your order, space additional bracket(s) evenly between the two end
brackets and mark their location. Allow a minimum of 18” from the motor end for the battery wand. Mount into wood
whenever possible.
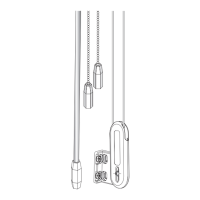
Install the Back Cover Clips (Optional)
■
If you ordered shades with the back cover option, snap on each back
cover clip that you received to the back of each installation bracket to
ensure that the back cover remains straight and properly secured.
IMPORTANT: Allow an additional
1
⁄
4
” spacing between the clip and the
window to install the back cover.
■
Align the hooks of the clips to the slots in the bracket and snap down to
secure the clip to the brackets.
Install the Bracket
■
The minimum mounting depth required for Automation III shades:
■
Center the brackets on your marks, then mark each of the screw holes.
IMPORTANT: The front edges of the installation brackets must be level and aligned to eachother.
➤
Fully recessed mounting for Automation III shades:
■
Drill the screw holes using a
3
⁄
32
” drill bit.
■
Use a level to check that the mounting surface is level. Shim the brackets if necessary. Shims are not provided.
■
Attach the installation brackets using the screws provided.
WARNING: Product is heavy. Mount into wood/metal studs or into concrete with concrete anchors. Drywall anchors are
not recommended.
Installation Brackets Jamb Jamb
Space EvenlySpace Evenly4" 4"
Motor
End
Back
Cover Clip
Cassette Bracket
Minimum IB Mounting Depth
Power Supply
Both Cassettes
Without
Back
Cover
With
Back
Cover
Without Battery Wand 1
1
⁄
4
" 1
13
⁄
16
"
Automation III with
Attached Battery Wand
1
7
⁄
8
" 2
3
⁄
16
"
Automation III with
Rechargeable Battery Wand
2
1
⁄
4
" 2
9
⁄
16
"
4"
Minimum IB Fully Recessed Mounting Depth
Power Supply
Small Cassette Large Cassette
Without
Back
Cover
With
Back
Cover
Without
Back
Cover
With
Back
Cover
Without Battery Wand 3
9
⁄
16
" 4
1
⁄
8
" 4
1
⁄
16
" 4
5
⁄
8
"
Automation III with Attached
Battery Wand
4
3
⁄
16
" 4
1
⁄
2
" 4
11
⁄
16
"
5"
Automation III with
Rechargeable Battery Wand
4
9
⁄
16
" 4
7
⁄
8
" 5
1
⁄
16
" 5
3
⁄
8
"
 Loading...