3.7. Using the encoder
The encoder mounted directly on the motor delivers a speed proportional frequency signal. This
signal can be evaluated in case of the inverter i550 and can be used for the motor control or as posi-
tion counter.
• Connect for operation of inverter i550 via single cable with 4 mm laboratory plug the encoder
connector X1 on the digital inputs DI3 and DI4 of the switching system IO.
• Switch on the switching system IO the toggle switches below of DI3 and DI4 to OFF (LOW
position)
• In order to operate the encoder, switch the toggle switch S2 for 24 V ON.
The digital inputs DI3 and DI4 have to be configured as HTL input. For more information, refer to the
documentation of the inverter i550.
3.8. Replacement of the control unit (CU) on the i550
• Switch the toggle switches S1 and S2 for 230 V and 24 V OFF.
• If necessary, remove the diagnostics module (keypad, USB, WLAN)
from the control unit.
• Unplug the I/O connector and detach the shield terminal (caution,
sharp edges!).
• Undo the now visible fixing screw (Torx T20) on the control unit.
• Slightly press in the left and right-hand sides on the underside of
the control unit (see legend = Gripping points) and fold upwards
and remove the control unit.
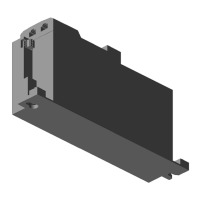
• Slightly press in the locking clip of the control unit's shield sheet
and pull the shield sheet off (see picture).
• Insert the shield sheet into the new control unit.
• Put the control unit on the inverter in place and attach in reverse
order.
 Loading...