For additional information, see the complete installation and operation guide at www.lutron.com/qs
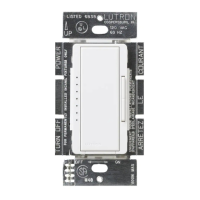
GRAFIK Eye QS with DALI® Control Unit Quick Installation and Operation Guide
5
Wiring the GRAFIK Eye QS with DALI® Control Unit:
DALI® Bus Wiring Details
Step 1
• Use the wire size chart below to determine
which wire size to use based on the length
of the DALI® bus.
Wiring Size and Bus Length
DALI® bus wires D1 and D2 are not
polarity-sensitive. DALI® bus length is
limited by the wire gauge used for D1 and
D2 as follows:
Wire Gauge Maximum DALI® Bus Length
1.5 mm
2
275 m
1.0 mm
2
175 m
0.75 mm
2
150 m
0.5 mm
2
100 m
Step 2
WARNING! Shock hazard. May
result in serious injury or death.
Do NOT wire live. Interrupt power
via circuit breaker before wiring and
servicing the GRAFIK Eye QS with
DALI® control unit.
• Wire the DALI® bus from terminal D1 and
terminal D2 to all DALI® devices.
Step 3
• Turn on circuit breaker to energize.
DALI® Bus
18 V- 250 mA
• DALI® terminal is double-insulated from QS and mains voltage
terminals.
• DALI® bus wiring may be run in the same conduit as mains wiring.
• Consult applicable national and local codes for compliance.
• Lutron recommends using two different colors for D1 and D2
(DALI
® bus) wires. This will prevent wiring mistakes in junction
boxes where several different DALI® bus wires combine.
• Use the following instructions for wiring the DALI
® bus.
– Each DALI® bus can have only 1GRAFIK Eye QS with DALI®
control unit connected to it. No additional DALI® bus supplies
can be on the link.
– Up to 64 DALI
® devices can be connected to the DALI® bus.
• DALI® bus wiring cables (1.5 mm
2
) are available from Lutron:
P/N C-CBL-216-GR-1 and C-PCBL-216-CL-1.
 Loading...