SENSOR REMOVAL
Copyright © 2017 McCrometer, Inc. All printed material should not be changed or altered without permission of
McCrometer. Any published technical data and instructions are subject to change without notice. Contact your McCrometer
representative for current technical data and instructions.
www.mccrometer.com
3255 WEST STETSON AVENUE • HEMET, CALIFORNIA 92545 USA Printed In the U.S.A.
TEL: 951-652-6811 • 800-220-2279 • FAX: 951-652-3078 Lit. # 30120-48 Rev. 2.4 / 11-5-18
19
Follow the steps below to safely remove the sensor:
1. Visually inspect the pipe and entire assembly
for damage or corrosion paying close attention
to any nipples and welded couplings. If there is
any doubt as to the condition of any element of
the pipe or meter, depressurize the line before
attempting to remove the meter.
2. Reduce line velocity to 5 ft/s or less to prevent
sensor vibration, or depressurize the line.
3. Thread a long retaining rod through the
captive nut until the rod nears the compression
assembly. Ensure that the bottom of the rod has
the hole for the locking cotter pin.
4. Thread a 3/8" nut onto the bottom of the long
retaining rod about an inch up from the bottom
of the rod.
5. Continue rotating the long retaining rod until
the bottom of the rod passes through the holes
on the bottom plate.
6. Thread another 3/8" or 1/2" nut onto the bottom of the long retaining rod until it is ush with the bottom
plate. Tighten the nuts above and below the bottom plate securely locking the long retaining rod in place.
Attach the locking cotter pin into the hole through the bottom of the long retaining rod.
7. Repeat the process for the second long retaining rod.
8. Once both of the long retaining rods are securely in place, completely remove the short retaining rods.
9. Loosen the compression seal bolts until the seal just begins to leak. This will relieve the pressure on the
compression seal allowing the sensor to be removed. Draping a towel around the compression seal can
reduce any spraying water. NOTE: The compression seal may prevent immediate leakage on sensors installed
for a long period of time until the sensor begins to rise.
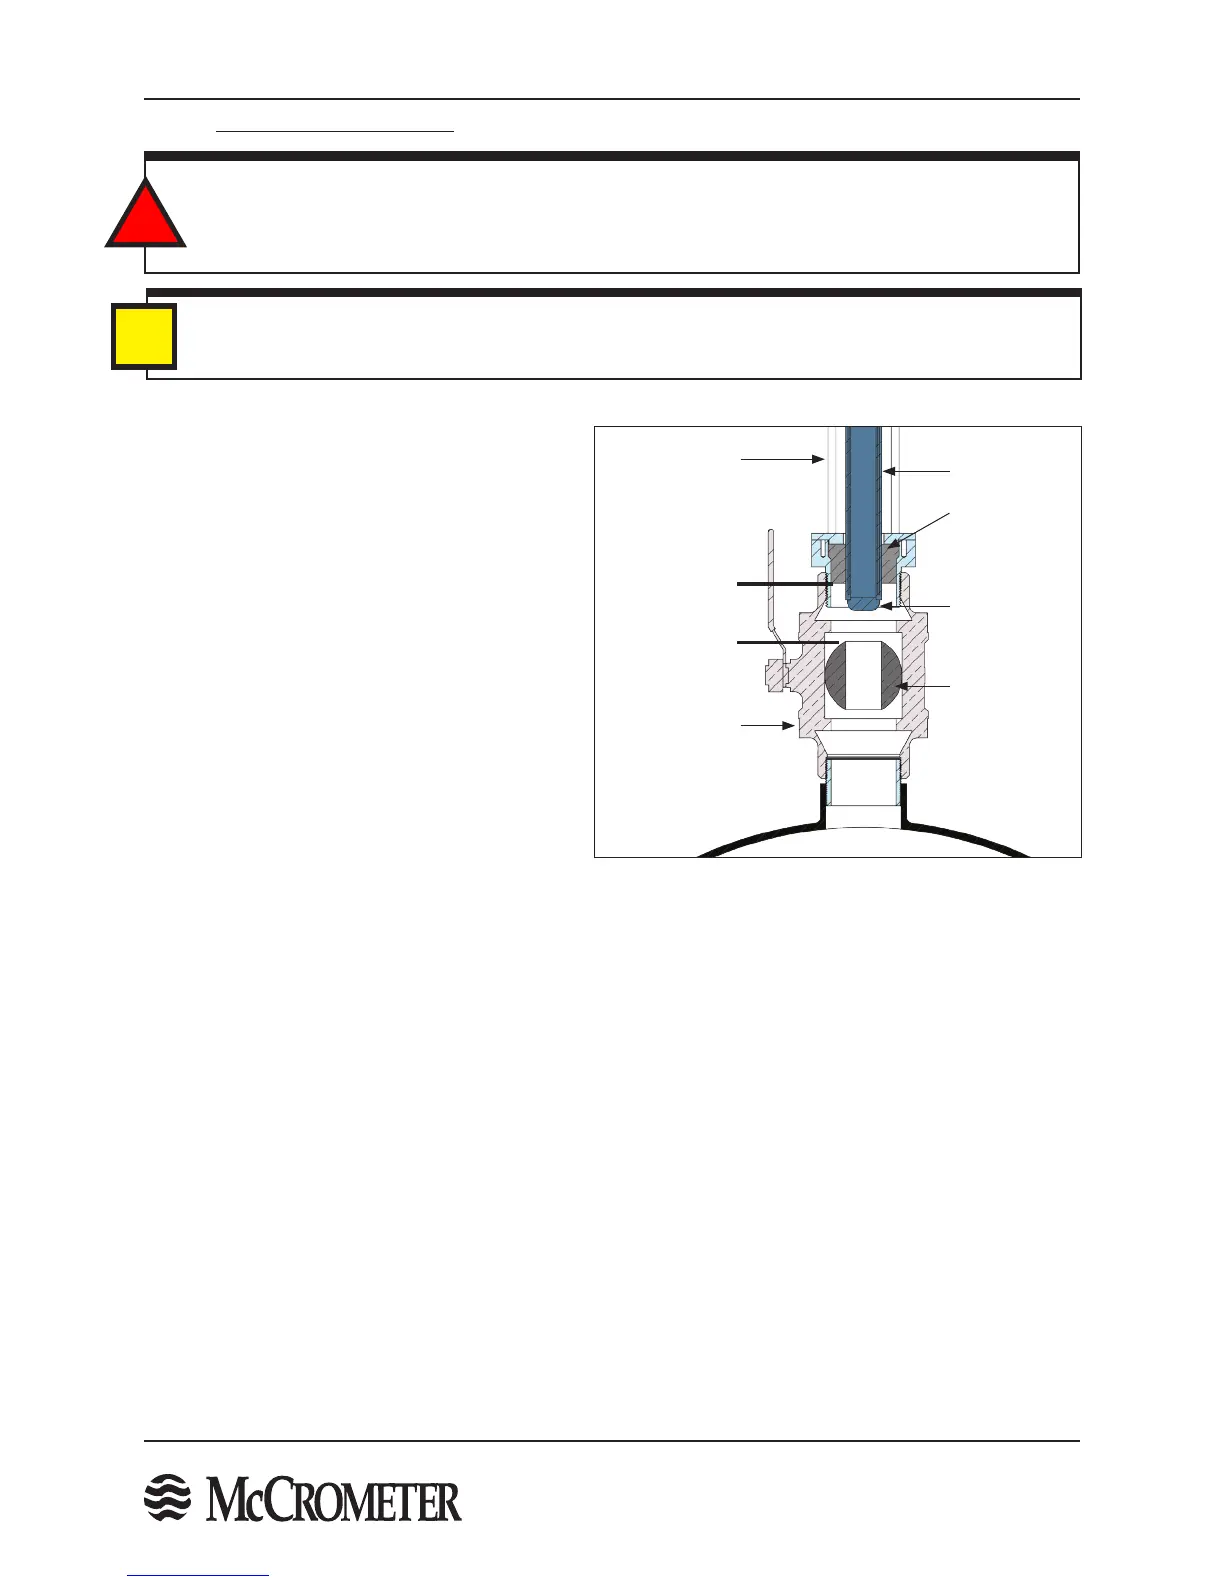
10. Rotate the captive nuts on the top plate simultaneously. The sensor insertion tool is recommended. See
Installation, STEP 10. This will cause the sensor to rise out of the pipe. If the line is under pressure do not
remove the sensor from the compression seal completely. Only raise the sensor until it is clear of the valve, but
still below the compression seal. See Figure 24. Once the sensor has cleared the valve mechanism, the valve
can then be closed. Do not attempt to force the valve closed while the sensor is still passing through the valve
as permanent damage to the sensor can occur.
11. Once the valve is closed, the entire sensor can be removed from the valve.
3.0 SENSOR REMOVAL
WARNING!
The pipe may be under pressure. Serious injury or death may result if proper procedures are not followed.
Do not attempt to remove the short retaining rods without the long retaining rods properly installed. Do
not attempt to remove the sensor with only the short retaining rods.
!
IMPORTANT
Use the long retaining rods provided with the meter for removal. If the rods used for removal are shorter
than those provided by the factory, the sensor cannot be removed without depressurizing the line.
i
Figure 24. Cross-Section Of Meter Showing
Sensor Removal
Compression
Seal
Sensor
Bottom Of
Sensor
Valve Closure
Mechanism
Space Between
Bottom Of
Seal And Valve
Mechanism
Pipe Valve
Retaining
Rods

 Loading...