31Quick Start Guide
Basic Operation
This section is intended to familiarise you with the control centre by showing you
how to carry out some basic operations in order to get some audio out of it.
NOTE: As the operation of both input bays is principally the same,
this chapter will generally only show the operation of the 12-channel input
bay. However, any di erences in operation between the 4-channel and
12-channel input bays will be highlighted.
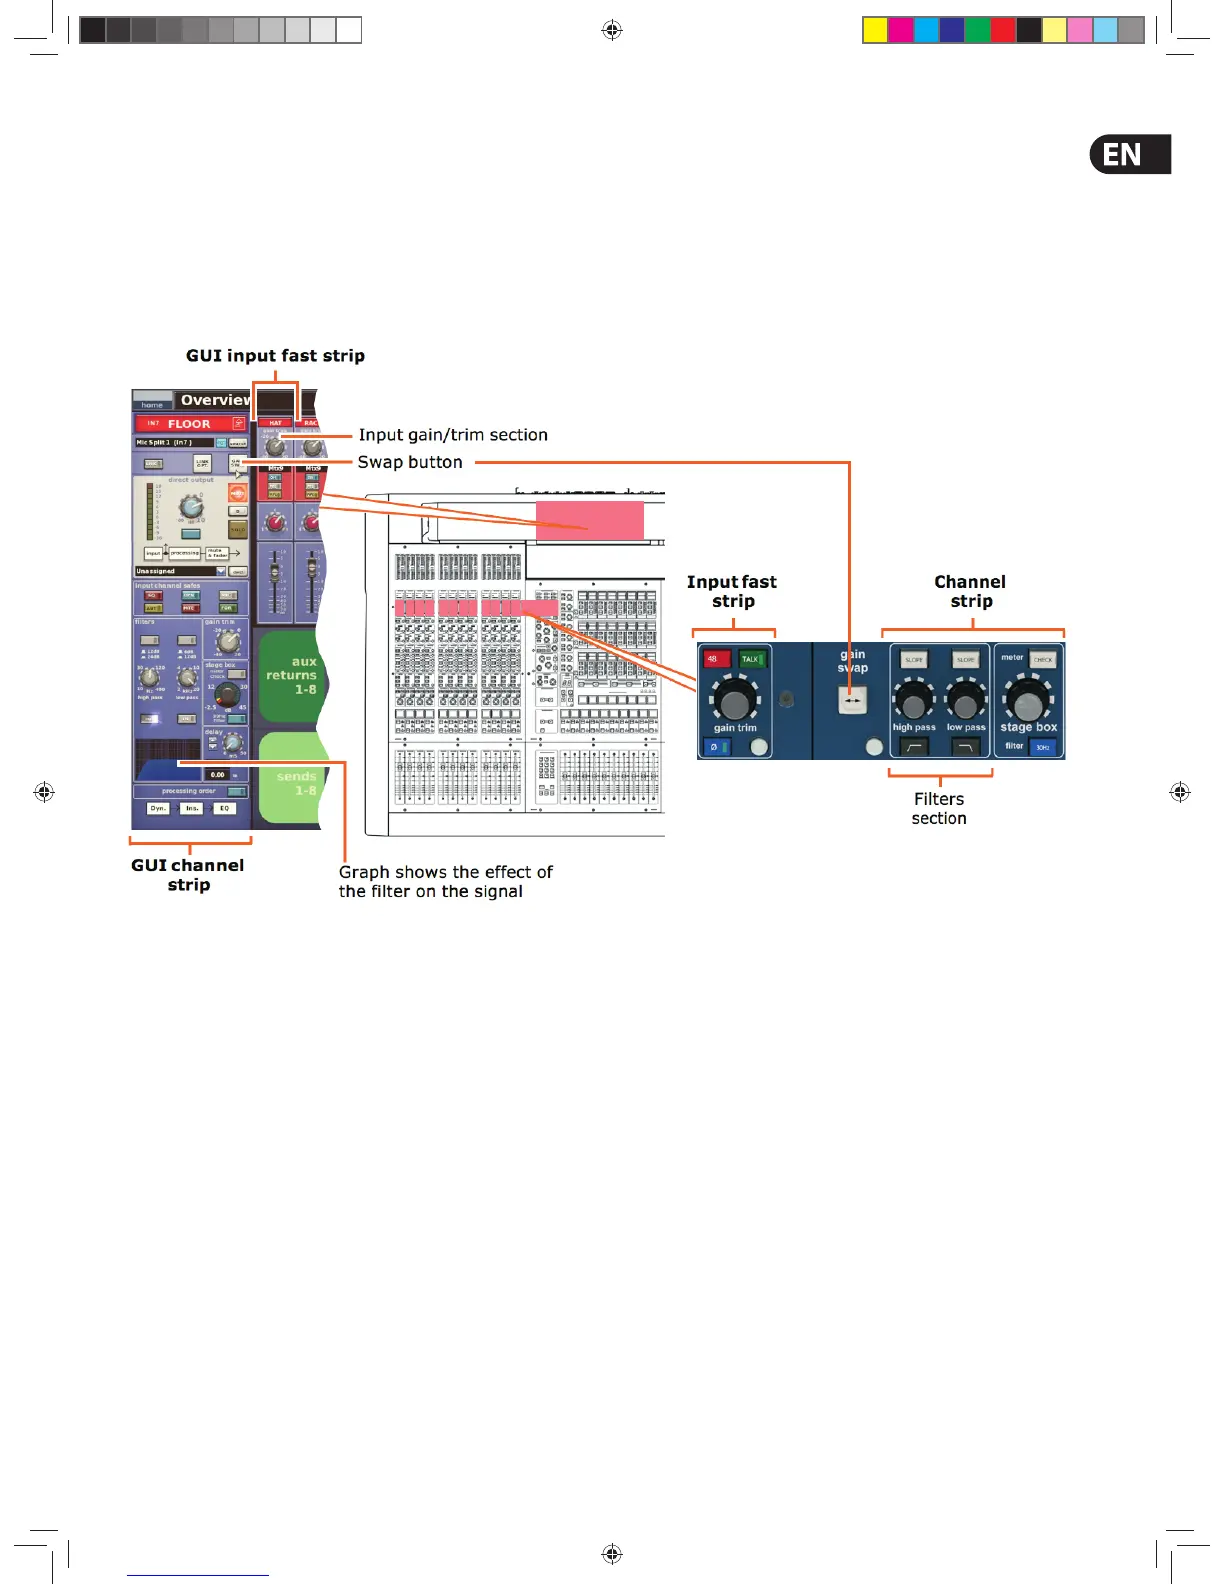
Setting A Mic Ampli er’s Input Gain
The control centre has two input gains per channel, one is the remote gain for the
analogue mic pre (stage box gain) and the other is the digital trim (console gain).
In its default state, the stage box gain is in the channel strip and the console gain
is in each input fast strip. However, you can swap these sections over (by pressing
the gain swap button) to give you a more global control of the stage box gain.
NOTE: The gain trim and stage box control knobs on the control surface
will adjust whatever has been ‘swapped’ to their respective strips and
not necessarily what their names suggest. The stage box control knob
(channel strip) always controls the alternative ‘swap’ to the ones shown in
the input fast strips on the GUI screen.
>> To set the stage box gain/console gain
1. In the gain trim section of an input fast strip, press the quick access button
(see Gain and lter sections of the input strips). This selects the input
channel and assigns its con guration processing area to GUI channel strip,
which contains the GAIN SWAP button.
2. Press the left-right arrow gain swap button (or click GAIN SWAP) to swap
the gain trim and stage box sections over.
3. Adjust the gain trim control knob to the required level to suit the MIDAS
pre-amp characteristic. A suitable level could be one that only just
illuminates the yellow LEDs. Do this for each required channel. Drive the mic
amps for that ‘MIDAS colouration’; feel free to overdrive if you want.
4. After you have achieved the required gain state, press the left-right arrow
gain swap button (or click GAIN SWAP) to swap the gains back to their
default state.
5. Adjust the gain trim control knob to (this time) adjust the console digital
trim (+20 dB to -40 dB continuous trim) for your preferred gain structure.
6. Set analogue remotes for initial set-up, then adjust digital trim
for showtime.
Setting The High And Low Pass Filters
Select high and low pass lters. The high and low pass lters can be switched
on/o and, when on, each has two settings. The lters are replicated on the GUI,
which also shows the value of the lter in operation.
>> To set both high and low pass lters in
1. In the gain trim section of an input fast strip (see the Gain And Filter
Sections Of The Input Strips diagram), press the quick access button.
This selects the input channel and assigns its con guration processing area
to the GUI channel strip, which contains the l t e r s section.
2. In the lters section of the input channel strip, press the lter select button
(high pass or low pass) to switch the lter in.
3. If necessary, press the lter’s SLOPE button to set its slope (dB); its status
is shown on the GUI. For the high pass lter, in = 24 dB and out = 12 dB,
and for the low pass lter, in = 12 dB and out = 6 dB.
4. Adjust the high pass/low pass control knob to set the lter frequency (Hz).
The ranges are 10 Hz to 400 Hz for the high pass lter and 2 kHz to 40 kHz for
the low pass lter.