41Quick Start Guide
VCA/POP groups can be pre-selected to populate area A or B, and a single group
of inputs can have members in both areas of the control surface. An operator can
then recall them to their own area to work on.
NOTE: Wwhen operating in area B, remember to select the B option,
where appropriate, particularly in the monitor section. Also note that solo
B (also for talkback) is totally independent of area B, which is used for
navigation only.
>> To set up the control centre for two-man operation
In the input select section of the master bay, press B (see above).
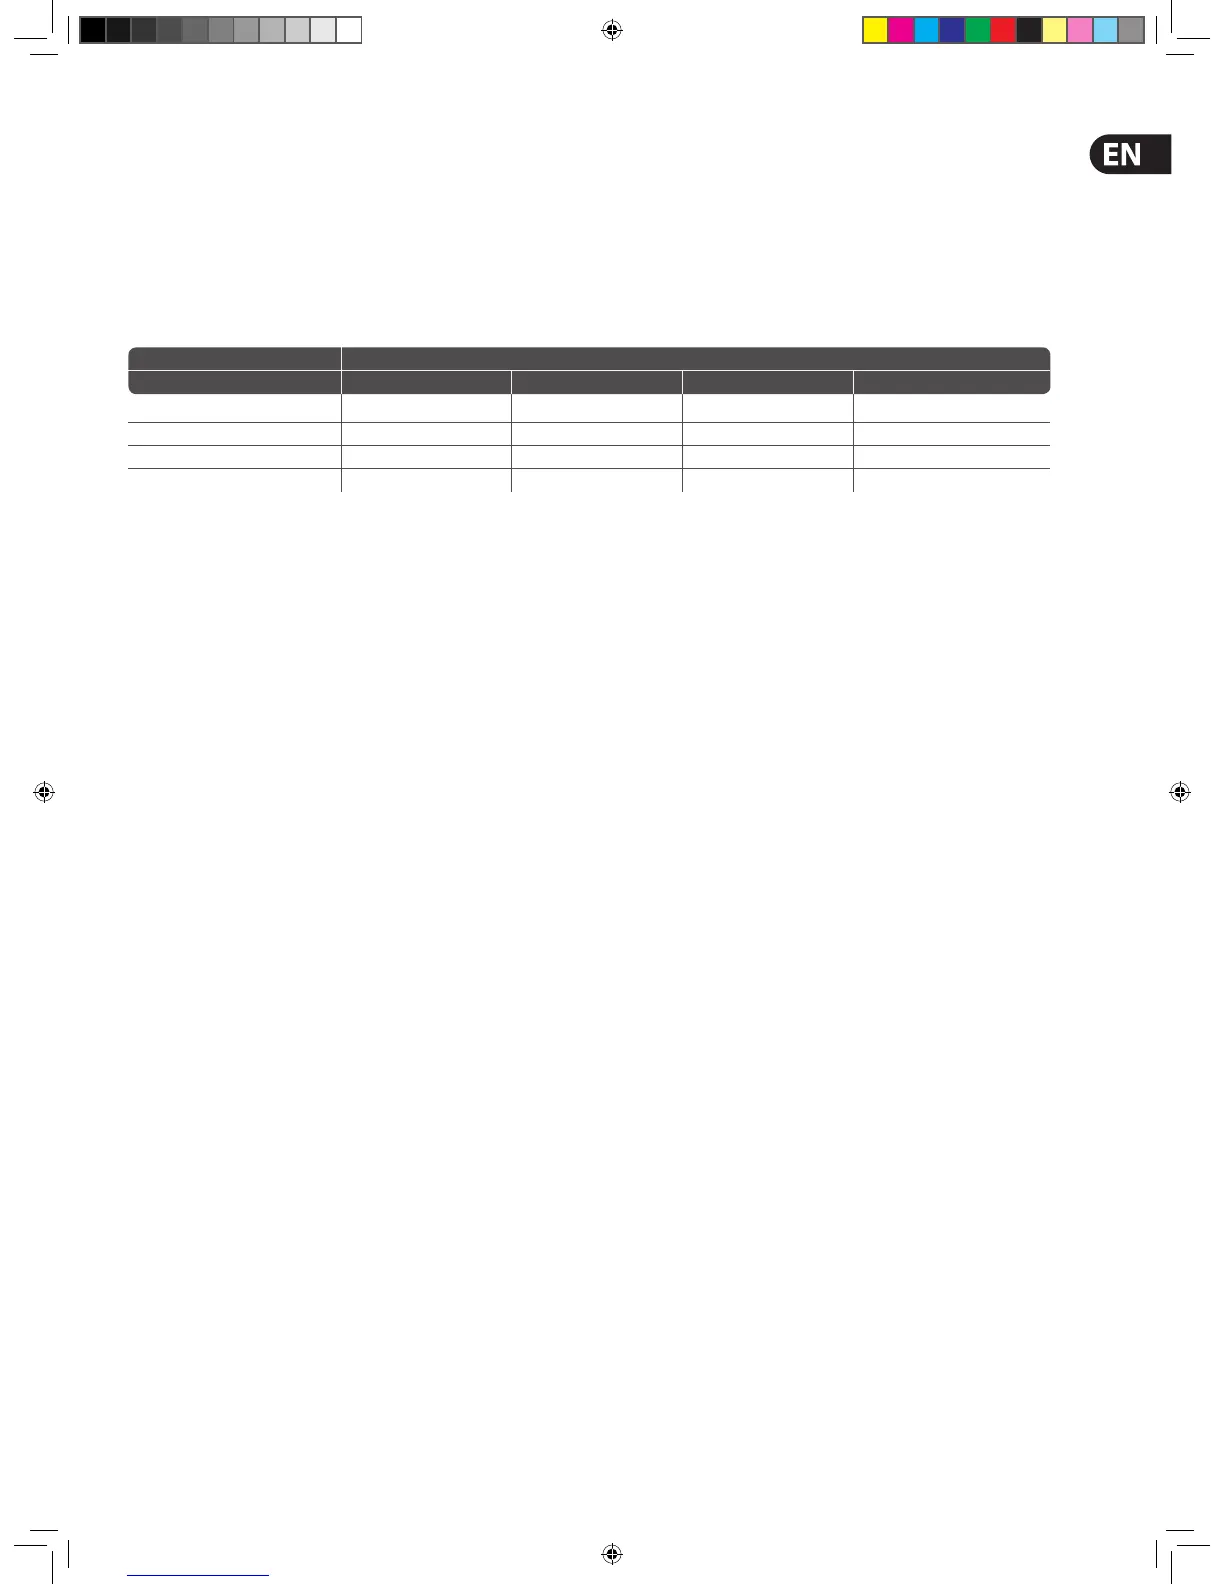
External AES50 Synchronisation
If you want to connect AES50 audio between two MIDAS digital consoles the
slave console must be set to external AES50 synchronisation, irrespective of the
synchronisation source of the master console.
Console 2 Sync Setting
Console 1 Sync Setting Master Word Clock AES3 External AES50 from Console 1
Master Not Valid Not Valid Not Valid Valid Connection
Word Clock Not Valid Not Valid Not Valid Valid Connection
AES3 Not Valid Not Valid Not Valid Valid Connection
External AES50 from Console 2 Valid Connection Valid Connection Valid Connection Not Valid
A valid connection can be a tie line between the stage routers or any I/O unit with
internal click, or a mic split which is receiving sync on the opposite port.
Security (Locking Mode)
If you need to leave the control centre unattended, but you want to preserve
its current state of operation, you can lock it via the GUI menu. This will prevent
unauthorised adjustment of its settings. When locked the GUI displays the
‘splash’ screens (shown during the start up sequence) and none of the controls on
the control surface will function; the control centre will be totally locked out.
>> To lock the control centre
At the GUI, choose home > Lock.
>> To unlock the control centre
At the GUI, click UNLOCK. This button is in the lower-left corner of both GUI
screens. For security, this button has been designed to blend in with the
background to disguise it. When unlocked, the control centre will revert to the
state it was in the last time it was locked.
Setting Up The System
Unpacking The Equipment
After carefully unpacking the equipment, save all packing materials, as they will
prove useful should it become necessary to transport the equipment later.
Inspect the equipment carefully for any sign of damage incurred during
transportation. It has undergone stringent quality control inspection and tests
prior to packing and was in perfect condition when it left the factory. However,
if the equipment shows any signs of damage, notify the transportation company
without delay. Only you, the consignee, may institute a claim against the carrier
for damage during transportation.
Making Up A Rack
In the standard supply, the rack supplied with the your system is fully tted with
the Neutron DSP Engine unit and the I/O unit(s) appropriate for your system.
Wiring Instructions
Powering the system
The following details the recommended power up and power down procedures
for the system.
NOTE: If you are in any doubt as to how to switch the rack units on/o ,
refer to their operator manuals.
>> To power up the system
Important Note:
DO NOT switch on the speaker sub-system until after the start-up of the system
has been completed.
After all system interconnections have been made (see Wiring Instructions),
start up the system by doing the following:
1. Make sure that all of the system equipment is switched o , such as the
control centre, speaker sub-system, Neutron DSP Engine unit and I/O unit(s).
2. Switch on the control centre (see To Switch On The Control Centre).
3. In the master bay of the control centre, move all of the monitor and master
channel faders to the minimum position and mute all of the master channel.
4. Power up the other system equipment, such as the Neutron DSP Engine unit
and I/O unit(s). This can be done in any order you like.
5. After the status indicator at the top of each GUI screen has changed to
green, switch on the speaker sub-system.
6. Switch on the audio source and start playing the audio.
7. On the control centre, check that the audio inputs are routed to the master
channels. Then, unmute the master channels and gradually increase their
faders while listening to the sound levels from the speakers.
If there is no sound at all coming from the speakers when the faders are at
maximum, move the faders to below the 0dB level and check if the audio is
muted somewhere along the input paths and also check that the individual
speakers are switched on. If there is still no sound from the speakers,
see No Audio.
>> To power down the system
Important Note:
BEFORE switching o any of the system components, don’t forget
to mute the audio from the speakers and switch o the speaker
sub-system.
1. Mute the audio from the speakers and switch o the speaker sub-system.
2. Switch o the I/O unit(s).
3. Switch o the Neutron DSP Engine unit.
4. Switch o the control centre (see To Switch O The Control Centre).