GR8-1200 OEM
Midtronics Inc. 7000 Monroe Street Willowbrook, IL 60527
www.midtronics.com
44
AC AMP (requires the optional amp clamp)
The DC ammeter measures the magnitude and ow of the AC
current through a circuit during normal operations.
1. Select the amp clamp range.
1
70 AMP MAX.
2 700 AMP MAX.
Press the NEXT soft key to continue.
2. The meter will zero itself.
3. Place the clamp’s jaws around the negative (–) cable.
4. The GR8 will display the measurement.
5. To return to the METERS menu, press the END soft key.
Temp
The IR temperature sensor measures surface temperature
within a range of –20 to 200°C. The tool can be used for checking
the transmission for overheating, and the temperature levels
of the heater and air conditioner. Figure 12 shows how to aim
the GR8’s temperature sensor at a component you are testing.
Ohm Meter
The meter is connected in parallel with the circuit under test
and uses the power supplied by the GR8’s internal batteries to
detect open or excessive resistance.
!
CAUTION: Always remove power from the circuit
before connecting the ohmmeter to avoid dam-
aging the analyzer.
1. Connect the DMM test lead to the GR8’s accessories port.
2. Select the meter’s icon.
3. Connect the clamps or probes in the correct polarity: red
clamp or probe to positive (+); black to negative (–).
4. The meter will autorange and display the measurement.
5. When nished, press the END soft key.
6. To return to the METERS menu, press the END soft key.
Diode
This test measures the voltage drop across components, such
as diodes.
1.
Connect the probes test lead to the GR8’s accessories port.
2. Select the meter’s icon.
3. Connect the probes in the correct polarity: red clamp or
probe to positive (+); black to negative (–).
4. The meter will autorange and display the measurement.
5. When nished, press the END soft key.
Volts/Amp (requires the optional amp clamp)
The volts/amp meter simultaneously
measures charging
voltage and charging current.
1.
Connect the amp clamp lead to the GR8’s accessories port.
2. Select the meter’s icon.
3. Select the amp clamp range.
1 70 AMP MAX.
2 700 AMP MAX.
Press the NEXT soft key to continue.
4. The meter will zero itself and display the amperage and
voltage measurements.
5. Place the clamp’s jaws around the negative (–) cable.
6. Connect the battery test cable to the GR8.
7. Connect the battery test clamps in the correct polarity: red
clamp or probe to positive (+); black to negative (–).
8. The GR8 will display the measurement.
9. To return to the METERS menu, press the END soft key.
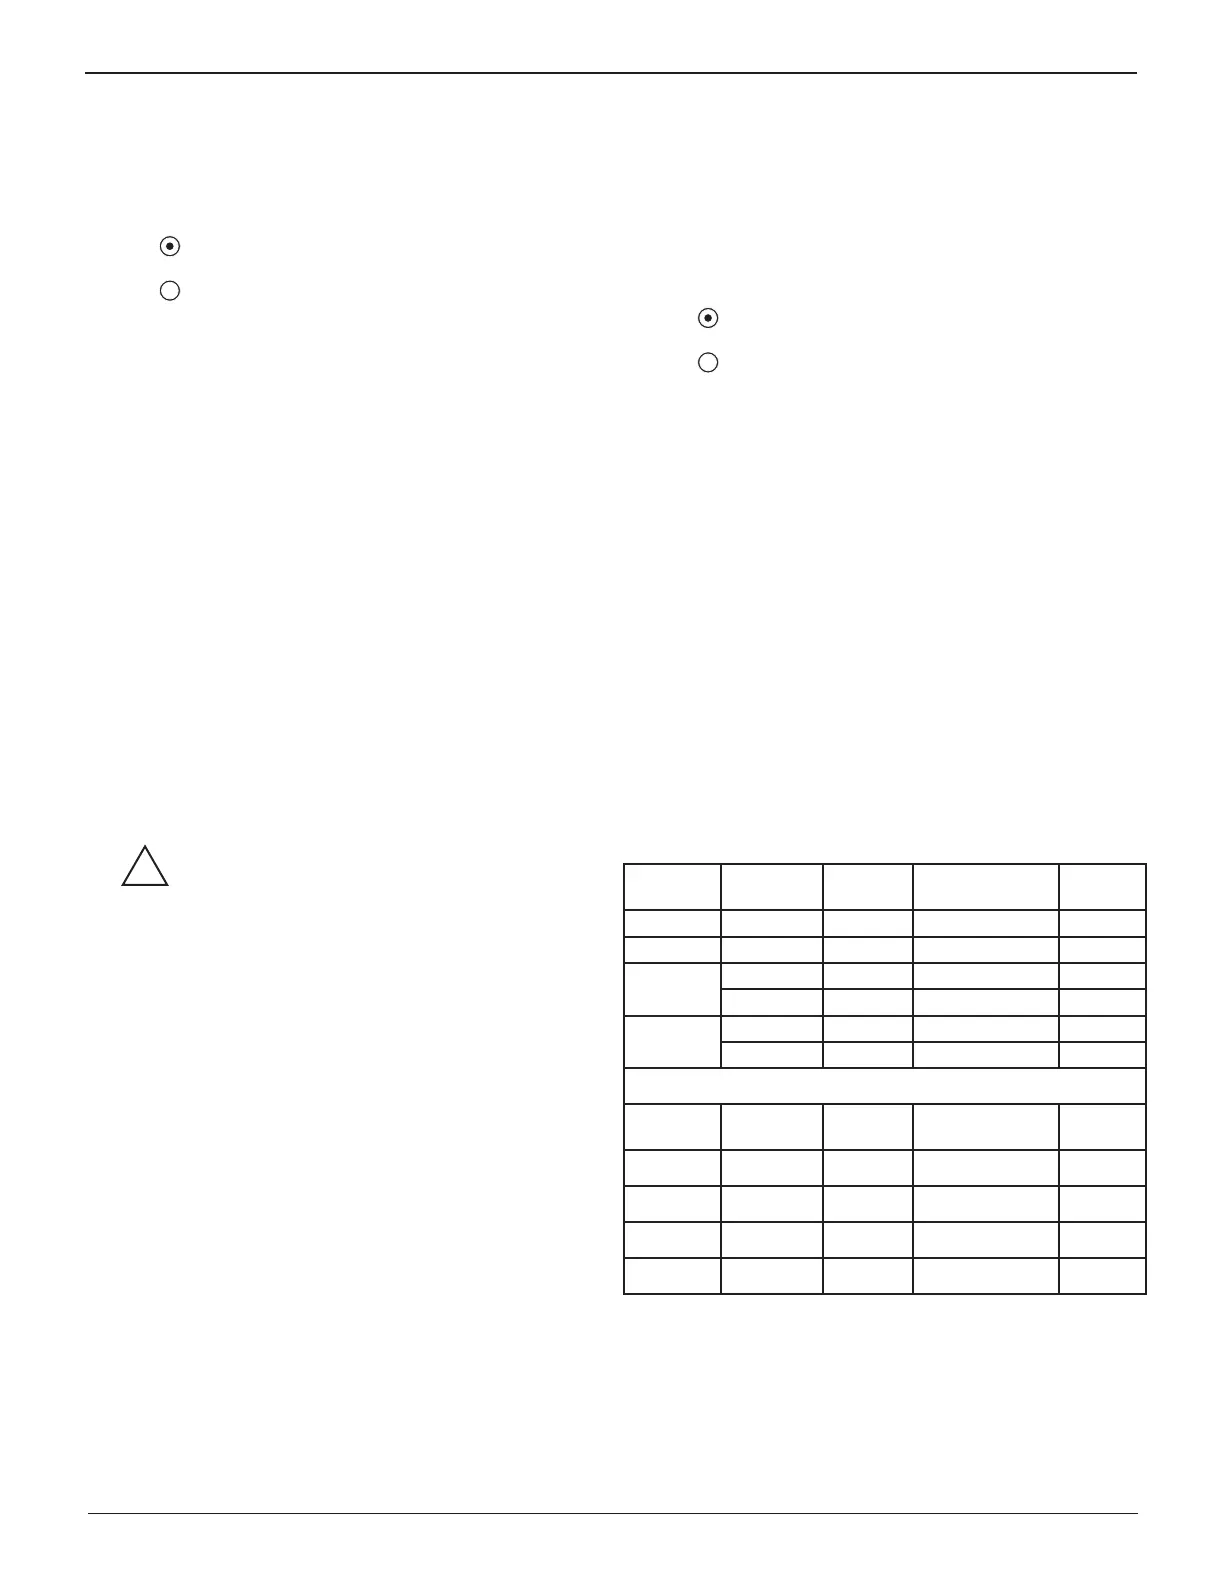
Multimeter Specifi cations
The accuracy speci cation is de ned as ± (n% reading + [count
* resolution]) at 77 °F.
Table 16: DMM Specifi cations
Range Resolution Accuracy
Overload
Protection
Vdc
0–60 V 0.01 V 0.05% + 2 120 Vrms
Vac
0–24 Vac rms 0.01 Vac 0.1% + 3 120 Vrms
Adc
0–70 A 0.01 A ± 3% of reading ± 1A 1000 Arms
0–700 A 0.1 A ± 3% of reading ± 1A 1000 Arms
Aac
0–70 A 0.01 A ± 3% of reading ± 1A 1000 Arms
0–700 A 0.1A ± 3% of reading ± 1A 1000 Arms
Accuracies are specifi ed from 2% to 100% of range.
Range Resolution Accuracy
Overload
Protection
Ohm
10Ω–2 MΩ 1 Ω 2.0% + 4 120 Vrms
Continuity
< 10 Ω 1 Ω 2.0% + 4 120 Vrms
Diode
0–1.5 V 0.01 V 0.05% + 2 120 Vrms
Temperature
-20–200 °F 1 °F 1.0% + 5 --------
Chapter 14: Digital Multimeter (DMM)