OM-4422 Page 25
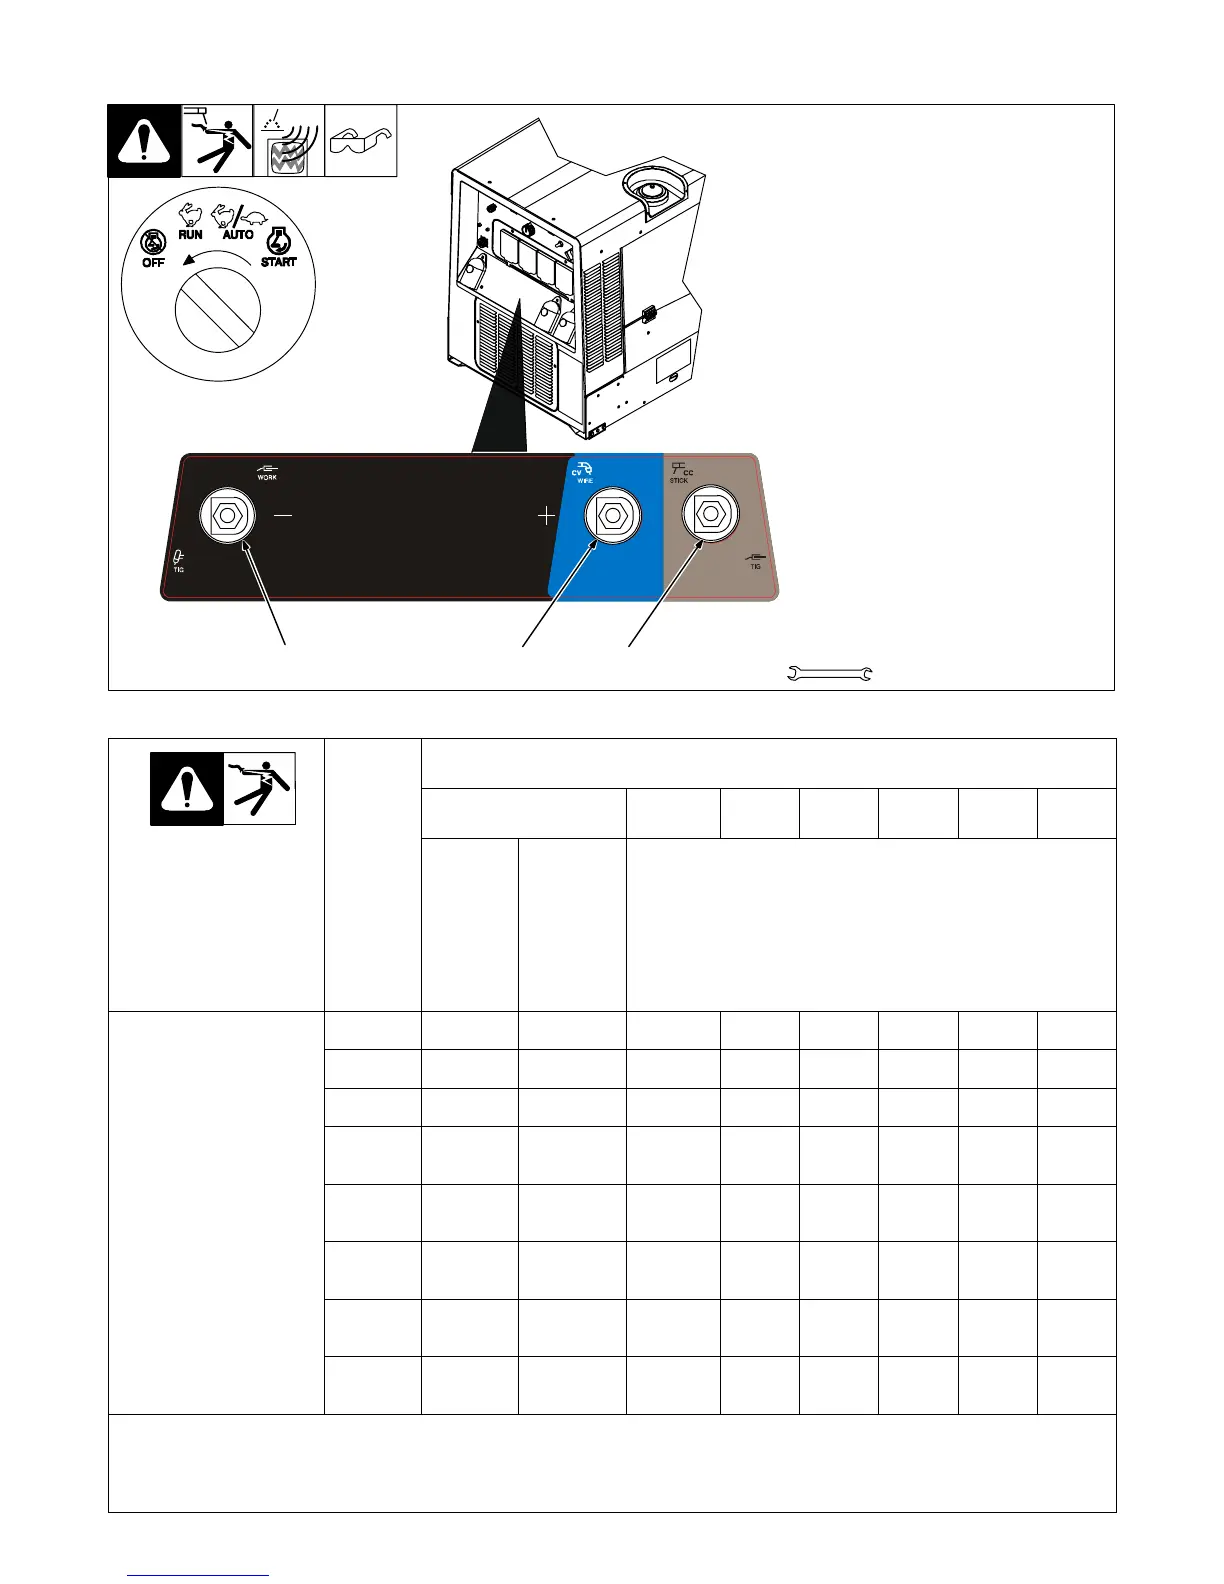
5-7. Connecting To Weld Output Terminals
Tools Needed:
3/4 in
1
2
Stop engine.
1 Work (−) Weld Output Terminal
2 CV (Wire) Weld Output Terminal
3 CC (Stick/TIG) Weld Output Terminal
Stick and TIG Welding
For Stick and TIG welding Direct Current Elec-
trode Positive (DCEP), connect electrode
holder cable to CC (Stick/TIG) terminal on
right and work cable to Negative (−) terminal
on left.
For Direct Current Electrode Negative
(DCEN), reverse cable connections.
Use Process/Contactor switch to select type
of weld output (see Section 6-3).
MIG and FCAW Welding
For MIG and FCAW welding Direct Current
Electrode Positive (DCEP, connect wire feed-
er cable to CV (Wire) terminal on right and
work cable to Work/Negative (−) terminal on
left. Use Process/Contactor switch to select
type of weld output (see Section 6-3).
For Direct Current Electrode Negative
(DCEN), reverse cable connections.
803 562 / 214 778-B
3
123
5-8. Selecting Weld Cable Sizes*
Weld Cable Size** and Total Cable (Copper) Length in Weld Circuit
Not Exceeding***
100 ft (30 m) or Less
150 ft
(45 m)
200 ft
(60 m)
250 ft
(70 m)
300 ft
(90 m)
350 ft
(105 m)
400 ft
(120 m)
Weld Output
Terminals
Stop engine before
connecting to weld out-
put terminals.
Do not use worn, dam-
aged, undersized, or
poorly spliced cables.
Welding
Amperes
10 − 60%
Duty
Cycle
60 − 100%
Duty
Cycle
10 − 100% Duty Cycle
100 4 (20) 4 (20) 4 (20) 3 (30) 2 (35) 1 (50) 1/0 (60) 1/0 (60)
150 3 (30) 3 (30) 2 (35) 1 (50) 1/0 (60) 2/0 (70) 3/0 (95) 3/0 (95)
200 3 (30) 2 (35) 1 (50) 1/0 (60) 2/0 (70) 3/0 (95) 4/0 (120) 4/0 (120)
250 2 (35) 1 (50) 1/0 (60) 2/0 (70) 3/0 (95) 4/0 (120)
2 ea. 2/0
(2x70)
2 ea. 2/0
(2x70)
300 1 (50) 1/0 (60) 2/0 (70) 3/0 (95) 4/0 (120)
2 ea. 2/0
(2x70)
2 ea. 3/0
(2x95)
2 ea. 3/0
(2x95)
350 1/0 (60) 2/0 (70) 3/0 (95) 4/0 (120)
2 ea. 2/0
(2x70)
2 ea. 3/0
(2x95)
2 ea. 3/0
(2x95)
2 ea. 4/0
(2x120)
400 1/0 (60) 2/0 (70) 3/0 (95) 4/0 (120)
2 ea. 2/0
(2x70)
2 ea. 3/0
(2x95)
2 ea. 4/0
(2x120)
2 ea. 4/0
(2x120)
500 2/0 (70) 3/0 (95) 4/0 (120)
2 ea. 2/0
(2x70)
2 ea. 3/0
(2x95)
2 ea. 4/0
(2x120)
3 ea. 3/0
(3x95)
3 ea. 3/0
(3x95)
* This chart is a general guideline and may not suit all applications. If cables overheat, use next size larger cable.
**Weld cable size (AWG) is based on either a 4 volts or less drop or a current density of at least 300 circular mils per ampere.
( ) = mm
2
for metric use S-0007-F
***For distances longer than those shown in this guide, call a factory applications representative at 920-735-4505.




 To Next Page