30
Mark through the
slots in the template
with a pencil
Spirit Level
Installation
Template
Bend tabs inwards and
place the spirit level on
tabs to level the template
5. Laminated Panels and Shower Enclosures (Rear Face)
Read the section 'Installation Requirements' first.
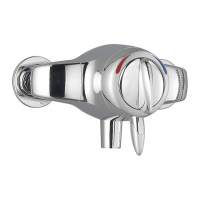
The built-in shower control is supplied with support brackets that can be used to
install the shower control onto the rear face of a laminated panel or preformed shower
cubicle.
Note! This installation is possible with
a finished wall thickness of between
4 and 21 mm.
5.1 Refer to section: 'Installation, 3. Solid
and dry-lined walls' and follow
instructions 3.1. to 3.3.
5.2 Use the installation template (supplied)
to mark the size of the hole required
on the panel.
Bend the tabs inwards and use a spirit
level to make sure that the hole is
marked symmetrically.
Mark through the inner slots of the
template.
5.3 Carefully cut the hole in the panel.
Note! The valve requires a clearance
depth of 47 mm, with a finished wall
thickness of between 4 and 21 mm
5.4 Drill a 5 mm diameter hole at each of
the marked positions.
4 mm Minimum Depth
21 mm
Maximum Depth
47 mm Clearance Depth
Alternative
Support
Fixing
For latest prices and delivery to your door visit MyTub Ltd 0845 303 8383 www.mytub.co.uk
 Loading...