33
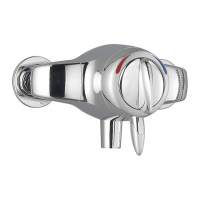
1.2 If the water supply has been connected and turned on, isolate the supplies and
operate the control lever to relieve the pressure.
1.3 Carefully pull off the control lever and shroud assembly. (refer to section:
'Commissioning and Control Assembly Installation').
1.4 Remove the four cartridge retaining screws (refer to section: 'Maintenance').
1.5 Remove the upper body / flow cartridge assembly (refer to section: 'Maintenance').
1.6 Lever the pressure balancing cartridge from the body and rotate the cartridge
180° and replace.
Caution! Take care not to damage the two inlet seals during assembly (refer
to section: 'Maintenance').
1.7 Refit the upper cartridge body and make sure that the two ports are aligned with
the two ports on the pressure balancing cartridge.
1.8 Refit the four cartridge retaining screws.
Caution! The upper cartridge must be fully pushed onto the pressure balancing
cartridge before securing with the retaining screws. If the upper cartridge seal is
visible then the cartridges are not aligned correctly.
1.9 Restore the hot and cold supplies and check for leaks.
1.10 Refit the shroud and the control lever assembly (refer to section: 'Commissioning
and Control Assembly Installation').
The shower control should be installed with hot on the left and cold on the right. If the
inlet positions are changed, i.e. top inlets are used then the internal cartridge must be
turned through 180° to enable the lever control to operate correctly.
The following procedure must be performed:
If the seal is visible then the cartridges
are not aligned and fully engaged
For latest prices and delivery to your door visit MyTub Ltd 0845 303 8383 www.mytub.co.uk
 Loading...